Version 2025-07 is the last API version to support React-based UI components. Later versions use Polaris web components, native UI elements with built-in accessibility, better performance, and consistent styling with Shopify's design system. Check out the upgrade guide to upgrade your extension and avoid being blocked from updating your extension after October 1st 2026.
Toggle
The ToggleButtonGroup component allows you to make a single choice out of the number of options provided. This is similar to the ChoiceList component, but without controls such as checkbox or radio button.
You can utilize our layout components to arrange the ToggleButtonGroup component.
Supported targets
- Checkout::Actions::Render
Before - Checkout::Cart
Line Details::Render After - Checkout::Cart
Lines::Render After - Checkout::Contact::Render
After - Checkout::Customer
Information::Render After - Checkout::Delivery
Address::Render Before - Checkout::Dynamic::Render
- Checkout::Pickup
Locations::Render After - Checkout::Pickup
Locations::Render Before - Checkout::Pickup
Points::Render After - Checkout::Pickup
Points::Render Before - Checkout::Reductions::Render
After - Checkout::Reductions::Render
Before - Checkout::Shipping
Method Details::Render After - Checkout::Shipping
Method Details::Render Expanded - Checkout::Shipping
Methods::Render After - Checkout::Shipping
Methods::Render Before - Checkout::Thank
You::Cart Line Details::Render After - Checkout::Thank
You::Cart Lines::Render After - Checkout::Thank
You::Customer Information::Render After - Checkout::Thank
You::Dynamic::Render - purchase.
checkout. actions. render-before - purchase.
checkout. block. render - purchase.
checkout. cart-line-item. render-after - purchase.
checkout. cart-line-list. render-after - purchase.
checkout. contact. render-after - purchase.
checkout. delivery-address. render-after - purchase.
checkout. delivery-address. render-before - purchase.
checkout. footer. render-after - purchase.
checkout. header. render-after - purchase.
checkout. payment-method-list. render-after - purchase.
checkout. payment-method-list. render-before - purchase.
checkout. pickup-location-list. render-after - purchase.
checkout. pickup-location-list. render-before - purchase.
checkout. pickup-location-option-item. render-after - purchase.
checkout. pickup-point-list. render-after - purchase.
checkout. pickup-point-list. render-before - purchase.
checkout. reductions. render-after - purchase.
checkout. reductions. render-before - purchase.
checkout. shipping-option-item. details. render - purchase.
checkout. shipping-option-item. render-after - purchase.
checkout. shipping-option-list. render-after - purchase.
checkout. shipping-option-list. render-before - purchase.
thank-you. announcement. render - purchase.
thank-you. block. render - purchase.
thank-you. cart-line-item. render-after - purchase.
thank-you. cart-line-list. render-after - purchase.
thank-you. customer-information. render-after - purchase.
thank-you. footer. render-after - purchase.
thank-you. header. render-after
Supported targets
- Checkout::Actions::Render
Before - Checkout::Cart
Line Details::Render After - Checkout::Cart
Lines::Render After - Checkout::Contact::Render
After - Checkout::Customer
Information::Render After - Checkout::Delivery
Address::Render Before - Checkout::Dynamic::Render
- Checkout::Pickup
Locations::Render After - Checkout::Pickup
Locations::Render Before - Checkout::Pickup
Points::Render After - Checkout::Pickup
Points::Render Before - Checkout::Reductions::Render
After - Checkout::Reductions::Render
Before - Checkout::Shipping
Method Details::Render After - Checkout::Shipping
Method Details::Render Expanded - Checkout::Shipping
Methods::Render After - Checkout::Shipping
Methods::Render Before - Checkout::Thank
You::Cart Line Details::Render After - Checkout::Thank
You::Cart Lines::Render After - Checkout::Thank
You::Customer Information::Render After - Checkout::Thank
You::Dynamic::Render - purchase.
checkout. actions. render-before - purchase.
checkout. block. render - purchase.
checkout. cart-line-item. render-after - purchase.
checkout. cart-line-list. render-after - purchase.
checkout. contact. render-after - purchase.
checkout. delivery-address. render-after - purchase.
checkout. delivery-address. render-before - purchase.
checkout. footer. render-after - purchase.
checkout. header. render-after - purchase.
checkout. payment-method-list. render-after - purchase.
checkout. payment-method-list. render-before - purchase.
checkout. pickup-location-list. render-after - purchase.
checkout. pickup-location-list. render-before - purchase.
checkout. pickup-location-option-item. render-after - purchase.
checkout. pickup-point-list. render-after - purchase.
checkout. pickup-point-list. render-before - purchase.
checkout. reductions. render-after - purchase.
checkout. reductions. render-before - purchase.
checkout. shipping-option-item. details. render - purchase.
checkout. shipping-option-item. render-after - purchase.
checkout. shipping-option-list. render-after - purchase.
checkout. shipping-option-list. render-before - purchase.
thank-you. announcement. render - purchase.
thank-you. block. render - purchase.
thank-you. cart-line-item. render-after - purchase.
thank-you. cart-line-list. render-after - purchase.
thank-you. customer-information. render-after - purchase.
thank-you. footer. render-after - purchase.
thank-you. header. render-after
allows you to make a single choice out of the number of options provided. This is similar to the ChoiceList component, but without controls such as checkbox or radio button.
You can utilize our layout components to arrange .
- (value: T) => void(value: T) => voidrequiredrequired
A callback that is run whenever one of the buttons is pressed. This callback is called with a string or array of strings indicating the ids of buttons that should now be selected. When this component is controlled, you must store this value in state and reflect it back in the
valueprop.- TTrequiredrequired
An id of the selected button.
- booleanboolean
Whether the button group is disabled.
Anchor to ExamplesExamples
Basic ToggleButtonGroup
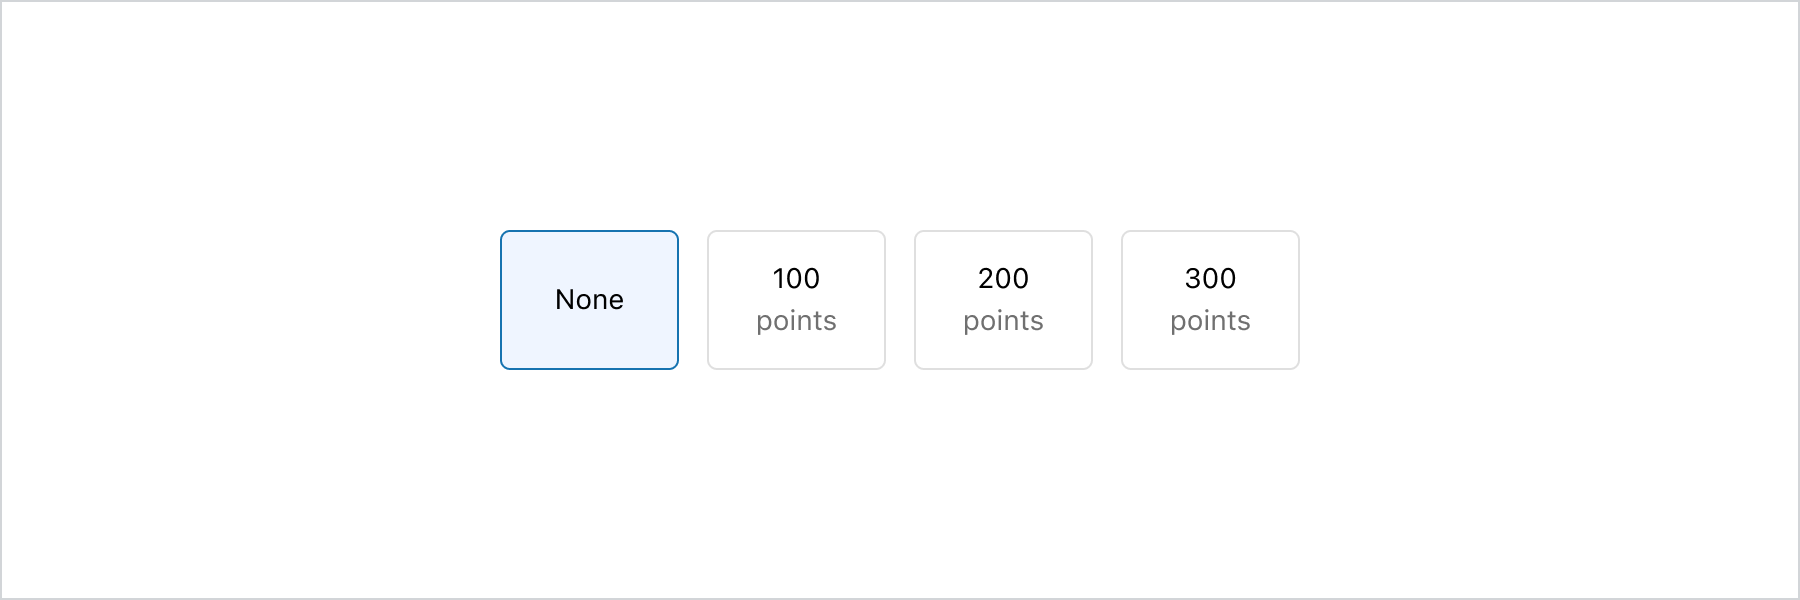
Basic ToggleButtonGroup
React
import {
  reactExtension,
  BlockStack,
  InlineLayout,
  Text,
  ToggleButton,
  ToggleButtonGroup,
  View,
} from '@shopify/ui-extensions-react/checkout';

export default reactExtension(
  'purchase.checkout.block.render',
  () => <Extension />,
);

function Extension() {
  return (
    <ToggleButtonGroup
      value="none"
      onChange={(value) => {
        console.log(
          `onChange event with value: ${value}`,
        );
      }}
    >
      <InlineLayout spacing="base">
        <ToggleButton id="none">
          <View
            blockAlignment="center"
            inlineAlignment="center"
            minBlockSize="fill"
          >
            None
          </View>
        </ToggleButton>
        <ToggleButton id="points-100">
          <BlockStack
            inlineAlignment="center"
            spacing="none"
          >
            <Text>100</Text>
            <Text appearance="subdued">
              points
            </Text>
          </BlockStack>
        </ToggleButton>
        <ToggleButton id="points-200">
          <BlockStack
            inlineAlignment="center"
            spacing="none"
          >
            <Text>200</Text>
            <Text appearance="subdued">
              points
            </Text>
          </BlockStack>
        </ToggleButton>
        <ToggleButton id="points-300">
          <BlockStack
            inlineAlignment="center"
            spacing="none"
          >
            <Text>300</Text>
            <Text appearance="subdued">
              points
            </Text>
          </BlockStack>
        </ToggleButton>
      </InlineLayout>
    </ToggleButtonGroup>
  );
}
JS
import {
  extension,
  ToggleButtonGroup,
  ToggleButton,
  InlineLayout,
  View,
  BlockStack,
  Text,
} from '@shopify/ui-extensions/checkout';

export default extension('purchase.checkout.block.render', (root) => {
  const toggleButtonGroup = root.createComponent(
    ToggleButtonGroup,
    {
      value: 'none',
      onChange: (value) => {
        console.log(`onChange event with value: ${value}`);
      },
    },
    [
      root.createComponent(InlineLayout, {spacing: 'base'}, [
        root.createComponent(
          ToggleButton,
          {id: 'none'},
          root.createComponent(
            View,
            {
              blockAlignment: 'center',
              inlineAlignment: 'center',
              minBlockSize: 'fill',
            },
            'None',
          ),
        ),
        root.createComponent(
          ToggleButton,
          {id: 'points-100'},
          root.createComponent(
            BlockStack,
            {inlineAlignment: 'center', spacing: 'none'},
            [
              root.createComponent(Text, undefined, '100'),
              root.createComponent(Text, {appearance: 'subdued'}, 'points'),
            ],
          ),
        ),
        root.createComponent(
          ToggleButton,
          {id: 'points-200'},
          root.createComponent(
            BlockStack,
            {inlineAlignment: 'center', spacing: 'none'},
            [
              root.createComponent(Text, undefined, '200'),
              root.createComponent(Text, {appearance: 'subdued'}, 'points'),
            ],
          ),
        ),
        root.createComponent(
          ToggleButton,
          {id: 'points-300'},
          root.createComponent(
            BlockStack,
            {inlineAlignment: 'center', spacing: 'none'},
            [
              root.createComponent(Text, undefined, '300'),
              root.createComponent(Text, {appearance: 'subdued'}, 'points'),
            ],
          ),
        ),
      ]),
    ],
  );

  root.appendChild(toggleButtonGroup);
});
Anchor to Displaying a small set of time choicesDisplaying a small set of time choices
The ToggleButtonGroup component is ideal for a small set of options. It allows for easy scanning of available choices. Also the ToggleButtonGroup component’s big tap target makes it a good choice for enhanced mobile experience. However, in a grid layout, having more than six ToggleButton components can get overwhelming and take up too much vertical space. When there are more than six choices, consider using the Select component instead.
Displaying a small set of time choices
 component instead.](https://shopify-assets.shopifycdn.com/shopifycloud/shopify-dev/production/assets/assets/images/templated-apis-screenshots/checkout-ui-extensions/2025-07/togglebuttongroup-time-picking-B9OkEN6X.png)
Displaying a small set of time choices
React
import {
  reactExtension,
  Grid,
  ToggleButton,
  ToggleButtonGroup,
  View,
} from '@shopify/ui-extensions-react/checkout';

export default reactExtension(
  'purchase.checkout.block.render',
  () => <Extension />,
);

function Extension() {
  return (
    <ToggleButtonGroup
      value="time-9am"
      onChange={(value) => {
        console.log(
          `onChange event with value: ${value}`,
        );
      }}
    >
      <Grid
        columns={['auto', 'auto', 'auto']}
        spacing="base"
      >
        <ToggleButton id="time-9am">
          <View inlineAlignment="center">
            9:00 AM
          </View>
        </ToggleButton>
        <ToggleButton id="time-10am">
          <View inlineAlignment="center">
            10:00 AM
          </View>
        </ToggleButton>
        <ToggleButton id="time-11am">
          <View inlineAlignment="center">
            11:00 AM
          </View>
        </ToggleButton>
        <ToggleButton id="time-1pm">
          <View inlineAlignment="center">
            1:00 PM
          </View>
        </ToggleButton>
        <ToggleButton id="time-2pm">
          <View inlineAlignment="center">
            2:00 PM
          </View>
        </ToggleButton>
        <ToggleButton id="time-3pm">
          <View inlineAlignment="center">
            3:00 PM
          </View>
        </ToggleButton>
      </Grid>
    </ToggleButtonGroup>
  );
}
JavaScript
import {
  extension,
  Grid,
  ToggleButtonGroup,
  ToggleButton,
  View,
} from '@shopify/ui-extensions/checkout';

export default extension(
  'purchase.checkout.block.render',
  (root) => {
    const toggleButtonGroup =
      root.createComponent(
        ToggleButtonGroup,
        {
          value: 'time-9am',
          onChange: (value) => {
            console.log(
              `onChange event with value: ${value}`,
            );
          },
        },
        [
          root.createComponent(
            Grid,
            {
              columns: ['auto', 'auto', 'auto'],
              spacing: 'base',
            },
            [
              root.createComponent(
                ToggleButton,
                {id: 'time-9am'},
                root.createComponent(
                  View,
                  {inlineAlignment: 'center'},
                  '9:00 AM',
                ),
              ),
              root.createComponent(
                ToggleButton,
                {id: 'time-10am'},
                root.createComponent(
                  View,
                  {inlineAlignment: 'center'},
                  '10:00 AM',
                ),
              ),
              root.createComponent(
                ToggleButton,
                {id: 'time-11am'},
                root.createComponent(
                  View,
                  {inlineAlignment: 'center'},
                  '11:00 AM',
                ),
              ),
              root.createComponent(
                ToggleButton,
                {id: 'time-1pm'},
                root.createComponent(
                  View,
                  {inlineAlignment: 'center'},
                  '1:00 PM',
                ),
              ),
              root.createComponent(
                ToggleButton,
                {id: 'time-2pm'},
                root.createComponent(
                  View,
                  {inlineAlignment: 'center'},
                  '2:00 PM',
                ),
              ),
              root.createComponent(
                ToggleButton,
                {id: 'time-3pm'},
                root.createComponent(
                  View,
                  {inlineAlignment: 'center'},
                  '3:00 PM',
                ),
              ),
            ],
          ),
        ],
      );

    root.appendChild(toggleButtonGroup);
  },
);
Anchor to Best practicesBest practices
The ToggleButtonGroup component is designed for streamlined single-choice selection, without any additional details associated with the selection. If you need to allow multiple selections or present associated details, use the ChoiceList component instead.
Anchor to Label and orderLabel and order
Use descriptive and concise labels for each ToggleButton component, and maintain consistency in the terminology used across options. Arrange the ToggleButton components in a logical order that makes sense to users. Consider factors such as alphabetical order, chronological order, or order of importance, depending on the context.
Avoid overwhelming users with too many ToggleButton components. Ideally, limit the number of choices to a manageable amount, typically between 2 and 7, to prevent decision fatigue and maintain clarity.

