Add a field to checkout
A custom field is a property that allows users to enter text into a user interface. For example, you might want to create a custom field that collects delivery instructions from customers.
In this tutorial, you'll use checkout UI extensions to create a custom field for collecting delivery instructions from customers, and then save those instructions to a metafield.
This tutorial is for delivery instructions, but you can use it as an example to build other use cases for custom fields.
Follow along with this tutorial to build a sample app, or clone the completed sample app.
Before you start, consider reviewing our custom field checkout UI extension UX guidelines.
Checkout UI extensions are available only to Shopify Plus merchants.
Checkout UI extensions are available only to Shopify Plus merchants.
Anchor to What you'll learnWhat you'll learn
In this tutorial, you'll learn how to do the following:
- Generate a checkout UI extension that appears in the checkout flow using Shopify CLI.
- Set up configurations for your checkout UI extension in the extension TOML file.
- Use the Checkout UI component library to render an optional input field for customers to add a note.
- Save the note to a cart metafield and display the value in the Shopify admin.
Requirements
-
You're a user with app development permissions.
-
You've created a new dev store with test data generated by Shopify. You can create one by running
shopify store create dev --with-demo-data. -
You've created an app that uses Shopify CLI 3.85.1 or higher.
Project
Anchor to Create a checkout UI extensionCreate a checkout UI extension
To create a checkout UI extension, you'll use Shopify CLI, which generates starter code for building your extension.
To create a checkout UI extension, you can use Shopify CLI, which generates starter code for building your extension and automates common development tasks.
-
Navigate to your app directory:
Terminal
cd <directory> -
Run the following command to create a new checkout UI extension:
Terminal
shopify app generate extension --template checkout_ui --name my-checkout-ui-extension -
Select
Checkout UI.You should now have a new extension directory in your app's directory. The extension directory includes the extension script at
src/Checkout.jsx. The following is an example directory structure:Checkout UI extension file structure
└── my-app└── extensions└── my-checkout-ui-extension├── src│ └── Checkout.jsx OR Checkout.js // The index page of the checkout UI extension├── locales│ ├── en.default.json // The default locale for the checkout UI extension│ └── fr.json // The locale file for non-regional French translations├── shopify.extension.toml // The config file for the checkout UI extension└── package.json -
Start your development server to build and preview your app:
Terminal
shopify app devRead more about the processes that are executed when you run
app dev. -
Press
pto open the Dev Console. -
In the extension list for your app, click on the preview link for your extension.
Anchor to Set up a targetSet up a target
Set up a target for your checkout UI extension. Targets control where your extension renders in the checkout flow.
Anchor to Export the target from your script fileExport the target from your script file
In your Checkout.jsx file, render the extension so it can be referenced in your configuration.
Anchor to Reference the extension targets in your configuration fileReference the extension targets in your configuration file
You can define more than one target so that app users can add the extension to multiple locations in the checkout.
In your checkout UI extension's configuration file, for each of your targets, create an [[extensions.targeting]] section with the following information:
-
module: The path to the file that contains the extension code. -
target: An identifier that specifies where you're injecting code into Shopify.
shopify.extension.toml is the configuration file for your extension. It contains basic information and settings.
Whenever you edit your extension configuration file, you need to restart your server for the changes to take effect.
Terminal
Whenever you edit your extension configuration file, you need to restart your server for the changes to take effect.
Terminal
This example uses the purchase.checkout.shipping-option-list.render-after target, so the user can provide all shipping and delivery information at the same stage in the checkout process.
Anchor to Set up a copyable cart metafieldSet up a copyable cart metafield
Now that you've set up the target, you'll save custom field value in a cart metafield.
Anchor to Define the cart metafield namespace and keyDefine the cart metafield namespace and key
Set a namespace and key for the cart metafield where you want to store the custom field value.
Later, you'll expose values stored in this metafield to merchants in the Shopify admin.
A metafield is a custom field that you can use to store additional information about a Shopify resource. You can use metafields to store information specific to your app without setting up your own storage.
Anchor to Request the cart metafield in your ,[object Object]Request the cart metafield in your shopify.extension.toml
shopify.extension.tomlRequest the cart metafield by namespace and key to read it in the extension.
Anchor to Add an order metafield definition to copy the cart metafieldAdd an order metafield definition to copy the cart metafield
- In the Shopify admin, add an Order metafield definition for your delivery instruction metafield.
- Set the type to Multi line text.
- Use the same
namespaceandkeythat you defined in yourCheckout.jsxfile. - Enable Copy values from cart metafields to copy the cart metafield value to the order.
The cart metafield value will display on the order metafield with this definition.
You can also enable the copy programmatically using the cart to order copyable capability.
You can also enable the copy programmatically using the cart to order copyable capability.
Anchor to Add a delivery instruction inputAdd a delivery instruction input
Build a basic user interface using components from the web components library.
Anchor to Add a delivery instruction option and text areaAdd a delivery instruction option and text area
Using checkout UI components, build a basic UI for the delivery instruction input.
This UI includes a checkbox component to specify whether the customer wants to add a delivery instruction. When the checkbox is checked, a text area component appears for the customer to enter the delivery instruction. If the customer has already entered a value, then the value is displayed.
Checkout UI extensions are limited to specific UI components exposed by the platform for security reasons. Web components allow you to create a UI that feels seamless within the checkout experience, and that inherits a merchant's brand settings.
Anchor to Store the user input in the metafieldStore the user input in the metafield
Use the applyMetafieldChange helper function to store the value that the customer enters in the cart metafield. This metafield value is later associated with the order.
applyMetafieldChange is part of the Metafields API. To learn more about it and other available APIs, refer to the Checkout UI Extension APIs reference.
Anchor to Preview the extensionPreview the extension
Preview your extension to make sure that it works as expected.
Anchor to Start your serverStart your server
Run the Shopify CLI dev command to build your app and preview it on your development store.
-
In a terminal, navigate to your app directory.
-
Either start or restart your server to build and preview your app:
Terminal
shopify app dev -
Press
pto open the Dev Console. -
In the extension list for your app, click on the preview link for the custom field extension.
The checkout opens.
This section describes how to solve some potential errors when you run dev for an app that contains a checkout UI extension.
Anchor to Property token errorProperty token error
If you receive the error ShopifyCLI:AdminAPI requires the property token to be set, then you'll need to use the --checkout-cart-url flag to direct Shopify CLI to open a checkout session for you.
Terminal
Anchor to Missing checkout linkMissing checkout link
If you don't receive the test checkout URL when you run dev, then verify the following:
-
You have a development store populated with products.
-
You're logged in to the correct Partners organization and development store. To verify, check your app info using the following command:
Terminal
shopify app info
Otherwise, you can manually create a checkout with the following steps:
-
From your development store's storefront, add some products to your cart.
-
From the cart, click Checkout.
-
From directory of the app that contains your extension, run
devto preview your app:Terminal
shopify app dev -
On the checkout page for your store, change the URL by appending the
?dev=https://{tunnel_url}/extensionsquery string and reload the page. Thetunnel_urlparameter allows your app to be accessed using a unique HTTPS URL.You should now see a rendered order note that corresponds to the code in your project template.
Anchor to Test the extensionTest the extension
Test your extension to make sure that it works as expected.
Anchor to Test the extension in checkoutTest the extension in checkout
Place an order with delivery instructions in the checkout.
-
With your server running, open the storefront of your dev store.
-
Add a product to the cart and then check out.
-
Fill out the contact and shipping address information, and then move to the Shipping step of the checkout.
Your Provide delivery instructions checkbox appears.
-
Select the Provide delivery instructions checkbox. A text field appears.
-
Enter a value in the text field and then complete the checkout.
-
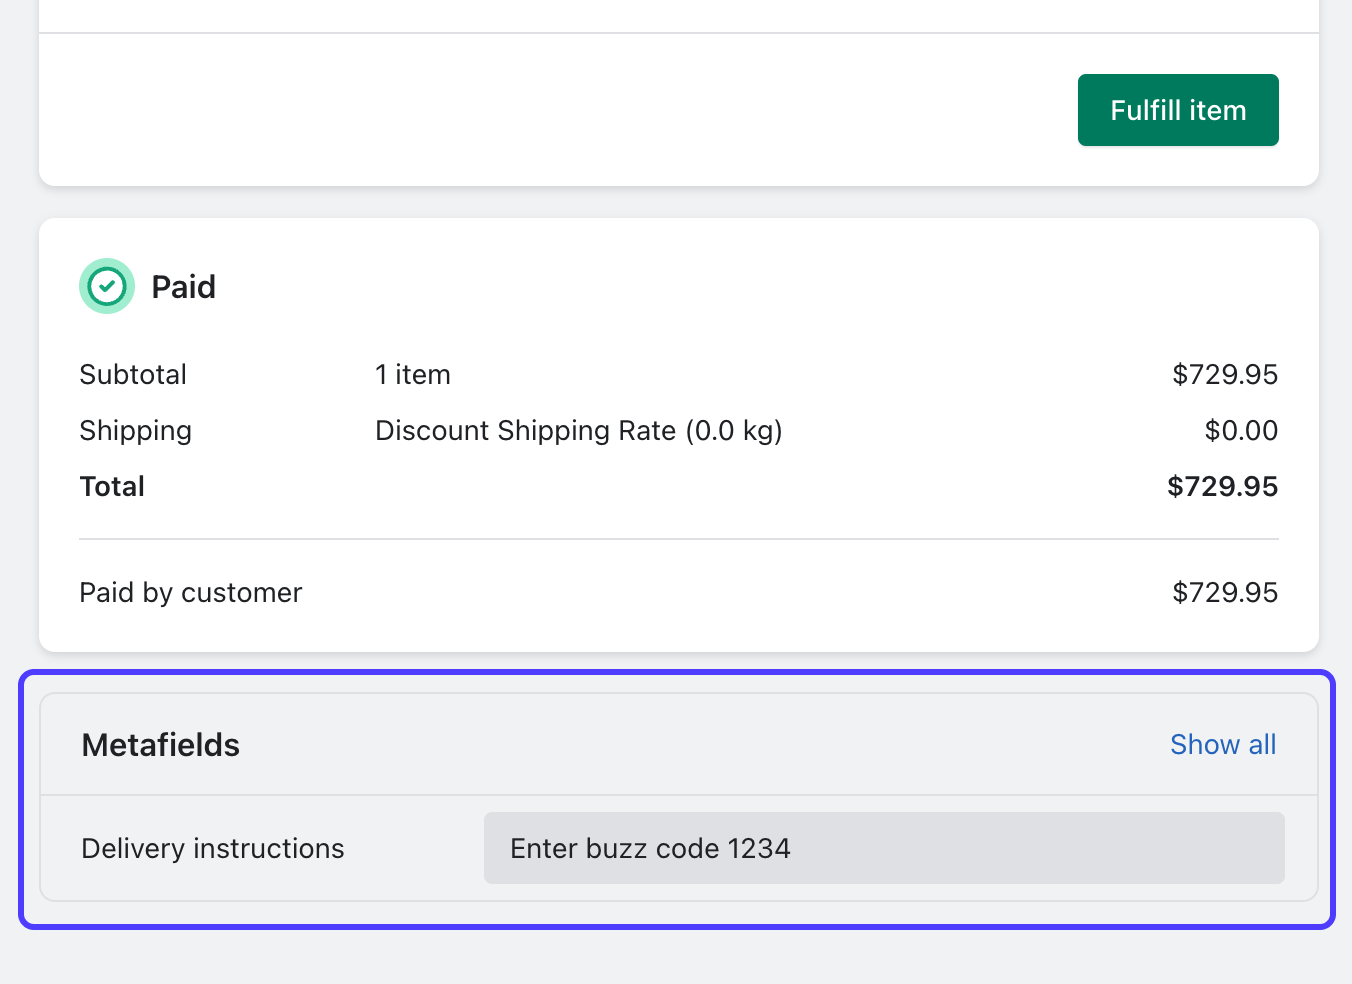
In the Shopify admin for the dev store, open the order details page for the order that you just placed.
The delivery instructions that you entered are displayed in the Metafields section, in the delivery instructions field that you created.
When you're ready to release your changes to users, you can create and release an app version. An app version is a snapshot of your app configuration and all extensions.
-
Navigate to your app directory.
-
Run the following command.
Optionally, you can provide a name or message for the version using the
--versionand--messageflags.Terminal
shopify app deploy
Releasing an app version replaces the current active version that's served to stores that have your app installed. It might take several minutes for app users to be upgraded to the new version.
If you want to create a version, but avoid releasing it to users, then run the deploy command with a --no-release flag.
You can release the unreleased app version using Shopify CLI's release command, or through the Dev Dashboard.
If you want to create a version, but avoid releasing it to users, then run the deploy command with a --no-release flag.
You can release the unreleased app version using Shopify CLI's release command, or through the Dev Dashboard.
Anchor to Tutorial complete!Tutorial complete!
Nice work - what you just built could be used by Shopify merchants around the world! Keep the momentum going with these related tutorials and resources.
Anchor to Next stepsNext steps


Build a user experience by following our UX guidelines.
Localize your extension

Learn how to localize the text and number formats in your extension.
Explore the checkout UI extension web component reference

Learn about all of the components that you can use in your checkout UI extension.
Explore the checkout UI targets referenceLearn about the targets offered in checkout.