Create an admin UI extension for a cart and checkout validation function
Imagine you're selling limited edition sneakers with only two pairs per customer, or managing inventory for high-demand products where bulk purchases could leave other customers empty-handed. Cart and checkout validation helps merchants enforce these types of business rules automatically, ensuring fair access while protecting their brand reputation.
In this tutorial, you'll build a complete validation system using Shopify Functions and admin UI extensions. Your validation function will enforce product quantity limits during checkout, while your admin UI will give merchants an intuitive interface to configure these limits for each product variant.
Follow along with this tutorial to build a sample app, or clone the completed sample app.
Errors from validation functions are exposed to the Storefront API's Cart object, in themes using the cart template, and during checkout.
Errors from validation functions are exposed to the Storefront API's Cart object, in themes using the cart template, and during checkout.
Anchor to What you'll learnWhat you'll learn
In this tutorial, you'll learn how to do the following:
- Create a cart validation function that enforces quantity limits during checkout
- Build an admin UI extension that gives merchants an intuitive interface for configuring validation rules
- Use metafields to store and retrieve validation configuration data
- Link validation functions with admin UI extensions using TOML configuration
- Test validation in both the checkout UI and GraphQL Storefront API
- Deploy a complete validation system to production stores
Requirements
Create an that has the read_products access
scopes, using the latest version of Shopify CLI.
Install Node.js 22 or higher.
On Windows, Rust requires the Microsoft C++ Build Tools. Make sure to select the Desktop development with C++ workload when installing the tools.
wasm32-unknown-unknown targetTo ensure compatibility with the latest version of Rust, install the wasm32-unknown-unknown target.
Project
Anchor to Create the validation functionCreate the validation function
The validation function is the core logic that runs during checkout to enforce quantity limits. It reads the merchant's configuration from metafields and compares cart item quantities against the set limits, returning validation errors when limits are exceeded.
In this step, you'll use Shopify CLI to generate a starter function, define the data inputs using an input query, and implement the validation logic using JavaScript or Rust.
-
Navigate to your app directory:
Terminal
cd <directory> -
Run the following command to create a new validation extension:
Terminal
shopify app generate extension --template cart_checkout_validation --name cart-checkout-validation
Shopify Functions support any language that compiles to WebAssembly (Wasm), such as Rust, AssemblyScript, or TinyGo. You specify the Wasm template option when you're using a language other than Rust and can conform to the Wasm API. Learn more about the Wasm API.
Shopify Functions support any language that compiles to WebAssembly (Wasm), such as Rust, AssemblyScript, or TinyGo. You specify the Wasm template option when you're using a language other than Rust and can conform to the Wasm API. Learn more about the Wasm API.
-
Choose the language that you want to use. For this tutorial, you should select either Rust or JavaScript.
Shopify defaults to Rust as the most performant and recommended language choice to stay within the platform limits. For more information, refer to language considerations.
Terminal
? What would you like to work in?> (1) Rust(2) JavaScript(3) TypeScript(4) Wasm
- Navigate to the
extensions/cart-checkout-validationdirectory:Terminal
cd extensions/cart-checkout-validation
Anchor to Define the GraphQL input queryDefine the Graph
Replace the contents of src/cart_validations_generate_run.graphql file with the following code.
The cart_validations_generate_run.graphql file defines the input for the function. You need to retrieve the quantity and merchandise ID of the current cart lines.
Metafields allow your app to store custom data related to the validation function. Using the $app reserved prefix makes the metafield private to your app.
Metafields allow your app to store custom data related to the validation function. Using the $app reserved prefix makes the metafield private to your app.
If you're using JavaScript, then run the following command to regenerate types based on your input query:
Terminal
Anchor to Implement the validation logicImplement the validation logic
Replace the src/cart_validations_generate_run.rs file with the following code.
The function logic checks that the quantity of each cart line isn't above the quantity set in the configuration metafield. You can configure the quantity limits for each product variant using the admin UI extension that you will create in the next step.
You can associate a validation error with a specific checkout UI field, or a global error by specifying the target property. The target property follows the pattern that's provided in the Cart and Checkout Validation API reference. For example, using the global target $.cart will result in a global error at the top of checkout.
You can associate a validation error with a specific checkout UI field, or a global error by specifying the target property. The target property follows the pattern that's provided in the Cart and Checkout Validation API reference. For example, using the global target $.cart will result in a global error at the top of checkout.
Anchor to Build the functionBuild the function
If you're using Rust, then build the function's Wasm module:
Terminal
If you encounter any errors, then ensure that you've installed Rust and the wasm32-wasip1 target.
If you encounter any errors, then ensure that you've installed Rust and the wasm32-wasip1 target.
Anchor to Create the validation user interface in adminCreate the validation user interface in admin
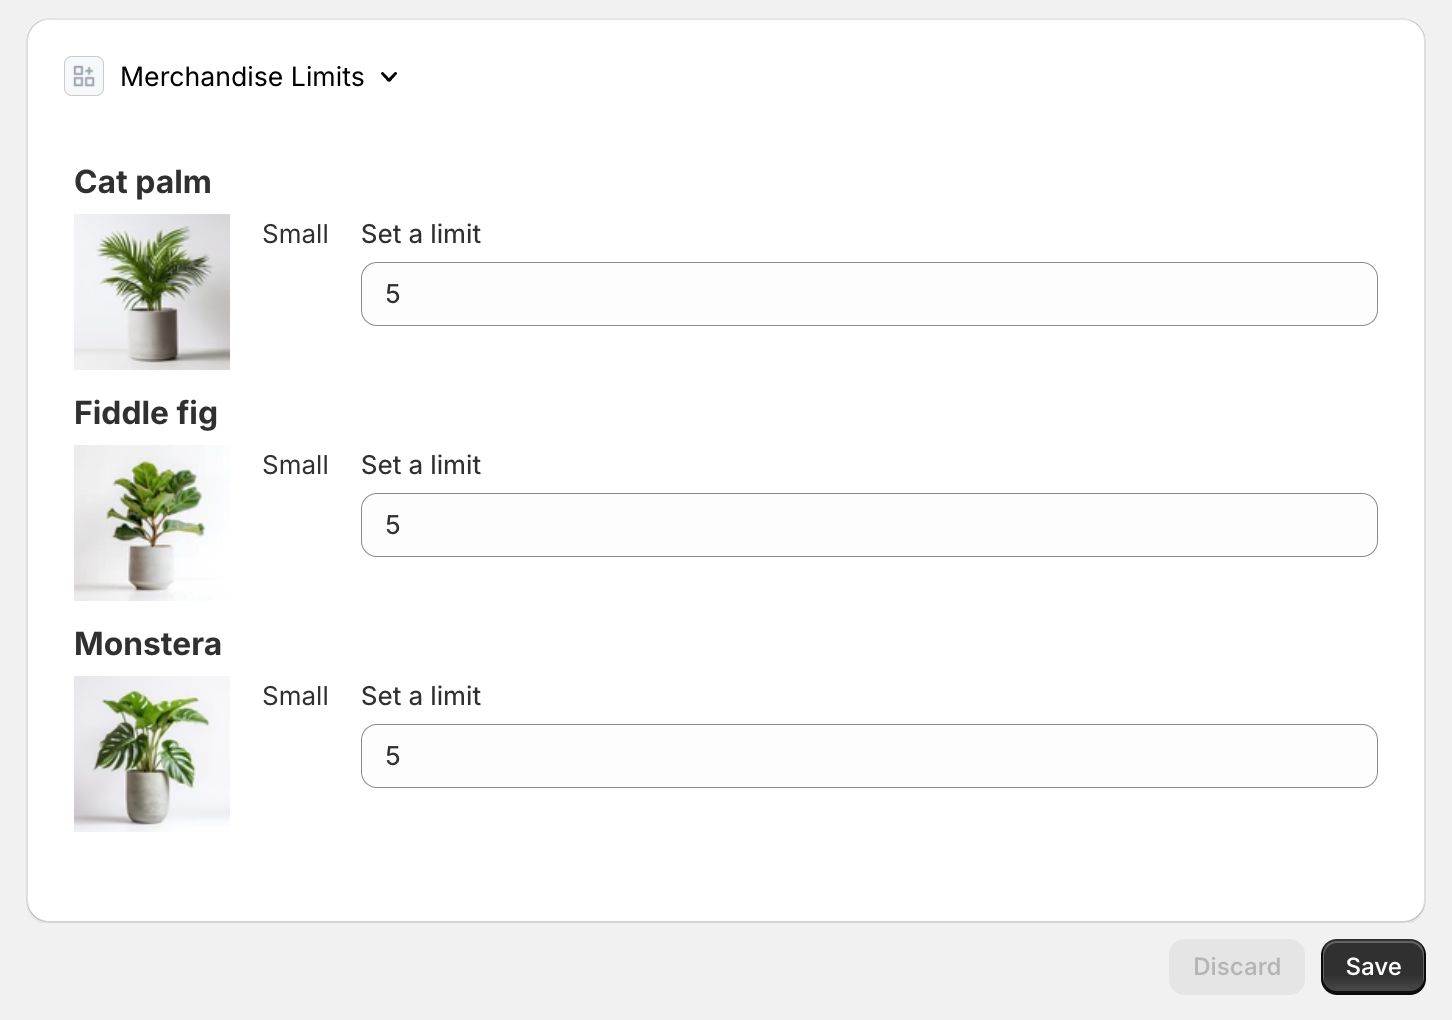
Now that you have a validation function that can read configuration data, you need to give merchants a way to set those configurations. The admin UI extension provides an intuitive interface in the Shopify admin where merchants can set quantity limits for each product variant.
The following steps show how to build an admin UI extension that enables merchants to configure your validation function. The interface will display a table of products and variants, with input fields for setting quantity limits.
-
Navigate to your app directory:
Terminal
cd <directory> -
Run the following command to create a new validation rule UI extension:
Terminal
shopify app generate extension --template validation_settings_ui --name validation-settings -
Navigate to the
extensions/validation-settingsdirectory:Terminal
cd extensions/validation-settingsAnchor to Implement the admin UI extensionImplement the admin UI extensionReplace the validation settings UI code with the linked code.
Anchor to Link the user interface to the validation functionLink the user interface to the validation function
With both the function and extension built, you need to connect them so that the admin UI can configure the validation function. This connection is established through TOML configuration files that specify which UI extension manages which function.
Anchor to Reference the admin UI extension's handle nameReference the admin UI extension's handle name
The handle name is in the shopify.extension.toml file for the admin UI extension.
Anchor to Configure the validation function extensionConfigure the validation function extension
Update the shopify.extension.toml file in the validation function directory to reference the UI extension's handle from the previous step.
Anchor to Configure app scopesConfigure app scopes
Make sure that the shopify.app.toml file in your app root folder has the read_products access scope.
If you're adding new access scopes to an existing app, then you need to redeploy and reinstall the app on the store by running shopify app deploy.
If you're adding new access scopes to an existing app, then you need to redeploy and reinstall the app on the store by running shopify app deploy.
Anchor to Test the validation on your dev storeTest the validation on your dev store
Testing your validation system involves verifying both the admin UI configuration and the checkout validation logic. You'll test the complete flow: configuring limits in the admin, adding items to cart, and seeing validation errors during checkout.
Run your development server and test both components on your dev store. You can validate the system through the checkout UI, Storefront API, and by testing edge cases like missing configurations.
Anchor to SetupSetup
- If you're developing a function in a language other than JavaScript or TypeScript, ensure you have configured
build.watchin your function extension configuration.
-
Navigate back to your app root:
Terminal
cd ../..
-
Use the Shopify CLI
devcommand to start the dev preview:Terminal
shopify app devYou can keep the preview running as you work on your function. When you make changes to a watched file, Shopify CLI rebuilds your function and updates the function extension's drafts, so you can immediately test your changes.
-
Follow the CLI prompts to preview your app on your development store.
-
From the Shopify admin, go to Settings > Checkout.
-
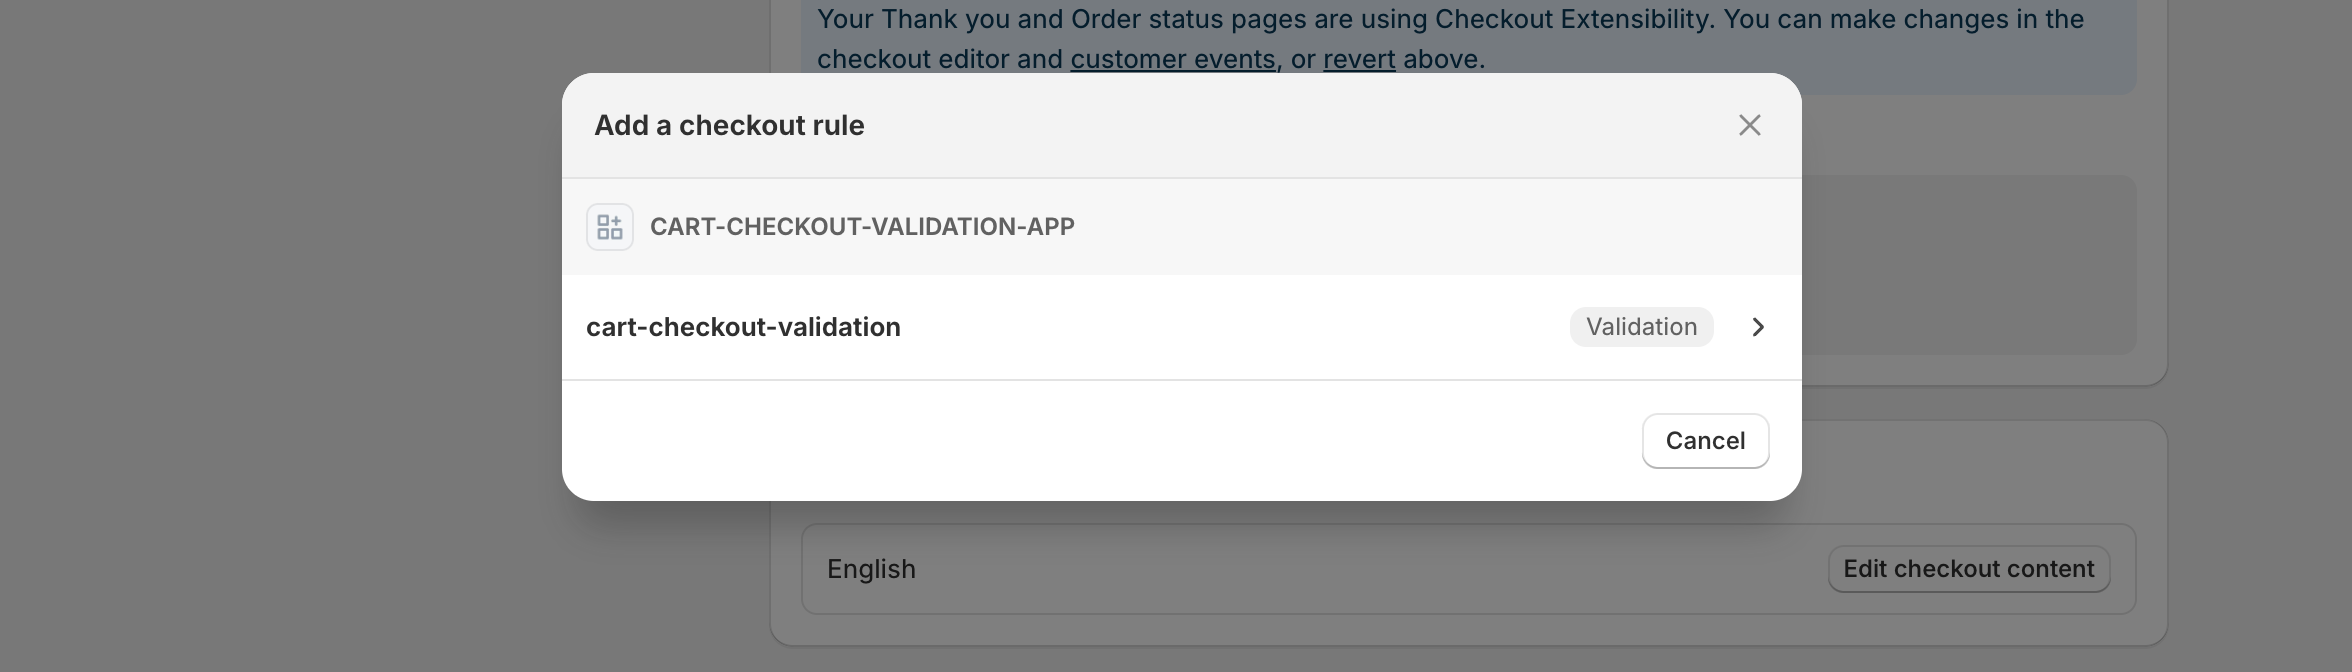
Under Checkout rules, click Add rule. A new page opens and displays a list of checkout rules.
-
Find the
cart-checkout-validationfunction that you want to test and select it. -
In the validation configuration, set the limit to five for each product variant.
-
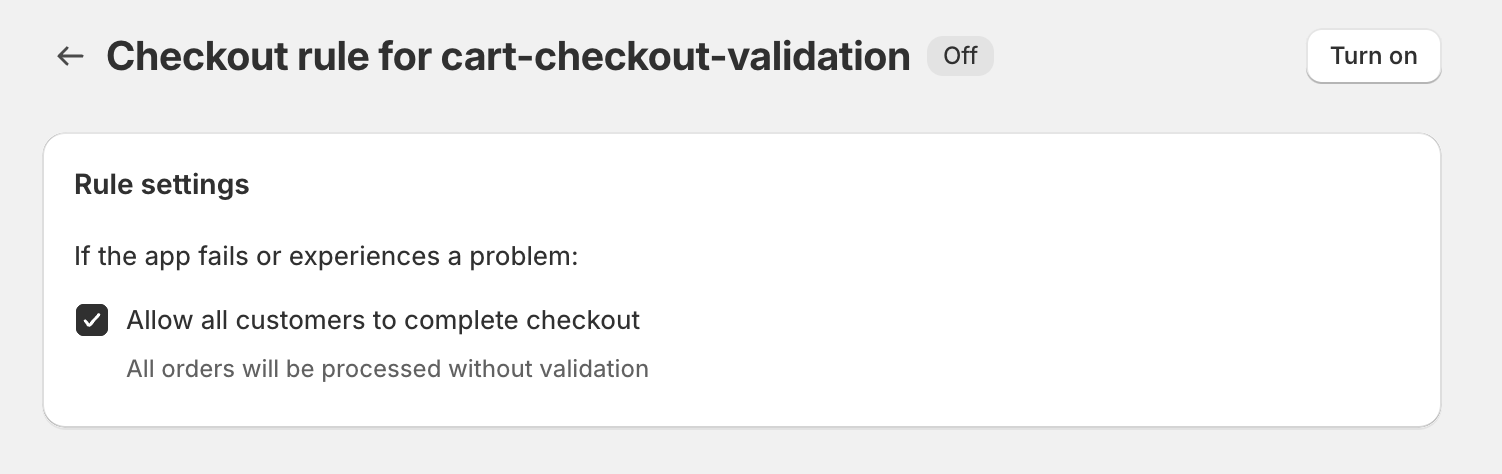
Click Save, but don't turn on the validation yet.
Anchor to Using checkoutUsing checkout
-
Before turning on the validation, create a cart that exceeds the quantity limit you set. For example, in your dev store, create a cart with a quantity of 10 products.
-
Go back to the checkout rules page in the Shopify admin and enable this validation by clicking on Turn on.
-
Optional: Control how checkout behaves when encountering runtime exceptions by selecting the validation under Checkout rules and toggling Allow all customers to complete checkout.
-
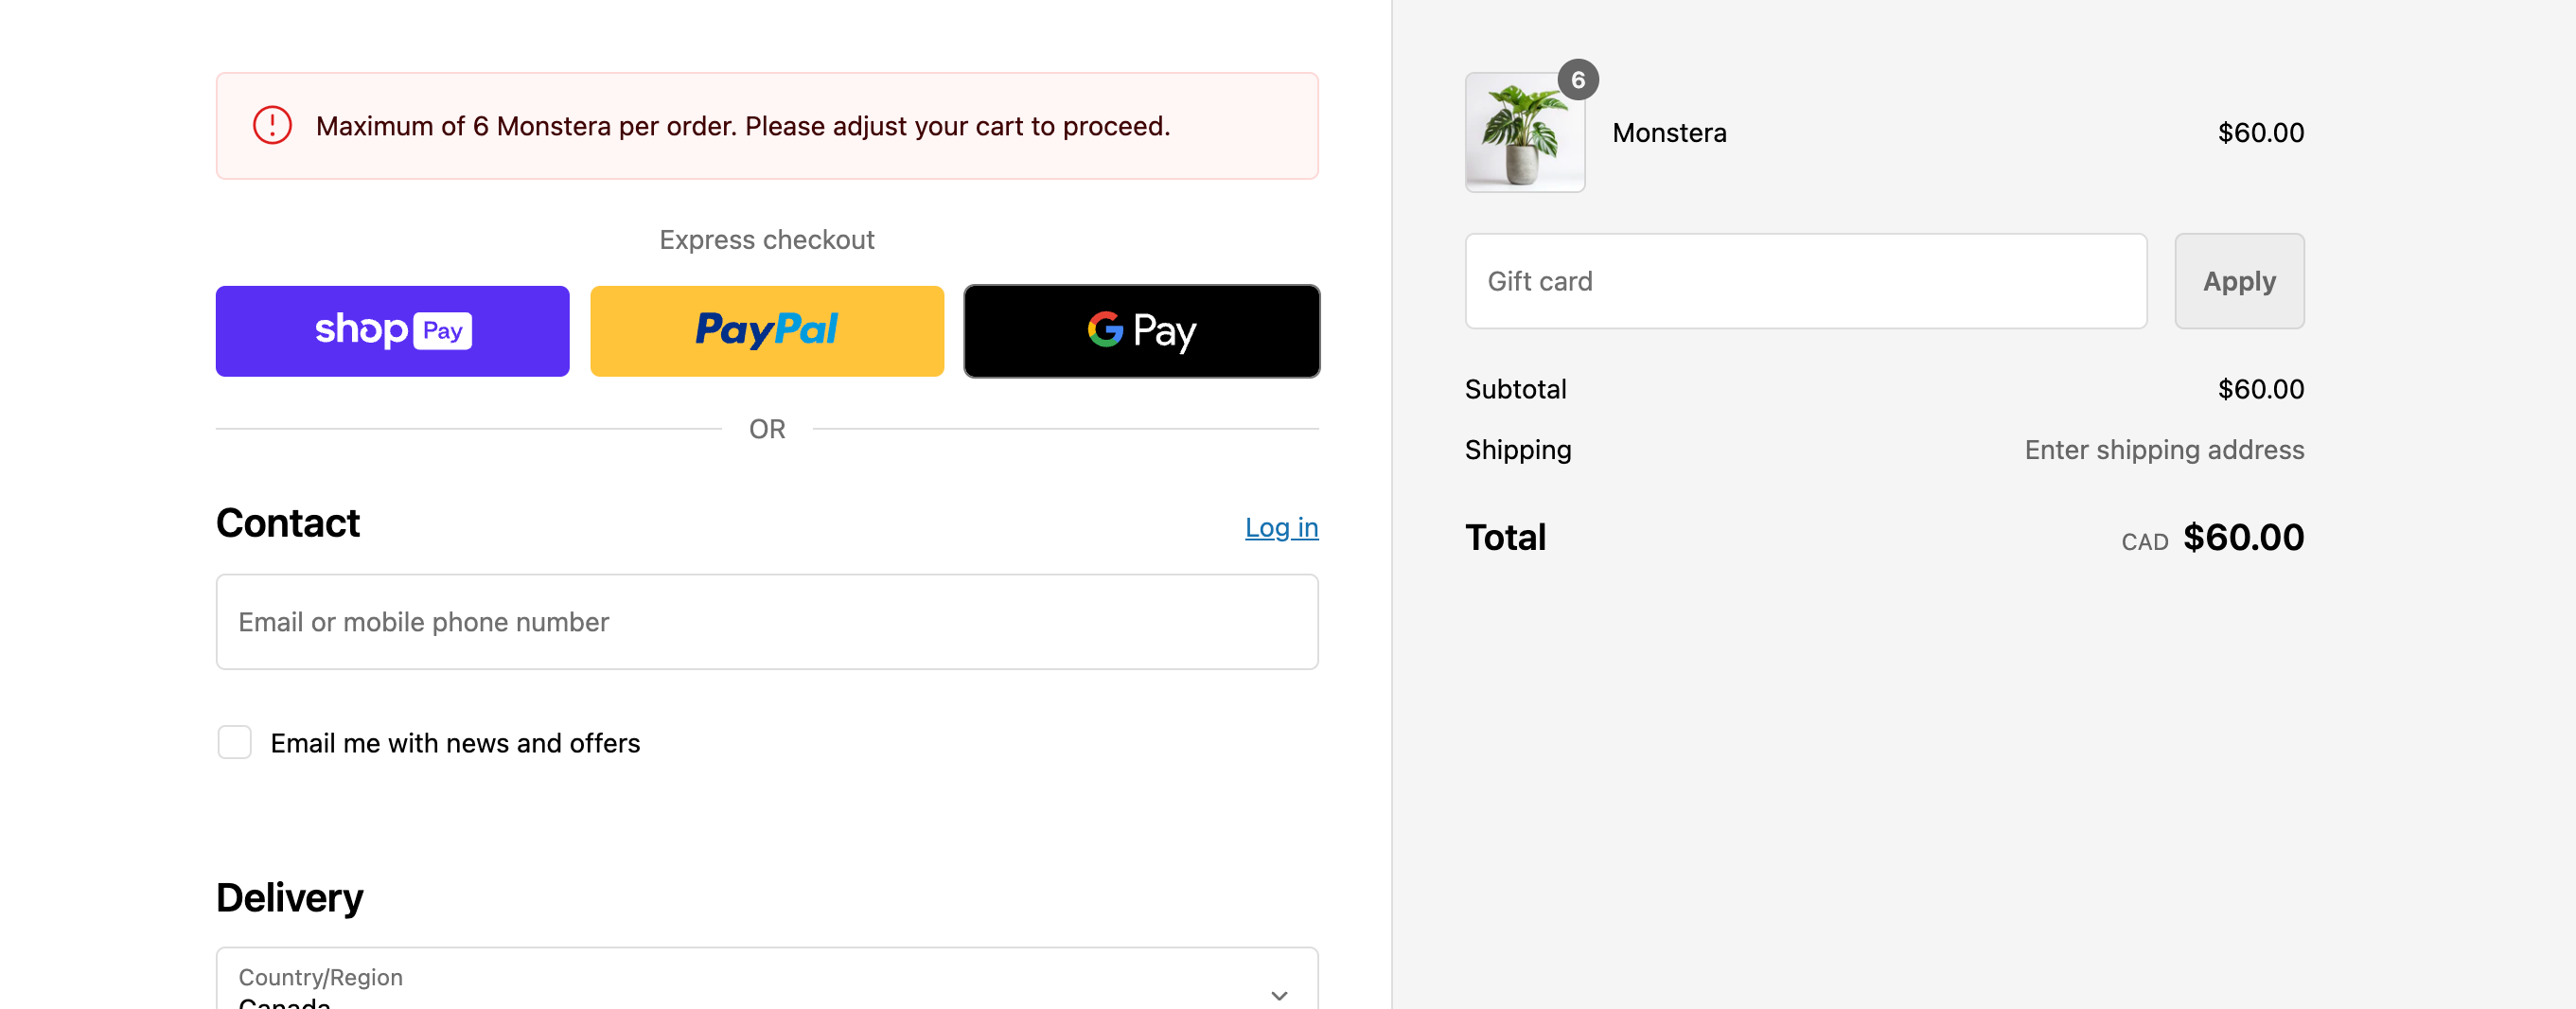
Complete a checkout in your online store and verify that the validation error message displays.
-
Verify that checkout progress is blocked. Clicking the Continue to shipping button in 3-page checkout, or the Pay now button in 1-page checkout, shouldn't redirect the user.
Anchor to Using GraphQLUsing Graph
-
You can also verify the validation is working properly through the Storefront API. After the validation is turned on, create a cart with the
cartCreatemutation:Create a cart
mutation cartCreate {cartCreate(input: {lines: []}) {cart {id}}} -
Using the Storefront API
cartLinesAddmutation, confirm that the mutation'suserErrorsfield contains the function's error message, and that executing the mutation was unsuccessful.Add line items to a cart
GraphQL mutation
mutation cartCreate {cartCreate(input: {lines: []}) {cart {id}}}Output
{"data": {"cartLinesAdd": {"cart": null,"userErrors": [{"code": "VALIDATION_CUSTOM","field": ["cartId"],"message": "Orders are limited to a maximum of 5 of Monstera"}]}}}
Anchor to Testing edge casesTesting edge cases
To ensure your validation works reliably, test these common scenarios:
-
No limits configured: Add products to cart when no quantity limits have been set in the admin UI. The validation should pass without errors.
-
Invalid limit values: Try setting negative numbers or non-numeric values in the admin interface. The UI should handle these gracefully.
-
Products without variants: Test with products that only have a default variant to ensure the UI displays correctly.
-
Large quantities: Test with quantities at and just above the configured limits to verify exact boundary behavior.
Troubleshooting
Anchor to Debugging using logsDebugging using logs
-
Open your terminal where
shopify app devis running, and review your function executions.When testing functions on development stores, the output of
devincludes executions of your functions, any debug logging you have added to them, and a link to a local file with the full function execution details. -
In a new terminal window, use the Shopify CLI
app function replaycommand to replay a function execution locally, and debug your function without the need to re-trigger the function execution on Shopify.
Terminal
- Select the function execution from the top of the list. Press
qto quit when you are finished debugging.
Anchor to Common issues and solutionsCommon issues and solutions
Admin UI not loading: Verify that your validation function's TOML file correctly references the UI extension handle, and that the UI extension was generated successfully.
Validation not triggering: Check that the validation function is properly deployed and activated in your dev store's checkout settings.
Configuration not saving: Ensure your app has the read_products scope and that metafield definitions are created correctly.
Function logs not appearing: Confirm your function is being executed by adding console output or using the debugging steps above.
Anchor to Deploy to productionDeploy to production
When you're ready to release your changes to users, you can create and release an app version. An app version is a snapshot of your app configuration and all extensions.
-
Navigate to your app directory.
-
Run the following command.
Optionally, you can provide a name or message for the version using the
--versionand--messageflags.Terminal
shopify app deploy
Releasing an app version replaces the current active version that's served to stores that have your app installed. It might take several minutes for app users to be upgraded to the new version.
If you want to create a version, but avoid releasing it to users, then run the deploy command with a --no-release flag.
You can release the unreleased app version using Shopify CLI's release command, or through the Dev Dashboard.
If you want to create a version, but avoid releasing it to users, then run the deploy command with a --no-release flag.
You can release the unreleased app version using Shopify CLI's release command, or through the Dev Dashboard.
Anchor to Tutorial complete!Tutorial complete!
Nice work - what you just built could be used by Shopify merchants around the world! Your validation system combines the power of Shopify Functions with intuitive admin configuration to help merchants enforce business rules at checkout.
Anchor to Next stepsNext steps
Now that you've built a complete validation system, explore these related topics to expand your app's capabilities: