Build an alternative payments extension
Processing a payment with an alternative payments extension is currently in an invite-only closed beta.
Processing a payment with an alternative payments extension is currently in an invite-only closed beta.
Ensure you have the latest version of Shopify CLI installed to access all payment extension features.
Ensure you have the latest version of Shopify CLI installed to access all payment extension features.
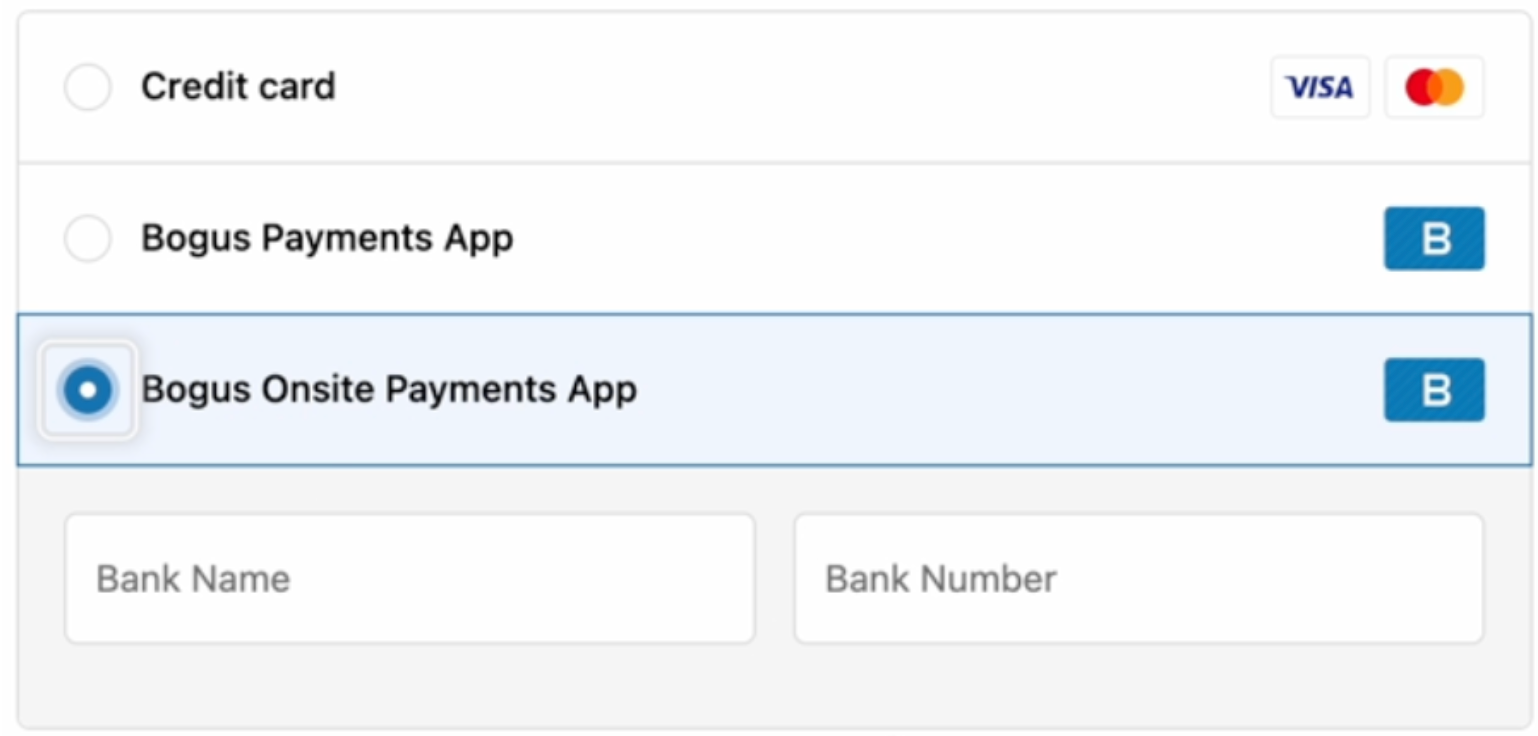
Alternative payments extensions allow Partners to incorporate additional fields and gather all necessary information upfront, directly on the checkout page, before initiating a payment.
This provides your payments extension with the ability to finalize a customer's payment without having to redirect them to an offsite page, yet if required, can still redirect them similar to the offsite payments extension.
Alternative payments extensions also enable Partners to prompt buyers to complete an additional verification step, if necessary, after they click Pay Now. This is an improvement to the existing flow where buyers are redirected to an offsite page to complete verification challenges.
Anchor to What you'll learnWhat you'll learn
In this tutorial, you'll learn how to do the following tasks:
- Set up your app.
- Create a checkout UI extension.
- Create an alternative payments extension.
- Explore the payment, refund, void, reject, and capture session flows, as well as how to implement them yourself.
- Implement buyer verification challenges using payment session modals.
Requirements
The dev store should be pre-populated with test data.
Apply and receive approval to become a Payments Partner.
Project


Anchor to Scaffold an appScaffold an app
Create a new payments app using Shopify CLI.
Anchor to Scaffold an app using Shopify CLIScaffold an app using Shopify CLI
- Run the following command to start creating your app:
Terminal
npm init @shopify/app@latest - When prompted, enter the name of your app.
- When prompted for the approach, select the option to add your first extension.
Terminal
Build a Remix app (recommended)> Build an extension-only app
Anchor to Create a checkout UI extensionCreate a checkout UI extension
Once the skeleton app has been created, create and publish checkout UI extension for your app.
- Follow these steps to create your checkout UI extension for your app.
- After generating your extension, the only difference is that the target you will bind to, and the hook you will call to update attributes from your extension, are not listed in the public documentation. A sample checkout UI extension shown below is done in Typescript/Preact. This framework is recommended when generating the extension.
Anchor to Sample checkout UI ExtensionSample checkout UI Extension
Update to the latest version of checkout UI extensions so you can use web components. The legacy checkout-ui-extensions-react package is no longer required.
Update to the latest version of checkout UI extensions so you can use web components. The legacy checkout-ui-extensions-react package is no longer required.
The following example demonstrates a checkout UI extension for a Custom Payment Method payments app. It uses hooks, such as useApplyPaymentMethodAttributesChange from the Preact-specific package.
extensions/<extension-name>/src/Checkout.jsx
You must specify the target you're rendering to (purchase.checkout.payment-option-item.details.render) in the shopify.extension.toml file in your extension directory.
You must specify the target you're rendering to (purchase.checkout.payment-option-item.details.render) in the shopify.extension.toml file in your extension directory.
Anchor to Deploy your checkout UI extensionDeploy your checkout UI extension
Create and release an app version with the deploy command.
-
Navigate to your app directory.
-
Run the following command. You can optionally provide a name or message for the version using the
--versionand--messageflags.
Terminal
An app version created using Shopify CLI contains the following:
- The app configuration from the local configuration file.
- The local version of the app's extensions.
If you have an extension in your deployed app, but the extension code doesn't exist locally, then the extension isn't included in your app version.
If you have an extension in your deployed app, but the extension code doesn't exist locally, then the extension isn't included in your app version.
Releasing an app version replaces the current active version that's served to stores with your app installed. It might take several minutes for app users to be upgraded to the new version.
If you want to create a version, but want to avoid releasing it to users, then run the deploy command with a --no-release flag.
You can release the unreleased app version using Shopify CLI's release command, or through the Dev Dashboard.
If you want to create a version, but want to avoid releasing it to users, then run the deploy command with a --no-release flag.
You can release the unreleased app version using Shopify CLI's release command, or through the Dev Dashboard.
Anchor to Create a payments extensionCreate a payments extension
Your Shopify app becomes a payments app after you've created and configured your payments extension.
- Run the following command to start generating your payment extension:
Terminal
shopify app generate extension - When prompted for "Type of extension", select "Payments App Extension > Custom Onsite" and name your extension.
Anchor to Configure your payments extensionConfigure your payments extension
When you generate an app extension, a TOML configuration file named shopify.extension.toml is automatically generated in your app's extension directory. You can find your extension configuration in extensions/<extension-name>/shopify.extensions.toml.
| Property name | Description |
|---|---|
payment_session_url required | The URL that receives payment and order details from the checkout. |
refund_session_url required | The URL that refund session requests are sent to. |
capture_session_url optional | The URL that capture session requests are sent to. This is only used if your payments app supports merchant manual capture. |
void_session_url optional | The URL that void session requests are sent to. This is only used if your payments app supports merchant manual capture or void payments. |
confirmation_callback_url optional | The URL that confirm session requests are sent to. This URL is required if your payments app supports inventory confirmation. If set, then the payments app can use the paymentSessionConfirm mutation to confirm with Shopify whether to proceed with the payment request. Refer to Explore confirm sessions section to learn more. |
supported_countries required | The countries where your payments app is available. Refer to the list of ISO 3166 (alpha-2) country codes where your app is available for installation by merchants. Ensure the countries match the geographic requirements in your app listing when submitting your app for review. |
supports_3ds required | 3-D Secure support is mandated in some instances. For example, you must enable the 3-D Secure field if you plan to support payments in countries which have mandated 3-D Secure. |
supported_payment_methods required | The payment methods (for example, Visa) that are available with your payments app. Learn more. |
supports_installments required | Enables installments |
supports_deferred_payments required | Enables deferred payments |
merchant_label optional | The name for your payment provider extension. This name is displayed to merchants in the Shopify admin when they search for payment methods to add to their store. Limited to 50 characters. |
buyer_label optional | The name of the method. Your checkout name can be the same as your merchant admin name or it can be customized for customers. This name is displayed with the payment methods that you support in the customer checkout. After a checkout name has been set, translations should be provided for localization. |
test_mode_available optional | Enables merchants using your payments app to test their setup by simulating transactions. To test your app on a dev store, your payment provider in the Shopify admin must be set to test mode. |
api_version optional | The Payments Apps GraphQL API version used by the payment provider app to receive requests from Shopify. You must use the same API version for sending GraphQL requests. You must not use unstable in production. API versions are updated in accordance with Shopify's general API versioning timelines. |
multiple_capture optional | Enables merchants using your payment provider app to partially capture an authorized payment multiple times up to the full authorization amount. This is used only if your payments app supports merchant manual capture. |
The properties are identical to what exists for the Offsite payments app extension; however, there are two additional configuration items that are worth highlighting below.
Anchor to UI extensionUI extension
This is where you link the checkout extension you previously built with your payment extension.
| Property name | Description |
|---|---|
ui_extension_handle required | The UI extension that renders your payments app in checkout. This value can only be a UI extension linked to this specific payments app. |
Anchor to UI Extension Field DefinitionsUI Extension Field Definitions
Specify the fields in your UI extensions to ensure the payment method validates the correct data sent from the front end.
| Property name | Description |
|---|---|
checkout_payment_method_fields required | The fields your payments app will accept from buyers in checkout (for example, installment details, payment plan). Each field is composed of a key name, and a data type. The data type defines the input that a buyer can provide. |
Example UI extension field definitions
The example field definitions configure a checkout form that appears as follows:
Anchor to Set up your payments appSet up your payments app
Anchor to Update your app configurationUpdate your app configuration
Shopify apps are embedded by default, but payments apps are an exception to this, because they don't need to render anything in Shopify admin.
In shopify.app.toml, update the embedded and set it to false.
The write_payment_gateways and write_payment_sessions scopes are automatically granted through the payment extension. Omit them from your shopify.app.toml file on initial deployment. In later deployments, you can add these scopes to request merchant permission for your payment extension.
Anchor to Deploy your payments extensionDeploy your payments extension
Create and release an app version with the deploy command.
- Navigate to your app directory.
- Run the following command. You can optionally provide a name or message for the version using the
--versionand--messageflags.
Terminal
An app version created using Shopify CLI contains the following:
- The app configuration from the local configuration file.
- The local version of the app's extensions.
If you have an extension in your deployed app, but the extension code doesn't exist locally, then the extension isn't included in your app version.
If you have an extension in your deployed app, but the extension code doesn't exist locally, then the extension isn't included in your app version.
Releasing an app version replaces the current active version that's served to stores with your app installed. It might take several minutes for app users to be upgraded to the new version.
If you want to create a version, but want to avoid releasing it to users, then run the deploy command with a --no-release flag.
You can release the unreleased app version using Shopify CLI's release command, or through the Dev Dashboard.
If you want to create a version, but want to avoid releasing it to users, then run the deploy command with a --no-release flag.
You can release the unreleased app version using Shopify CLI's release command, or through the Dev Dashboard.
Anchor to Test your app locallyTest your app locally
-
Start
app devif it's not already running:Terminal
shopify app devIn your terminal, select your development store. You can use the generated URL to test your payments app by using it in your payments app configuration. If you want a consistent tunnel URL, then you can use the
--tunnel-urlflag with your own tunnel when starting your server. -
Press
pto open the app in your browser.
Anchor to Explore payment sessionsExplore payment sessions
In this step, you'll explore the flows that an app needs to implement to process a payment.
In the app template, the endpoint that handles start payment session requests is predefined, and will automatically resolve or reject the payment by calling the Payments Apps API, based on the customer's name.
Note that this behavior is exclusively for testing and should be replaced with your own payment processing logic in a production app.
Anchor to Start the payment sessionStart the payment session
When a customer selects your payment provider, Shopify sends an HTTP POST request the payment session URL for the app. The request contains information about the customer and the order. To learn more about the request body and header, refer to the Offsite payment request reference.
When the POST request is received, the payments app returns an HTTP 2xx response with a redirect_url in the body. The redirect_url should be less than 8192 bytes in length. This response and parameter are required for the payment session creation to be successful.
If the request fails, then it's retried several times. If the request still fails, then the customer needs to retry their payment through Shopify Checkout. If there's an error on the payments app's side, then return an appropriate error status code instead.
You configure the payment session URL for your app as part of the app extension configuration.
It isn't necessary to specify a redirect URL unless additional information is required. You may proceed to resolve or reject the payment after acknowledging the start of the payment session, if appropriate.
It isn't necessary to specify a redirect URL unless additional information is required. You may proceed to resolve or reject the payment after acknowledging the start of the payment session, if appropriate.
Anchor to Sample payment session payloadSample payment session payload
The metadata we are passing through payment session as part of the checkout UI extension would be contained within the payment_method request params under attributes:
Example payment method request parameters
Example Payload
Anchor to Sample payment session payload with localized fieldsSample payment session payload with localized fields
For certain countries that require additional fields on orders, localized_fields are included in the payload inside the transaction_metadata object. In the case of Brazil, localized_fields contains the CPF value. As a result of this, payment app developers won't need to manually add a CPF field to the payments app.
Example payload with localized fields
Anchor to Resolve a paymentResolve a payment
The payments app uses the paymentSessionResolve mutation after the customer has successfully gone through the payment process to complete the payment. The id argument corresponds to the global identifier (gid) of the payment.
In the referenced code, this.resolveMutation corresponds to the paymentSessionResolve mutation.


Anchor to Reject a paymentReject a payment
The payments app should reject a payment if the customer can't complete a payment with the provider. The rejected payment tells Shopify that the checkout process will be halted. For example, if you don't want to process a high-risk payment, then you can reject the payment using the paymentSessionReject mutation.
Rejecting a payment is final. You can't call other actions on a payment after it has been rejected.
The payments app should retry a failed user attempt and complete the payment before calling paymentSessionReject. For example, if any of the following conditions are met, then you don't need to reject the payment:
- The user doesn't interact with your payments app.
- The user cancels the payment.
- The user needs to retry the payment because of specific errors, such as the user entering the wrong CVV.
In the referenced code, this.rejectMutation corresponds to the paymentSessionReject mutation.
Anchor to Cancel the paymentCancel the payment
If a customer wants to cancel a payment on your provider page, then they are redirected to the merchant's website or store by using the cancel_url.
The cancel_url is sent to your payments app in the payment request request-body that was sent from Shopify.
Don't use the paymentSessionReject mutation to cancel the payment; otherwise, the customer will be unable to pay again with your provider.
Anchor to Mark the payment as pendingMark the payment as pending
You can mark a payment as pending if it's awaiting asynchronous action by the customer, the merchant, the payment Partner, or a payment network.
Not all payments can be processed and finalized quickly. Some payments can take several days to complete. Pending a payment indicates to the customer that you have started processing the payment, but require more time to complete the payment.
If an order is in pending payment status, then merchants might be restricted from editing, canceling, or manually capturing payment for the order until the payment is finalized. For more information, refer to the pending payments documentation on the Shopify Help Center.
In the referenced code, this.pendingMutation corresponds to the paymentSessionPending mutation.
Anchor to Triggering resolve, reject, or pending for a payment in the templateTriggering resolve, reject, or pending for a payment in the template
In the app template, after a start payment session request has been received by the app, the payment is automatically resolved or rejected based on the customer's name.
If the customer's first name is reject, then the payment is rejected. If the customer's first name is pending, then the payment is marked as pending. Otherwise, the payment is resolved.
Anchor to Process next actionProcess next action
Upon receiving the response from either the paymentSessionResolve, paymentSessionReject, or paymentSessionPending mutations, the next action that the payments app performs is specified under nextAction.
The nextAction will either be nil or contain two fields.
In the case where it is nil, no next action is expected of the payments app.
Otherwise, the two fields are as follows:
action: APaymentSessionNextActionActionenum that specifies the type of the action the app must perform.context: A union type requiring inline fragments to access data on the underlying type. Takes a type ofPaymentSessionActionsRedirect.
Anchor to Explore refund sessionsExplore refund sessions
In this step, you'll explore the flows that an app needs to implement to process a refund. In the app template, the endpoint that handles the start of refund session requests is predefined to store sessions for an asynchronous resolution.
The refund flow begins with an HTTP POST request sent from Shopify to the payments app's refund session URL provided during app extension configuration. To learn more about the request body and header, refer to the Refund request reference.
Anchor to Start the refund sessionStart the refund session
The refund flow begins with an HTTP POST request sent from Shopify to the payments app's refund session URL. Shopify must receive an HTTP 201 (Created) response for the refund session creation to be successful.
If the request fails, then it's retried several times. If the request still fails, then the user needs to manually retry the refund in the Shopify admin.
You configure the refund session URL for your app as part of the app extension configuration.
Anchor to Resolve a refundResolve a refund
After the app successfully processes the refund request, the refundSessionResolve mutation automatically resolves the refund. The id argument corresponds to the gid of the refund.
In the referenced code, this.resolveMutation corresponds to the refundSessionResolve mutation.
Anchor to Reject a refundReject a refund
If the app can't process a refund, then it rejects it. You should only reject a refund in the case of final and irrecoverable errors. Otherwise, you can re-attempt to process the refund.
The refund is rejected using the refundSessionReject mutation.
As part of the rejection, a reason why the refund was rejected must be included as part of RefundSessionRejectionReasonInput.
The RefundSessionRejectionReasonInput.code is a RefundSessionStatusReasonRejectionCode, which is an enum of standardized error codes.
The RefundSessionRejectionReasonInput.merchantMessage argument is a localized error message presented to the merchant explaining why the refund was rejected.
In the referenced code, this.rejectMutation corresponds to the refundSessionReject mutation.
Anchor to Triggering resolve or reject for a refund in the templateTriggering resolve or reject for a refund in the template
In the app template, the simulator built into the dashboard handles the resolution or rejection of all post-payment sessions, including refunds, asynchronously. This means that after a refund is created in a store's Shopify admin, it must be manually completed from the app template's dashboard.
In a production-ready app, your app would process the refund itself once it receives the start refund session request.
Anchor to Explore capture sessions (optional)Explore capture sessions (optional)
A capture describes the process of how merchants capture funds for an authorized payment. A capture is the next step of the payment flow, and occurs after an authorized payment is finalized. Finalized payments have kind set to authorization.
The app template is designed to either resolve or reject a transaction when Shopify sends a capture request to a payments app. This occurs after a merchant tries to capture the funds from an authorized transaction.
Anchor to Start the capture sessionStart the capture session
A capture can only be performed when the payment initiated by Shopify has a kind property with a value of authorization. With an authorization, the app places a hold on the funds and then responds to Shopify's capture request. The captureSessionResolve or captureSessionReject mutation is used to accept or reject the capture of funds, respectively.
The capture flow begins with an HTTP POST request sent from Shopify to the payments app's capture session URL.
You configure the capture session URL for your app as part of the app extension configuration.
Shopify sends a capture request to the payments app after a merchant tries to capture the funds on an authorized transaction. When this occurs, the app template is set up to store a capture session. These sessions can then be resolved through the simulator for testing. In a production-ready app, this is when your app would process the capture request.
Anchor to Resolve a capture sessionResolve a capture session
After the app successfully processes the capture request, the captureSessionResolve mutation automatically resolves the capture. The id argument corresponds to the gid of the capture.
In the referenced code, this.resolveMutation corresponds to the captureSessionResolve mutation.
Anchor to Reject a captureReject a capture
If you don't want to process a capture request, then you should reject it. You might want to reject a capture if authorization has expired or if you suspect that the request is fraudulent or high risk. You should only reject a capture in the case of final and irrecoverable errors. Otherwise, you should re-attempt to resolve the capture.
The app rejects a capture using the captureSessionReject mutation.
As part of the rejection, you need to include a reason why the capture was rejected as part of CaptureSessionRejectionReasonInput.
The CaptureSessionRejectionReasonInput.code is a CaptureSessionStatusReasonRejectionCode, which is an enum of standardized error codes.
The CaptureSessionRejectionReasonInput.merchantMessage argument is a localized error message presented to the merchant explaining why the capture was rejected.
Anchor to Triggering resolve or reject for a capture in the templateTriggering resolve or reject for a capture in the template
In the app template, the simulator built into the dashboard (/app/dashboard) handles the resolution or rejection of all post-payment sessions, including captures, asynchronously. This means that after a capture is created in a store's Shopify admin, it must be manually completed from the app template's dashboard.
In a production-ready app, your app would process the capture itself after it receives the start capture session request.
Anchor to Explore void sessions (optional)Explore void sessions (optional)
A void describes the process of how merchants void funds for an authorized payment. A void is the next step of the payment flow, and occurs after an authorized payment is finalized. Finalized payments have kind set to authorization.
Anchor to Start the void sessionStart the void session
A void can only be performed when the payment initiated by Shopify has a kind property with a value of authorization. With an authorization, you place a hold on funds and then reply to Shopify's void request with the voidSessionResolve or voidSessionReject mutation to accept or reject the voiding of funds respectively.
The void flow begins with an HTTP POST request sent from Shopify to the payments app's void session URL.
You configure the void session URL for your app as part of the app extension configuration.
The app template stores the void session when Shopify sends a void request to a payments app after a merchant tries to cancel the order for an authorized transaction. These sessions can then be resolved through the simulator for testing. In a production-ready app, this is when your app would process the void request.
Anchor to Resolve a void sessionResolve a void session
After the app successfully processes the void request, the voidSessionResolve mutation automatically resolves the void. The id argument corresponds to the gid of the void.
Anchor to Reject a voidReject a void
If you can't process a void request, then you should reject it. You should only reject a void in the case of final and irrecoverable errors. Otherwise, you can re-attempt to resolve the void.
You can reject a void using the voidSessionReject mutation.
As part of the rejection, you need to include a reason why the void was rejected as part of VoidSessionRejectionReasonInput.
The VoidSessionRejectionReasonInput.code is a VoidSessionStatusReasonRejectionCode, which is an enum of standardized error codes.
The VoidSessionRejectionReasonInput.merchantMessage argument is a localized error message presented to the merchant explaining why the void was rejected.
Anchor to Triggering resolve or reject for a void in the templateTriggering resolve or reject for a void in the template
In the app template, the simulator built into the dashboard handles the resolution or rejection of all post-payment sessions, including voids, asynchronously. This means that after a void is created in a store's Shopify admin, it must be manually completed from the app template's dashboard.
In a production-ready app, your app would process the void itself after it receives the start void session request.
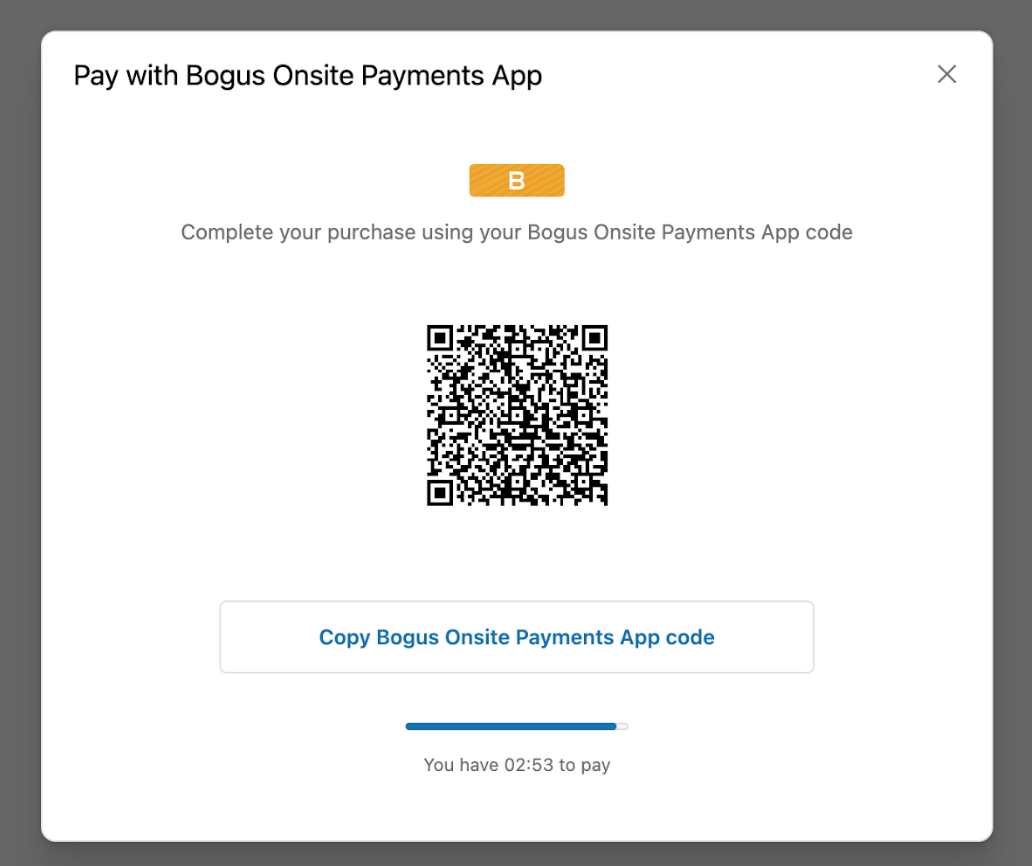
Anchor to Explore buyer verification challenge (optional)Explore buyer verification challenge (optional)
Alternative payment extensions can make a request for Shopify to present a verification challenge to the buyer during the checkout process, starting with API version 2025-07.
This feature enables partners to add an extra layer of verification after the payment session has started without redirecting the buyer to an external page.
This experience is optional and should only be used when the buyer needs to complete additional verification for the payment to succeed.
Anchor to Payment session flow with verification challengesPayment session flow with verification challenges
Once the payment session has been initiated, you can initiate the request for a buyer challenge using the paymentSessionModal mutation.
The overall flow is:
-
Shopify initiates a payment session with your payments extension.
-
Your payments extension sends a
paymentSessionModalrequest to Shopify with challenge details. -
Shopify presents a verification challenge to the buyer on their checkout.
-
The buyer completes the verification challenge (for example, scanning a QR code and following instructions).
-
Your payments extension resolves or rejects the payment request, or marks it as pending.
-
If the payment is successful or pending, Shopify creates an order and the buyer is redirected to the Thank You Page.
If your payments extension rejects the payment, the buyer is redirected back to the Checkout page.
Shopify creates the order only after the buyer completes verification and your payment app resolves or marks the payment as pending.
Shopify creates the order only after the buyer completes verification and your payment app resolves or marks the payment as pending.
Anchor to Using the ,[object Object], mutationUsing the paymentSessionModal mutation
paymentSessionModal mutationTo initiate a request for Shopify to present a buyer verification challenge, your payments extension will need to use the paymentSessionModal mutation.
Prerequisites:
- Shopify needs to grant you the
write_payment_session_modalsandread_payment_session_modalsaccess scopes. Check with your partnerships manager if these scopes are not already enabled for your app.
The paymentSessionModal mutation takes the following parameters:
paymentSessionModal mutation
With variables:
Variables example
Anchor to Timeout, expiry, cancellation, and re-attemptsTimeout, expiry, cancellation, and re-attempts
Buyers are expected to complete the required challenge within the time limit set by partners using the expiresAt variable in the mutation, with a maximum limit defined by Shopify.
If a buyer is unable to complete the action within this time, Shopify will mark the payment as expired.
The buyer will then be redirected back to checkout, where they can attempt the checkout process again.
-
Use the
expiresAtvariable to pass in the date and time when the buyer challenge expires. -
Shopify has set a default maximum timeout of
7 minutesand adds an extra5 secondsbuffer on top to account for network latency. After this time has elapsed, Shopify marks the payment session as expired and the buyer is shown an error message. You can set a shorter expiration time if needed for your use case. -
The
expiresAtvalue must be less than or equal to the Shopify-defined maximum timeout into the future from the time the challenge is generated. -
If the buyer closes the payment modal, Shopify will redirect them back to the checkout page.
-
Buyers are able to re-attempt the payment from the checkout page if it expires or if they close the modal. Buyers have the option to keep the same payment method selected or change it if necessary.
If they choose to proceed with the same payment method, Shopify will initiate a new payment session with the payments extension.
NoteIf they choose to proceed with the same payment method, Shopify will initiate a new payment session with the payments extension.
Note:If they choose to proceed with the same payment method, Shopify will initiate a new payment session with the payments extension.
Anchor to Known limitations and restrictionsKnown limitations and restrictions
When implementing buyer verification challenges, be aware of these limitations:
- The experience within the modal is currently controlled by Shopify and is not customizable by partners through UI extensions/etc.
Anchor to Explore confirm sessionsExplore confirm sessions
This feature is only available to merchants with access to one page checkout and/or who have upgraded to Shopify Extensions in Checkout.
This feature is only available to merchants with access to one page checkout and/or who have upgraded to Shopify Extensions in Checkout.
If your app supports Inventory Confirmation, you must use the paymentSessionConfirm mutation to confirm with Shopify whether to proceed with the payment request, according to Shopify's business logic.
We enforce payment apps supporting this feature to have a Refund session URL in their payment extension configuration. This requirement is triggered if more than 3 minutes elapse between confirmation and its resolution. After this length of time has passed, the confirmation process is re-initiated. If the re-initiated confirmation fails, then Shopify will issue a refund request on the payment.
If you support capture/void, then we will look at the payment to decide if we should void instead of refund.
Anchor to Confirm a paymentConfirm a payment
You must use the paymentSessionConfirm mutation to confirm with Shopify whether to proceed with the payment request, according to Shopify's business logic. For example, Shopify checks that inventory is still available and that discount codes are still valid. Call this mutation when the customer has completed the steps of the payment, and you are ready to process the payment.
The id argument corresponds to the global identifier (gid) of the payment.
Shopify will return a Null nextAction in the response, not expecting the payments app to redirect the buyer back to Shopify at this point.
Your app should indicate activity to the user and must wait for Shopify to confirm whether the payment request can proceed.
Anchor to Process a confirm sessionProcess a confirm session
When Shopify determines that the payment request can proceed, Shopify sends a POST request to the confirm session URL of the alternative payments app extension, delivering the confirmation result:
Shopify must receive an HTTP 2xx response for the payment session confirmation to be successful.
If the request fails, then it's retried several times. If the request still fails, then the customer needs to retry their payment through Shopify checkout.
If there's an error on the payments app's side, then don't respond with an HTTP 2xx. Use an appropriate error status code instead.
Anchor to Complete a paymentComplete a payment
After the confirmation callback has been received by your application, we expect you to either resolve, reject, or pend the payment.
When Shopify indicates that the payment request can't proceed, the payments app must invoke the paymentSessionReject mutation using the CONFIRMATION_REJECTED reason code.
Shopify expects the payment to be resolved/rejected within 3 minutes of the successful confirmation callback being sent to the payments app. If the call takes longer than 3 minutes, we will attempt to re-run the confirmation process on resolve. As we no longer guarantee the confirmation result, after resolving the payment, Shopify may issue a refund/void request.
Anchor to Test your payments app locallyTest your payments app locally
Before submitting your app extension for review, you should test that your various endpoints work as expected locally.
Anchor to Submit a request to your local serverSubmit a request to your local server
With the dev server you started previously, go through the relevant requests from our reference, and submit a request to your app with cURL or an API platform like Postman or Insomnia.
Anchor to Test your payments app with a ShopTest your payments app with a Shop
Preview your app to make sure that it works as expected with Shopify.
The testing steps outlined in this section are specific to apps built with the template. The template provides a basic UI that lets you test the payment flows, but your app might have a UI stored outside of the Shopify admin.
The testing steps outlined in this section are specific to apps built with the template. The template provides a basic UI that lets you test the payment flows, but your app might have a UI stored outside of the Shopify admin.
Anchor to Start your serverStart your server
If you're using a permanent tunnel with your app extension, you can use the Shopify CLI dev command to build your app and preview it on your dev store.
Otherwise, deploy your app to your server, and move to the next step.
-
In a terminal, navigate to your app directory.
-
Either start or restart your server to build and preview your app:
Terminal
shopify app dev --tunnel-url <tunnel> -
Press
pto open the App Home.
Anchor to Install and test the payments appInstall and test the payments app
Follow these steps to test the payments app flows:
-
From the app splash page, enter an account name.
-
Select Ready > Unstable and click Submit.
You need to set your app as ready to process payments by calling the paymentsAppConfigure mutation.
If you set ready: false after the app is installed and activated on the store, the request will fail.
If you set ready: false after the app is installed and activated on the store, the request will fail.
- In the banner, click Return to Shopify.
After calling the mutation, you must configure your app to redirect back to the Shopify admin using the following URL:
-
Enable test mode.
-
Click Activate.
Anchor to Set up your payments app to accept test paymentsSet up your payments app to accept test payments
This step is applicable only to the template. If you've implemented the app yourself, then skip to the next step.
This step is applicable only to the template. If you've implemented the app yourself, then skip to the next step.
Onboard your app onto your dev store.
-
In the Shopify admin for your dev store, go to Settings > Apps and sales channels.
-
Select your payments app, then click Open app. The App Home opens in a new window.
-
From the App Home, enter an account name, select Ready? and your
Payments Apps APIAPI Version, and then click Submit.In the banner, click Return to Shopify.
You'll return to admin, where you can review the app's details prior to activation.
TroubleshootingAnchor to An error ocurred while onboarding your appAn error ocurred while onboarding your appYour app extension may not be set up properly. Ensure the URLs provided are accurate, and that the app extension is being updated in the active dev session. You might have to uninstall and reinstall your payments app to successfully onboard.
You can uninstall and reinstall your app using one of the following methods:
- Restart your dev session: Quit your dev session, run
shopify app dev clean, then runshopify app devto restart the session. This will uninstall and reinstall your app. - Manually uninstall and reinstall: Uninstall your app from Settings > Apps and sales channels in your app's admin, then reinstall it from your app's overview page in the Dev Dashboard by clicking Install app in the Installs section.
- Restart your dev session: Quit your dev session, run
-
Enable test mode.
-
Click
Activate.
Now that your app is installed, you can test payments, refunds, captures, and voids.
Anchor to Test paymentsTest payments
Make a payment, and create an order.
-
In your dev store, add a product to your cart, and then begin a checkout.
-
Complete the checkout as usual, until the Payment section.
At this point, your payments app should be available under the Payment section.
-
Enter some test payments details, and then select Pay now.
Shopify sends a request to the
payment session URLspecified in your app extension configuration.Your app should then begin, and complete processing the payment.
-
Verify the payment is complete by finding the order under Orders in your shop's admin.
Anchor to Test refundsTest refunds
Make a refund on an order.
-
In the Shopify admin for your dev store, go to Orders. Select an order with a completed payment.
-
In the top right corner, click Refund.
-
Select the item to refund, and then click Refund <amount>.
Shopify sends a request to the
refund session URLspecified in your app extension configuration.
If you've customized your app, then the refund process should trigger.
If you're testing the app template, then your app receives this request, and saves a record of it. Perform the following additional steps:
-
Navigate to
/app/dashboardin your app to find the relevant payment session. From the App Home, you can click Dashboard. -
Click Simulate, and then scroll down to Refunds. On the relevant refund session, click Open.
-
Select Resolve or Reject to complete the refund.
-
Verify that the refund has completed by returning to the order under Orders in your store's admin. You should see that the order is now marked as Refunded.
Anchor to Test capturesTest captures
Capture funds from an authorized payment.
-
In your dev store, enable manual payment capture to test captures.
-
Submit another test payment.
The order appears in the Shopify admin under Orders.
-
Open the new order. In the top right corner, click Capture payment.
-
In the page that opens, click Accept <amount>.
Shopify sends a request to the
capture session URLspecified in your app extension configuration.
If you've customized your app, then the capture process should trigger.
If you're testing the app template, then your app receives this request, and saves a record of it. Perform the following additional steps:
-
Navigate to
/app/dashboardin your app to find the relevant payment session. From the App Home, you can click Dashboard. -
Click Simulate, and then scroll down to Captures. On the relevant capture session, click Open.
-
Select Resolve or Reject to complete the capture.
-
Verify that the capture has completed by returning to the order under Orders in your store's admin. You should see that the order is now marked as Paid.
Anchor to Test voidsTest voids
Void an authorized payment.
-
In your dev store, enable manual payment capture to test voids.
-
Submit another test payment.
The order appears in the Shopify admin under Orders.
-
Open the new order. In the top right, click More actions, then Cancel order. In the modal that opens, click Cancel order.
Shopify sends a request to the
void session URLspecified in your app extension configuration.
If you've customized your app, then the void process should trigger.
If you're testing the app template, then your app receives this request, and saves a record of it. Perform the following additional steps:
-
Navigate to
/app/dashboardin your app to find the relevant payment session. From the App Home, you can click Dashboard. -
Click Simulate, and then scroll down to Void. Click Open on the void session.
-
Select Resolve or Reject to complete the void.
-
Verify that the void has completed by returning to the order under Orders in your store's admin. You should see that the order is now marked as Voided.
Anchor to Test error scenariosTest error scenarios
If you want to test out an error scenario in the template, then set the last name in a checkout to any PaymentSessionStateRejectedReason, and then complete the checkout as normal. The app template receives this code and automatically rejects the payment with it.
Anchor to Tutorial complete!Tutorial complete!
Congratulations! You set up an alternative payments extension.
Anchor to Next stepsNext steps
Before a merchant can use your payments extension, they need to go through an onboarding experience.
This guide describes how a merchant discovers, installs, authorizes, and activates a payments extension.
Payments Apps APIAfter you've completed this tutorial to understand how Payments apps work, you can use the Payments Apps API to programmatically access your payments app's configuration data.
You can also use the Payments Apps API to resolve, pend, or reject payments sessions.