Build a Discount Function
With Shopify Functions, you can create a new type of discount that applies to cart lines, order subtotal, and shipping rates.
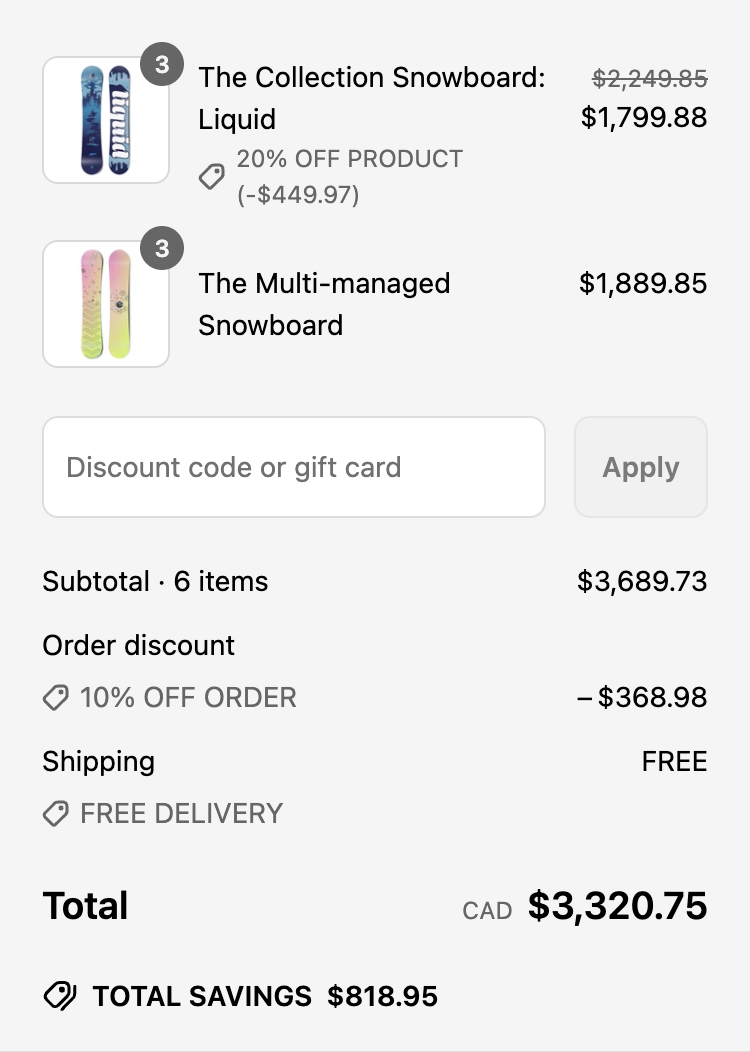
In this tutorial, you'll use Shopify Functions to create a new type of discount that does three things:
- Reduces the price of a cart line by 20%
- Discounts the order subtotal by 10%
- Provides free shipping
After creating the discount, you can test it out in your store.
To learn how to migrate your existing Discount Functions to use the Discount API, refer to Migrate to the Discount API.
To learn how to migrate your existing Discount Functions to use the Discount API, refer to Migrate to the Discount API.
Anchor to What you'll learnWhat you'll learn
In this tutorial, you'll learn how to do the following tasks:
- Use the Shopify CLI to add a Discount Function to an app
- Review the configuration of your discount function
- Review the input queries associated with your discount function
- Review the function logic associated with your discount function
- Use GraphiQL to create a discount and configure it to work with your function
- Test your discount function and view its logs
Requirements
Create an that has the write_discounts and read_products access
scopes, using the latest version of Shopify CLI.
Install Node.js 22 or higher.
On Windows, Rust requires the Microsoft C++ Build Tools. Make sure to select the Desktop development with C++ workload when installing the tools.
wasm32-unknown-unknown targetTo ensure compatibility with the latest version of Rust, install the wasm32-unknown-unknown target.
Project


Anchor to Create the Discount FunctionCreate the Discount Function
To create a Discount Function, you'll use the Shopify CLI, which generates starter code for your Function.
- Navigate to your app's directory:
Terminal
cd directory - Run the following command to create a new Discount Function:
Terminal
shopify app generate extension --template discount --name discount-function-rs - Choose the language that you want to use. For this tutorial, select
Rust.
Steps 2-4 review the generated code. To proceed directly to deploying and testing your Discount Function, jump to Step 5.
Steps 2-4 review the generated code. To proceed directly to deploying and testing your Discount Function, jump to Step 5.
Anchor to Review the Discount Function ConfigurationReview the Discount Function Configuration
The shopify.extension.toml file defines the Discount Function's metadata, targets, and build configuration.
Anchor to MetadataMetadata
The [[extensions]] section defines the Function metadata. This includes the Function's handle, name, description, and type. The name and description are displayed on the Discount page of your Shopify admin.
Shopify provides localization tools, and you can use them to localize the name and description of Discount Functions. To learn more, refer to localizing your Shopify app.
Shopify provides localization tools, and you can use them to localize the name and description of Discount Functions. To learn more, refer to localizing your Shopify app.
Anchor to TargetsTargets
The [[extensions.targeting]] sections define the Function targets. Each section includes a target, input_query, and export property.
The target property defines where the Function is applied. The Discount API has two run targets:
cart.lines.discounts.generate.run- The Function can apply discounts to cart lines and order subtotals.cart.delivery-options.discounts.generate.run- The Function can apply discounts to shipping rates.
The input_query property is the path to the Function's input query file. This file defines the Function's input parameters.
The export property specifies the build entrypoint that will run for a specified target. This will usually be the function name of your main export.
Anchor to Build configurationBuild configuration
The [extensions.build] section defines the build configuration for your Function. This includes the build command, the build path and a watch property which allows you to watch for changes to the Function. Refer to Shopify Functions configuration properties for more information.
Depending on your app type, you may have to define the [extensions.ui] or [extensions.ui.paths] section.
Refer to Build a discounts UI with admin UI extensions or Build a discounts UI with React Router to learn more about building UIs to configure Functions.
Depending on your app type, you may have to define the [extensions.ui] or [extensions.ui.paths] section.
Refer to Build a discounts UI with admin UI extensions or Build a discounts UI with React Router to learn more about building UIs to configure Functions.
Anchor to Review the input queries for your FunctionReview the input queries for your Function
Input queries are used to define the input that the Discount Function needs. The result of those queries will be given as input parameters to the export functions.
Anchor to [object Object], inputcart_lines_discounts_generate_run.graphql input
cart_lines_discounts_generate_run.graphql inputThe result of this query is provided as input to the cart.lines.discounts.generate.run target. Refer to Discount API for more information about the input data available to your Function.
Anchor to [object Object], inputcart_delivery_options_discounts_generate_run.graphql input
cart_delivery_options_discounts_generate_run.graphql inputThe result of this query is provided as input to the cart.delivery-options.discounts.generate.run Function. Refer to Discount API for more information about the input data available to your Function.
Anchor to Review the logic of your FunctionReview the logic of your Function
To specify how a Discount Function should apply discounts, update its logic. This logic can make use of the input parameters provided to the Function, and should output discount operations.
Your Function should only return operations for discountClasses that the discount applies to. For example, if the discount is configured to apply to PRODUCT and ORDER, but not SHIPPING, your Function should only return operations for PRODUCT and ORDER.
Your Function should only return operations for discountClasses that the discount applies to. For example, if the discount is configured to apply to PRODUCT and ORDER, but not SHIPPING, your Function should only return operations for PRODUCT and ORDER.
Anchor to Review your cart run Function logicReview your cart run Function logic
This is the entry point for cart line and order subtotal discount calculation logic. The name must match the export property in the [[extensions.targeting]] section of your Function's configuration and must output CartOperations.
In this example, the Function checks whether the discount applies to PRODUCT and ORDER and applies two discounts: 10% off the entire order subtotal, plus an additional 20% off the highest cart line subtotal.
Anchor to Review your delivery run Function logicReview your delivery run Function logic
This is the entry point for shipping rate discount calculation logic. The name must match the export property in the [[extensions.targeting]] section of your Function's configuration and must output DeliveryOperations.
In this example, the Function checks whether the discount applies to SHIPPING and reduces the first delivery group by 100%, offering free shipping.
Anchor to Update your app's access scopesUpdate your app's access scopes
You must request the write_discounts access scope to give your app the permissions that it needs to create and update discounts.
In shopify.app.toml, located in the root of your app, add the write_discounts scope to the access_scopes array.
Anchor to Start your app to preview changesStart your app to preview changes
-
Save your updated configuration TOML file.
-
Start
app devif it's not already running:Terminal
shopify app devThe configuration TOML file changes will be applied automatically on the development store.
The app dev command automatically watches files that match the build.watch glob pattern. When it detects a change, it builds your Function and updates the Function extension's draft so that you can preview changes immediately.
The app dev command automatically watches files that match the build.watch glob pattern. When it detects a change, it builds your Function and updates the Function extension's draft so that you can preview changes immediately.
Anchor to Create a discount in your storeCreate a discount in your store
In this step, you'll use GraphiQL, an in-browser tool for testing GraphQL, to create a discount that applies a line-item price adjustment, an order-wide percentage discount, and free shipping. Then you'll link this discount to the Function that you created. GraphiQL is an in-browser tool for writing, validating, and testing GraphQL queries.
You can also build a discount interface using admin UI extensions and configure your Functions using Metafields.
You can also build a discount interface using admin UI extensions and configure your Functions using Metafields.
Anchor to Open the GraphiQL interface for the Shopify Admin APIOpen the Graphi
- Open the GraphiQL interface by pressing
gin the terminal window where you started your app. - On the GraphiQL interface, for API Version, select the latest stable release.
Anchor to Get the handle of your FunctionGet the handle of your Function
-
Use your function handle in GraphQL mutations instead of querying for the function ID.
Your function handle is defined in
shopify.extension.tomlashandle:shopify.extension.toml
[[extensions]]name = "discount-function"handle = "discount-function-rs"type = "function"uid = "3d664979-ccd6-e9dd-4497-41289ece62373715032a"NoteIf you're upgrading to API version 2025-10 or later, you no longer need to query for function IDs. Use your stable function handle instead, which remains consistent across environments.
Note:If you're upgrading to API version 2025-10 or later, you no longer need to query for function IDs. Use your stable function handle instead, which remains consistent across environments.
Anchor to Create the discountCreate the discount
To create a discount in your store, use the discountAutomaticAppCreate mutation.
- For
functionHandle, provide the Function handle from the previous step. - Add the
discountClassesfield to your mutation based on the business requirements.
You should receive a GraphQL response that includes the ID of the created discount.
If the response includes any userErrors, then review them, check that your mutation and functionHandle are correct, and try the request again.
Troubleshooting
If you receive a Could not find Function error, then confirm the following:
shopify app devis running.- The function handle is correct.
- Your app has the
write_discountsaccess scope.
Anchor to Test the Discount FunctionTest the Discount Function
Anchor to View your discountView your discount
In your Shopify admin, go to Discounts. You should now see the Cart line, Order, and Shipping discount that you created.
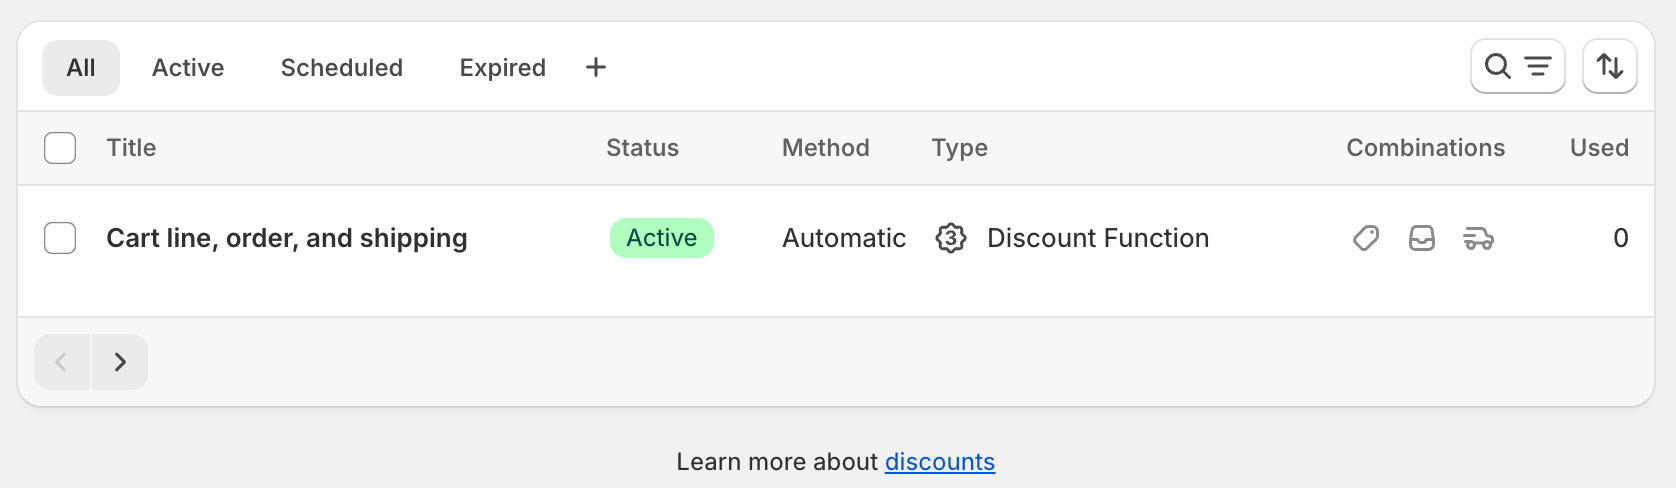
Anchor to Deactivate other discountsDeactivate other discounts
Deactivate or delete all other discounts, to ensure that the Cart line, Order, and Shipping discount is the only active discount.
Anchor to Build a cartBuild a cart
Open your dev store and build a cart with a single item in it.
Anchor to Validate discount applicationValidate discount application
On the cart page, you should see that your Discount Function has applied a discount to a cart line and the order subtotal. Once you navigate to the checkout page and fill in your shipping address, you will see the discounts applied to the shipping rates.
Anchor to Review the Function executionReview the Function execution
-
In the terminal where
shopify app devis running, review your Function executions.When testing Functions on development stores, the
devoutput shows Function executions, debug logs you've added, and a link to a local file containing full execution details. -
In a new terminal window, use the Shopify CLI command
app function replayto replay a Function execution locally. This lets you debug your Function without triggering it again on Shopify.Terminal
shopify app function replay -
Select the Function execution from the top of the list. Press
qto quit when you are finished debugging.
Anchor to Deploy your appDeploy your app
When you're ready to release your changes to users, you can create and release an app version. An app version is a snapshot of your app configuration and all extensions.
-
Navigate to your app directory.
-
Run the following command.
Optionally, you can provide a name or message for the version using the
--versionand--messageflags.Terminal
shopify app deploy
Releasing an app version replaces the current active version that's served to stores that have your app installed. It might take several minutes for app users to be upgraded to the new version.
If you want to create a version, but avoid releasing it to users, then run the deploy command with a --no-release flag.
You can release the unreleased app version using Shopify CLI's release command, or through the Dev Dashboard.
If you want to create a version, but avoid releasing it to users, then run the deploy command with a --no-release flag.
You can release the unreleased app version using Shopify CLI's release command, or through the Dev Dashboard.
Anchor to Tutorial complete!Tutorial complete!
You've successfully created a discount function using Shopify Functions. You can now use this Function to apply discounts targeting cart lines, order subtotals, and shipping rates.Anchor to Next StepsNext Steps
Add configuration to your discounts experience using metafields and build a user interface for your Function.Add network access to your discount Function
Learn how to add network access to your discount Function to query an external system for discount code validation.Learn more about discount code rejections
Learn how to build a Discount Function that rejects invalid discount codes and displays custom error messages.Review the UX guidelines
Review the UX guidelines to learn how to implement discounts in user interfaces.Learn more about deploying app versions
Learn more about deploying app versions to Shopify