Localize a checkout UI extension
Checkout UI extensions that render on the information and shipping and payment steps in checkout are available only to stores on a Shopify Plus plan.
Checkout UI extensions that render on the information and shipping and payment steps in checkout are available only to stores on a Shopify Plus plan.
In this tutorial, you'll use JavaScript API functions to localize a Preact-based checkout UI extension that displays a customer's loyalty point balance. You'll localize the extension text, the number format of the loyalty points balance, and the monetary value of the points. You'll also provide translations for singular and plural values. You can use what you learn here to localize other extensions.
Anchor to What you'll learnWhat you'll learn
In this tutorial, you'll learn how to do the following tasks:
-
Create a checkout UI extension that renders some text in the checkout flow with some basic localization.
-
Run the extension locally and test it on a dev store.
-
Define translation data and localize the following elements:
- Numbers using a
formatNumberfunction similar to theIntlobject - Currency using a
formatCurrencyIntlobject - Singular and plural values
- Numbers using a
-
Deploy your extension code to Shopify.
Requirements
-
You're a user with app development permissions.
-
You've created a new development store with test data generated by Shopify.
-
You've created an app that uses Shopify CLI 3.85.1 or higher.
-
You're familiar with how localization works for checkout UI extensions.
-
You've added and published a second language to your dev store.
-
You've activated the language in your dev store's primary market.
Project
Anchor to Create a UI extensionCreate a UI extension
If you already have a checkout UI extension that you want to localize, then you can skip to step 2.
If you already have a checkout UI extension that you want to localize, then you can skip to step 2.
To create a checkout UI extension, you can use Shopify CLI, which generates starter code for building your extension and automates common development tasks.
-
Navigate to your app directory:
Terminal
cd <directory> -
Run the following command to create a new checkout UI extension:
Terminal
shopify app generate extension --template checkout_ui --name my-checkout-ui-extension -
Select
Checkout UI.You should now have a new extension directory in your app's directory. The extension directory includes the extension script at
src/Checkout.jsx. The following is an example directory structure:Checkout UI extension file structure
└── my-app└── extensions└── my-checkout-ui-extension├── src│ └── Checkout.jsx OR Checkout.js // The index page of the checkout UI extension├── locales│ ├── en.default.json // The default locale for the checkout UI extension│ └── fr.json // The locale file for non-regional French translations├── shopify.extension.toml // The config file for the checkout UI extension└── package.json -
Start your development server to build and preview your app:
Terminal
shopify app devRead more about the processes that are executed when you run
app dev. -
Press
pto open the Dev Console. -
In the extension list for your app, click on the preview link for your extension.
Anchor to Define translationsDefine translations
To define translations, you'll adjust the [locale].json files in the extensions/<name-of-checkout-ui-extension>/locales folder within your app.
In this tutorial, you'll keep French (fr, non-regional) as an available locale. However, you can also create translations for additional locales.
In this tutorial, you'll keep French (fr, non-regional) as an available locale. However, you can also create translations for additional locales.
Anchor to Set the default localeSet the default locale
Your default locale specifies which locale Shopify should use when no other appropriate locale can be matched. In this example, English (en) is already the default locale. However, you can set any locale to be your default locale.
To change your default locale, go to the locales folder and change the [locale].json filename to [locale].default.json.
Anchor to Add translation strings for ,[object Object]Add translation strings for en.default.json
en.default.jsonAdd the translation strings we need to support English translations, including the zero, one, and other plural rules.
You can specify any pluralization key that Intl.PluralRules.select() supports and that's appropriate for the locale.
In subsequent steps, you'll use these keys to translate balance and points.
Anchor to Add translation strings for ,[object Object]Add translation strings for fr.json
fr.jsonNow add the translation strings we need to support French translations, many, one and other plural rules.
Similar to English, you can specify any pluralization key that Intl.PluralRules.select() supports and that's appropriate for the locale.
Anchor to LocalizeLocalize
Anchor to Localize the currencyLocalize the currency
Now that you've defined translations, you'll learn how to localize currency.
You'll add the formatCurrency function provided by i18n. The function wraps the standard Intl object.
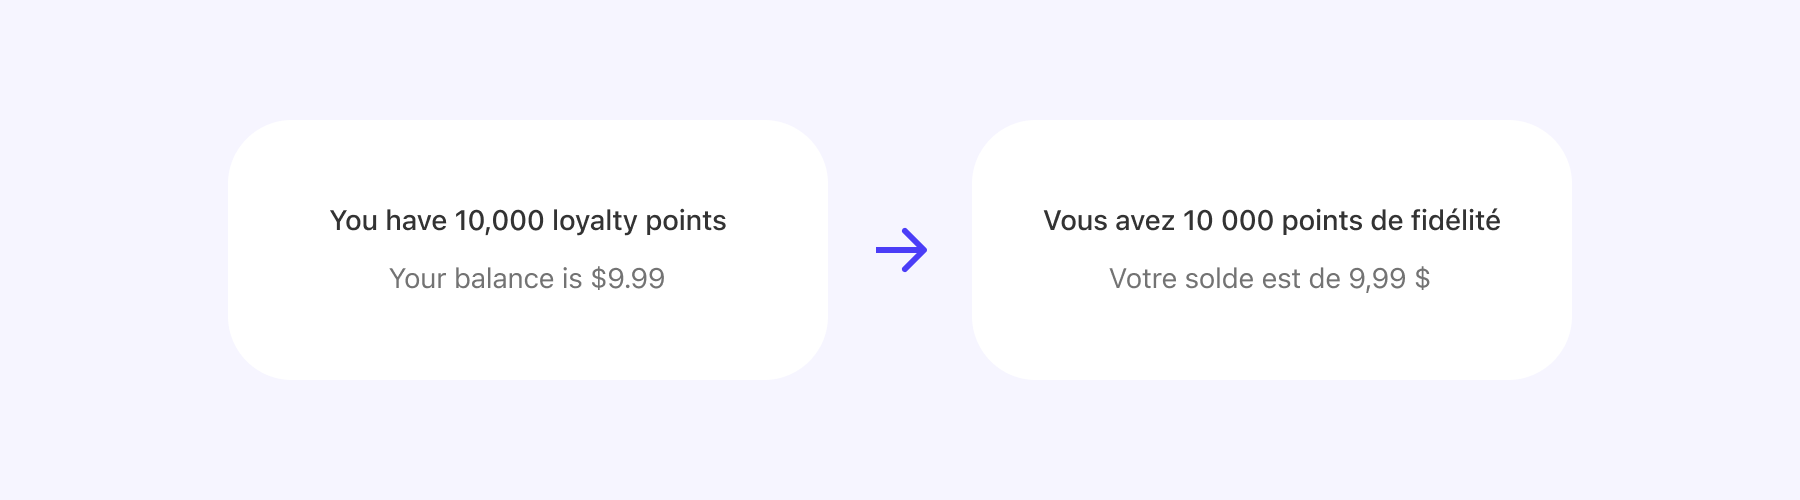
Depending on the current locale, 9.99 will now resolve to the following localized currency formats:
-
en:$9.99 -
fr:9,99
Anchor to Localize numbersLocalize numbers
You'll localize number formatting using the formatNumber function provided by i18n. The function wraps the standard Intl object.
Depending on the current locale, 10000 will resolve to one of the following localized number formats:
-
en:10,000 -
fr:10 000
Anchor to Translate the balance remaining messageTranslate the balance remaining message
You'll also call the translate function, which sends the formattedBalance variable so that it can be used in the translation string.
Anchor to Translate the loyalty points message with plural valuesTranslate the loyalty points message with plural values
You'll use the translate function to pass in the count of how many points are available. You'll use formattedPoints to render the points in the current locale.
When working with translation keys with pluralization, you must provide the count property. This allows the translate function to determine which pluralization to use, according to Intl Pluralization Rules.
When working with translation keys with pluralization, you must provide the count property. This allows the translate function to determine which pluralization to use, according to Intl Pluralization Rules.
Anchor to Preview the extensionPreview the extension
Preview your extension to make sure that it works as expected.
Anchor to Start your serverStart your server
Run the Shopify CLI dev command to build your app and preview it on your development store.
-
In a terminal, navigate to your app directory.
-
Either start or restart your server to build and preview your app:
Terminal
shopify app dev -
Press
pto open the Dev Console. -
In the extension list for your app, click on the preview link for the custom header extension.
The checkout opens.
This section describes how to solve some potential errors when you run dev for an app that contains a checkout UI extension.
Anchor to Property token errorProperty token error
If you receive the error ShopifyCLI:AdminAPI requires the property token to be set, then you'll need to use the --checkout-cart-url flag to direct Shopify CLI to open a checkout session for you.
Terminal
Anchor to Missing checkout linkMissing checkout link
If you don't receive the test checkout URL when you run dev, then verify the following:
-
You have a development store populated with products.
-
You're logged in to the correct Partners organization and development store. To verify, check your app info using the following command:
Terminal
shopify app info
Otherwise, you can manually create a checkout with the following steps:
-
From your development store's storefront, add some products to your cart.
-
From the cart, click Checkout.
-
From directory of the app that contains your extension, run
devto preview your app:Terminal
shopify app dev -
On the checkout page for your store, change the URL by appending the
?dev=https://{tunnel_url}/extensionsquery string and reload the page. Thetunnel_urlparameter allows your app to be accessed using a unique HTTPS URL.You should now see a rendered order note that corresponds to the code in your project template.
Anchor to Test the extension functionalityTest the extension functionality
The checkout UI extension should now render localized checkout content for en and fr:
To test the extension, preview the language from your dev store admin.
Anchor to Deploy the UI extensionDeploy the UI extension
When you're ready to release your changes to users, you can create and release an app version. An app version is a snapshot of your app configuration and all extensions.
You can have up to 50 checkout UI extensions in an app version.
-
Navigate to your app directory.
-
Run the following command.
Optionally, you can provide a name or message for the version using the
--versionand--messageflags.Terminal
shopify app deploy
Releasing an app version replaces the current active version that's served to stores that have your app installed. It might take several minutes for app users to be upgraded to the new version.
If you want to create a version, but avoid releasing it to users, then run the deploy command with a --no-release flag.
You can release the unreleased app version using Shopify CLI's release command, or through the Dev Dashboard.
If you want to create a version, but avoid releasing it to users, then run the deploy command with a --no-release flag.
You can release the unreleased app version using Shopify CLI's release command, or through the Dev Dashboard.