Build the delivery options function
With Shopify Functions, you can customize delivery options. This allows you to hide, reorder, or rename the delivery options available to buyers at checkout. This tutorial demonstrates how to use Functions to rename a checkout delivery option based on shipping destination.
Anchor to What you'll learnWhat you'll learn
In this tutorial, you'll learn how to do the following tasks:
- Generate starter code for Shopify Functions.
- Use GraphQL to define the input of your function.
- Deploy functions to the Shopify platform.
- Review logs for your function.
Anchor to RequirementsRequirements
- You're a user with app development permissions.
- You've created a development store.
- You've created an app using Shopify CLI. If you previously installed Shopify CLI, then make sure that you're using the latest version. If you plan to create a UI for your extension, then start with the React Router app template.
- You've installed Node.js 16 or higher.
- You've installed your app on the development store.
- You're using API version 2025-07 or higher for your function.
Anchor to Rust-specific requirementsRust-specific requirements
The following requirements are specific to Rust-based development with Shopify Functions.
-
You've installed Rust.
On Windows, Rust requires the Microsoft C++ Build Tools. Make sure to select the Desktop development with C++ workload when installing the tools.
-
You've installed the
wasm32-unknown-unknowntarget:Terminal
rustup target add wasm32-unknown-unknown
Anchor to LimitationsLimitations
- In the Delivery Customization API, the carrier name is automatically prepended to the shipping method title at checkout when using the
DeliveryOptionRenameOperationobject, and can't be altered or omitted through the API. For example, if the carrier name isUPSand the method isStandard, you could changeUPS StandardtoUPS Standard Shipping, but you couldn't changeUPS StandardtoStandard Shipping.
Anchor to Sample codeSample code
If you want to quickly get started, then you can get the sample code by completing the following steps. This tutorial describes the sample code step by step.
-
Clone the delivery customizations sample app:
Terminal
shopify app init --template https://github.com/Shopify/function-examples/sample-apps/delivery-customizationsNoteYou can view the source code for the delivery customizations sample app in GitHub.
Note:You can view the source code for the delivery customizations sample app in GitHub.
-
Enter a name for your app project.
-
Navigate to your app directory:
Terminal
- Link your app configuration:
Terminal
- Start a local server for your app:
Terminal
-
With the server running, open the Preview URL in the terminal output.
When you open the URL, you're prompted to install the app on your development store.
-
Click Install app to install the app on the store.
Anchor to Step 1: Create the delivery customization functionStep 1: Create the delivery customization function
To create your delivery customization function, you can use Shopify CLI to generate a starter function, specify the inputs for your function using an input query, and implement your function logic using JavaScript or Rust.
-
Navigate to your app directory:
Terminal
cd <directory> -
Run the following command to create a new delivery customization extension:
Terminal
shopify app generate extension --template delivery_customization --name delivery-customization
-
Choose the language that you want to use. For this tutorial, you should select either Rust or JavaScript.
Shopify defaults to Rust as the most performant and recommended language choice to stay within the platform limits. For more information, refer to language considerations.
Terminal
? What would you like to work in?> (1) Rust(2) JavaScript(3) TypeScript(4) Wasm
-
Navigate to
extensions/delivery-customization:Terminal
cd extensions/delivery-customization -
Replace the contents of
src/run.graphqlfile with the following code:run.graphqldefines the input for the function. You need the cart delivery groups, with the delivery state/province code and available delivery options.NoteCheckouts and orders can include multiple delivery methods, such as shipping and pickup in the same order. When your app uses delivery or fulfillment data, iterate over all delivery groups or fulfillment orders to determine the delivery method for each one. Don't assume one method for the order. For more information, refer to split carts in checkout.
Note:Checkouts and orders can include multiple delivery methods, such as shipping and pickup in the same order. When your app uses delivery or fulfillment data, iterate over all delivery groups or fulfillment orders to determine the delivery method for each one. Don't assume one method for the order. For more information, refer to split carts in checkout.
The query differs slightly in Rust and JavaScript because of code generation requirements.
run.graphql
src/run.graphql
query Input {cart {deliveryGroups {deliveryAddress {provinceCode}deliveryOptions {handletitle}}}}query RunInput {cart {deliveryGroups {deliveryAddress {provinceCode}deliveryOptions {handletitle}}}}Rust input query
query Input {
  cart {
    deliveryGroups {
      deliveryAddress {
        provinceCode
      }
      deliveryOptions {
        handle
        title
      }
    }
  }
}
JavaScript input query
query RunInput { cart { deliveryGroups { deliveryAddress { provinceCode } deliveryOptions { handle title } } } } -
If you're using JavaScript, then run the following command to regenerate types based on your input query:
Terminal
shopify app function typegen -
Replace the
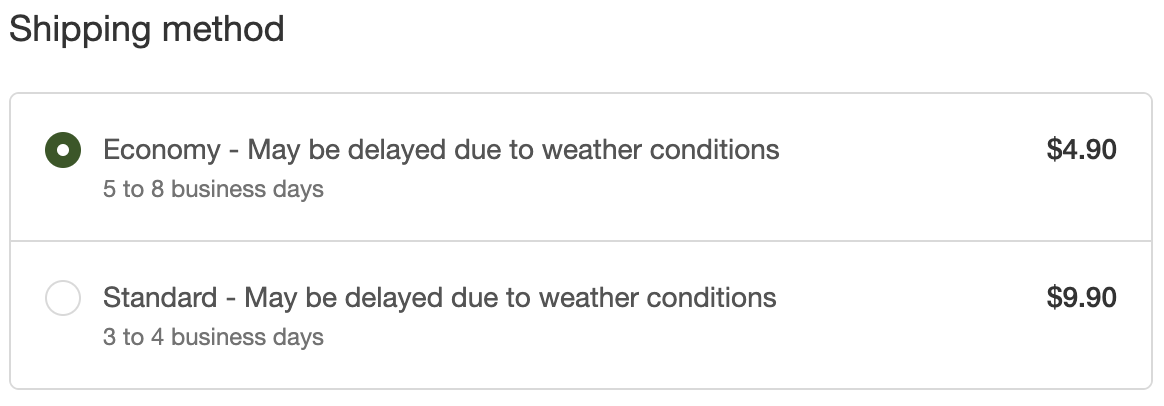
src/run.rsorsrc/run.jsfile with the following code:This function logic appends a message to all delivery options if the shipping address state or province code is
NC. You can adjust this to the state or province of your choice.File
src/run.rs
use super::schema;use shopify_function::prelude::*;use shopify_function::Result;fn run(input: schema::run::Input) -> Result<schema::CartDeliveryOptionsTransformRunResult> {let message = "May be delayed due to weather conditions";let operations = input.cart().delivery_groups().iter().filter_map(|group| {if let Some(address) = group.delivery_address() {if address.province_code() == Some(&"NC".to_string()) {return Some(group.delivery_options().iter().map(|option| {schema::Operation::Rename(schema::DeliveryOptionRenameOperation {delivery_option_handle: option.handle().to_string(),title: match option.title() {Some(title) => format!("{} - {}", title, message),None => message.to_string(),},})}).collect::<Vec<_>>(),);}}None}).flatten().collect();Ok(schema::FunctionRunResult { operations })}// @ts-check// Use JSDoc annotations for type safety/*** @typedef {import("../generated/api").RunInput} RunInput* @typedef {import("../generated/api").CartDeliveryOptionsTransformRunResult} CartDeliveryOptionsTransformRunResult* @typedef {import("../generated/api").Operation} Operation*/// The configured entrypoint for the 'cart.delivery-options.transform.run' extension target/*** @param {RunInput} input* @returns {CartDeliveryOptionsTransformRunResult}*/export function run(input) {// The message to be added to the delivery optionconst message = "May be delayed due to weather conditions";let toRename = input.cart.deliveryGroups// Filter for delivery groups with a shipping address containing the affected state or province.filter(group => group.deliveryAddress?.provinceCode &&group.deliveryAddress.provinceCode == "NC")// Collect the delivery options from these groups.flatMap(group => group.deliveryOptions)// Construct a rename operation for each, adding the message to the option title.map(option => /** @type {Operation} */({deliveryOptionRename: {deliveryOptionHandle: option.handle,title: option.title ? `${option.title} - ${message}` : message}}));return {operations: toRename};};Rust
use super::schema;
use shopify_function::prelude::*;
use shopify_function::Result;

#[shopify_function]
fn run(input: schema::run::Input) -> Result<schema::CartDeliveryOptionsTransformRunResult> {
    let message = "May be delayed due to weather conditions";

    let operations = input
        .cart()
        .delivery_groups()
        .iter()
        .filter_map(|group| {
            if let Some(address) = group.delivery_address() {
                if address.province_code() == Some(&"NC".to_string()) {
                    return Some(
                        group.delivery_options().iter().map(|option| {
                            schema::Operation::Rename(schema::DeliveryOptionRenameOperation {
                                delivery_option_handle: option.handle().to_string(),
                                title: match option.title() {
                                    Some(title) => format!("{} - {}", title, message),
                                    None => message.to_string(),
                                },
                            })
                        })
                        .collect::<Vec<_>>(),
                    );
                }
            }
            None
        })
        .flatten()
        .collect();

    Ok(schema::FunctionRunResult { operations })
}
JavaScript
// @ts-check

// Use JSDoc annotations for type safety
/**
 * @typedef {import("../generated/api").RunInput} RunInput
 * @typedef {import("../generated/api").CartDeliveryOptionsTransformRunResult} CartDeliveryOptionsTransformRunResult
 * @typedef {import("../generated/api").Operation} Operation
 */

// The configured entrypoint for the 'cart.delivery-options.transform.run' extension target
/**
 * @param {RunInput} input
 * @returns {CartDeliveryOptionsTransformRunResult}
 */
export function run(input) {
    // The message to be added to the delivery option
    const message = "May be delayed due to weather conditions";

    let toRename = input.cart.deliveryGroups
      // Filter for delivery groups with a shipping address containing the affected state or province
      .filter(group => group.deliveryAddress?.provinceCode &&
        group.deliveryAddress.provinceCode == "NC")
      // Collect the delivery options from these groups
      .flatMap(group => group.deliveryOptions)
      // Construct a rename operation for each, adding the message to the option title
      .map(option => /** @type {Operation} */({
        deliveryOptionRename: {
          deliveryOptionHandle: option.handle,
          title: option.title ? `${option.title} - ${message}` : message
        }
      }));

    return {
      operations: toRename
    };
};
Anchor to Step 2: Preview the function on a dev storeStep 2: Preview the function on a dev store
To test your function, you need to make it available to your dev store.
- If you're developing a function in a language other than JavaScript or TypeScript, ensure you have configured
build.watchin your function extension configuration.
-
Navigate back to your app root:
Terminal
cd ../..
-
Use the Shopify CLI
devcommand to start the dev preview:Terminal
shopify app devYou can keep the preview running as you work on your function. When you make changes to a watched file, Shopify CLI rebuilds your function and updates the function extension's drafts, so you can immediately test your changes.
-
Follow the CLI prompts to preview your app on your development store.
Anchor to Step 3: Create the delivery customization with GraphiQLStep 3: Create the delivery customization with Graphi
To activate your function, you must create a delivery customization on the store where you installed your app. You can do this using the deliveryCustomizationCreate GraphQL mutation.
In subsequent tutorials, you'll use metafields on this delivery customization to configure your function, and create a user interface so merchants can configure the function themselves.
-
Open the GraphiQL interface by pressing
gin the terminal window where you started your app. -
In the GraphiQL app, in the API Version field, select the 2025-10 version.
-
Use your function handle in GraphQL mutations instead of querying for the function ID.
Your function handle is defined in
shopify.extension.tomlashandle:shopify.extension.toml
[[extensions]]name = "delivery-customization"handle = "function-handle"type = "function"uid = "3d664979-ccd6-e9dd-4497-41289ece62373715032a"NoteIf you're upgrading to API version 2025-10 or later, you no longer need to query for function IDs. Use your stable function handle instead, which remains consistent across environments.
Note:If you're upgrading to API version 2025-10 or later, you no longer need to query for function IDs. Use your stable function handle instead, which remains consistent across environments.
-
Execute the following mutation and replace
YOUR_FUNCTION_HANDLE_HEREwith the handle of your function:mutation.graphql
mutation {deliveryCustomizationCreate(deliveryCustomization: {functionHandle: "YOUR_FUNCTION_HANDLE_HERE"title: "Add message to delivery options for state/province"enabled: true}) {deliveryCustomization {id}userErrors {message}}}You should receive a GraphQL response that includes the ID of the created delivery customization. If the response includes any messages under
userErrors, then review the errors, check that your mutation andfunctionHandleare correct, and try the request again.TipIf you receive a
Could not find Functionerror, then confirm the following:shopify app devis running.- The function handle is correct.
Tip:If you receive a
Could not find Functionerror, then confirm the following:shopify app devis running.- The function handle is correct.
Anchor to Step 4: Test the delivery customizationStep 4: Test the delivery customization
- From the Shopify admin, go to Settings > Shipping and delivery.
- Check the Delivery customizations section. You should find the Add message to delivery options for state/province delivery customization that you created with GraphiQL.
- Open your development store, build a cart, and proceed to checkout.
- Enter a delivery address that doesn't use the specified state/province code. You shouldn't see any additional messaging on the delivery options.
- Change your shipping address to use your chosen state/province code. Your delivery options should now have the additional messaging.
-
Open your terminal where
shopify app devis running, and review your function executions.When testing functions on development stores, the output of
devincludes executions of your functions, any debug logging you have added to them, and a link to a local file with the full function execution details. -
In a new terminal window, use the Shopify CLI
app function replaycommand to replay a function execution locally, and debug your function without the need to re-trigger the function execution on Shopify.
Terminal
- Select the function execution from the top of the list. Press
qto quit when you are finished debugging.
Anchor to Next stepsNext steps
- Add configuration to your delivery customization using metafields.