Build the UI for the delivery customization function
Merchants create and manage delivery customizations in the Shopify admin. Shopify uses URLs that you configure to render the delivery customization creation and editing experience for the merchant. You can customize this UI for your function's configuration needs, or to meet other requirements of your app.
Anchor to What you'll learnWhat you'll learn
In this tutorial, you'll learn how to do the following tasks:
- Create an App Bridge UI that enables users to create a function owner.
- Configure the UI paths for your function.
Anchor to RequirementsRequirements
- You've completed the Add configuration to your delivery customization tutorial.
- You created your app with the React Router app template.
Anchor to Step 1: Create the frontend UI for your functionStep 1: Create the frontend UI for your function
The following example builds a React-based page that enables merchants to create and configure a new delivery customization. The code renders a frontend page in your app and uses the GraphQL Admin API to create a delivery customization.
-
In
app/routes, create a new file namedapp.delivery-customization.$functionId.$id.jsx.The Shopify React Router app template uses file-based routing, so the file name determines the page's URL. The
$prefix indicatesfunctionIdandidare dynamic segments. The path for this page is/app/delivery-customization/{functionId}/{id}. -
Add the following code in
app.delivery-customization.$functionId.$id.jsx:- The
loaderfunction handles fetching the data to populate the form and is used when this page has anidvalue that is notnew. - The
actionfunction handles submitting the form data to Shopify to create the delivery customization. - The
DeliveryCustomizationfunction renders the page and form components using Polaris web components and React Router hooks.
app/routes/app.delivery-customization.$functionId.$id.jsx
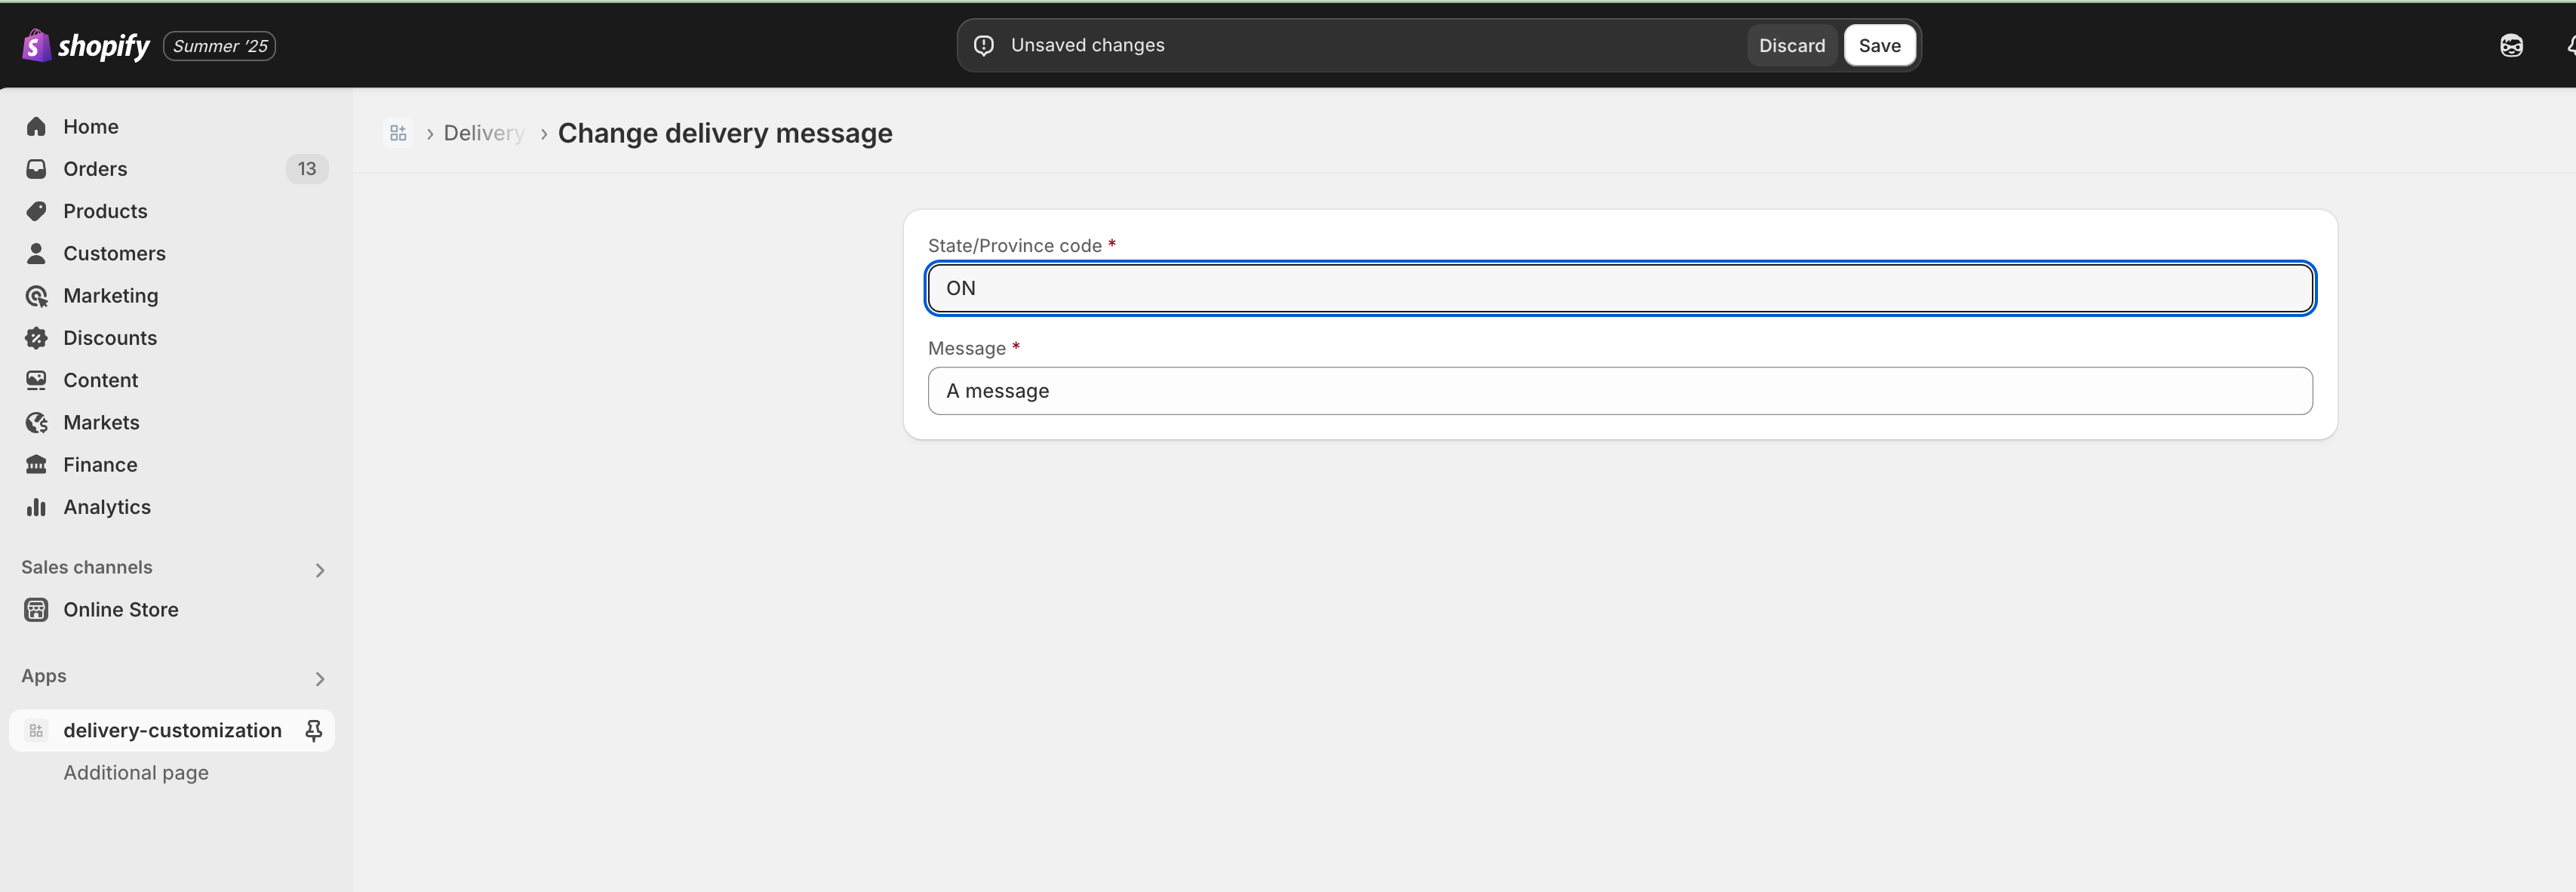
import { useState, useEffect } from "react";import type { FormEvent } from "react";import {useActionData,useNavigation,useSubmit,useLoaderData,} from "react-router";import type { LoaderFunctionArgs, ActionFunctionArgs } from "react-router";import { authenticate } from "../shopify.server";interface LoaderData {headers: { "Content-Type": string };body: string;}interface ActionData {errors: Array<{ message: string }>;}interface DeliveryCustomizationData {stateProvinceCode: string;message: string;}export const loader = async ({ params, request }: LoaderFunctionArgs): Promise<LoaderData> => {const { id } = params;const { admin } = await authenticate.admin(request);if (id !== "new") {const gid = `gid://shopify/DeliveryCustomization/${id}`;const response = await admin.graphql(`#graphqlquery getDeliveryCustomization($id: ID!) {deliveryCustomization(id: $id) {idtitleenabledmetafield(namespace: "$app:delivery-customization", key: "function-configuration") {idvalue}}}`,{variables: {id: gid,},});const responseJson = await response.json();const deliveryCustomization = responseJson.data.deliveryCustomization;const metafieldValue = JSON.parse(deliveryCustomization.metafield.value);return {headers: { "Content-Type": "application/json" },body: JSON.stringify({stateProvinceCode: metafieldValue.stateProvinceCode,message: metafieldValue.message,}),};}return {headers: { "Content-Type": "application/json" },body: JSON.stringify({stateProvinceCode: "",message: "",}),};};export const action = async ({ params, request }: ActionFunctionArgs): Promise<ActionData> => {const { functionId, id } = params;const { admin } = await authenticate.admin(request);const formData = await request.formData();const stateProvinceCode = formData.get("stateProvinceCode") as string;const message = formData.get("message") as string;const deliveryCustomizationInput = {functionId,title: `Change ${stateProvinceCode} delivery message`,enabled: true,metafields: [{namespace: "$app:delivery-customization",key: "function-configuration",type: "json",value: JSON.stringify({stateProvinceCode,message,}),},],};if (id !== "new") {const response = await admin.graphql(`#graphqlmutation updateDeliveryCustomization($id: ID!, $input: DeliveryCustomizationInput!) {deliveryCustomizationUpdate(id: $id, deliveryCustomization: $input) {deliveryCustomization {id}userErrors {message}}}`,{variables: {id: `gid://shopify/DeliveryCustomization/${id}`,input: deliveryCustomizationInput,},});const responseJson = await response.json();const errors = responseJson.data.deliveryCustomizationUpdate?.userErrors;return { errors };} else {const response = await admin.graphql(`#graphqlmutation createDeliveryCustomization($input: DeliveryCustomizationInput!) {deliveryCustomizationCreate(deliveryCustomization: $input) {deliveryCustomization {id}userErrors {message}}}`,{variables: {input: deliveryCustomizationInput,},});const responseJson = await response.json();const errors = responseJson.data.deliveryCustomizationCreate?.userErrors;return { errors };}};export default function DeliveryCustomization() {const submit = useSubmit();const actionData = useActionData<ActionData>();const navigation = useNavigation();const loaderData = useLoaderData<LoaderData>();const parsedLoaderData: DeliveryCustomizationData = loaderData?.body? JSON.parse(loaderData.body): { stateProvinceCode: "", message: "" };const [stateProvinceCode, setStateProvinceCode] = useState(parsedLoaderData.stateProvinceCode);const [message, setMessage] = useState(parsedLoaderData.message);useEffect(() => {if (loaderData?.body) {const parsedData: DeliveryCustomizationData = JSON.parse(loaderData.body);setStateProvinceCode(parsedData.stateProvinceCode || "");setMessage(parsedData.message || "");}}, [loaderData]);const isLoading = navigation.state === "submitting";useEffect(() => {if (actionData?.errors.length === 0) {open('shopify:admin/settings/shipping/customizations', '_top')}}, [actionData?.errors]);const errorBanner = actionData?.errors.length ? (<s-banner tone="critical" heading="There was an error creating the customization."><ul>{actionData?.errors.map((error, index) => (<li key={index}>{error.message}</li>))}</ul></s-banner>) : null;const handleSubmit = (event: FormEvent<HTMLFormElement>) => {event.preventDefault();submit({ stateProvinceCode, message }, { method: "post" });};const handleReset = () => {setStateProvinceCode(parsedLoaderData.stateProvinceCode);setMessage(parsedLoaderData.message);};return (<form data-save-bar onSubmit={handleSubmit} onReset={handleReset}><s-page title="Change delivery message"><button variant="breadcrumb" href="shopify:admin/settings/shipping/customizations">Delivery customizations</button>{errorBanner}<s-section><s-grid gap="base"><s-text-fieldname="stateProvinceCode"type="text"label="State/Province code"value={stateProvinceCode}requireddisabled={isLoading}onInput={(e: any) => setStateProvinceCode((e.target as HTMLInputElement).value)}></s-text-field><s-text-fieldname="message"type="text"label="Message"value={message}requireddisabled={isLoading}onInput={(e: any) => setMessage((e.target as HTMLInputElement).value)}></s-text-field></s-grid></s-section></s-page></form>);} - The
Anchor to Step 2: Update your input query to use an app-owned namespaceStep 2: Update your input query to use an app-owned namespace
In the previous tutorial, you used a metafield namespace that was accessible to any app, so that the metafield namespace could be populated using GraphiQL. To make your function ready for production, you should update the metafield namespace to use a reserved prefix so that other apps can't use your metafield.
Replace the code in the extensions/delivery-customization/src/run.graphql file with the following code. The query differs slightly in Rust and JavaScript due to code generation requirements.
Checkouts and orders can include multiple delivery methods, such as shipping and pickup in the same order. When your app uses delivery or fulfillment data, iterate over all delivery groups or fulfillment orders to determine the delivery method for each one. Don't assume one method for the order. For more information, refer to split carts in checkout.
Checkouts and orders can include multiple delivery methods, such as shipping and pickup in the same order. When your app uses delivery or fulfillment data, iterate over all delivery groups or fulfillment orders to determine the delivery method for each one. Don't assume one method for the order. For more information, refer to split carts in checkout.
run.graphql
src/run.graphql
JavaScript input query
query RunInput {
  cart {
    deliveryGroups {
      deliveryAddress {
        provinceCode
      }
      deliveryOptions {
        handle
        title
      }
    }
  }
  deliveryCustomization {
    metafield(namespace: "$app:delivery-customization", key: "function-configuration") {
      value
    }
  }
}
Rust input query
query Input {
  cart {
    deliveryGroups {
      deliveryAddress {
        provinceCode
      }
      deliveryOptions {
        handle
        title
      }
    }
  }
  deliveryCustomization {
    metafield(namespace: "$app:delivery-customization", key: "function-configuration") {
      value
    }
  }
}
Anchor to Step 3: Configure the create UI path for your functionStep 3: Configure the create UI path for your function
In shopify.extension.toml, define the URLs that users will access to create and edit delivery customizations using your function. Shopify automatically fills in any dynamic tokens in these URLs.
In extensions/delivery-customization/shopify.extension.toml, populate the two settings directly under [ui.paths]. This change is automatically reflected as long as you're running dev.
extensions/delivery-customization/shopify.extension.toml
Anchor to Step 4: Update your app access scopesStep 4: Update your app access scopes
You must request the write_delivery_customizations access scope to invoke delivery customization mutations in the Admin API.
-
In
shopify.app.tomlin the root of your app, add thewrite_delivery_customizationsscope.shopify.app.toml
# This file stores configurations for your Shopify app.scopes = "write_products, write_delivery_customizations" -
Save your configuration file. If
app devis running, the scope changes will be applied automatically. If not, start the command:Terminal
shopify app dev
Anchor to Step 5: Create and test your delivery customizationStep 5: Create and test your delivery customization
- From the Shopify admin, go to Settings > Shipping and delivery.
- Under the Delivery customizations section, click Manage.
- If you have existing customizations from previous tutorials, then click the checkbox next to each of them, and then click Deactivate.
- Click Add a customization and then click delivery-customization by {your app}.
- Fill in the delivery customization form, then click Save.
- Open your development store, build a cart, and proceed to checkout.
- Enter a delivery address that doesn't use the specified state/province code. You shouldn't see any additional messaging on the delivery options.
- Change your shipping address to use your chosen state/province code. Your delivery options should now have the additional messaging.
-
Open your terminal where
shopify app devis running, and review your function executions.When testing functions on development stores, the output of
devincludes executions of your functions, any debug logging you have added to them, and a link to a local file with the full function execution details. -
In a new terminal window, use the Shopify CLI
app function replaycommand to replay a function execution locally, and debug your function without the need to re-trigger the function execution on Shopify.
Terminal
- Select the function execution from the top of the list. Press
qto quit when you are finished debugging.
Anchor to Deploy your appDeploy your app
When you're ready to release your changes to users, you can create and release an app version. An app version is a snapshot of your app configuration and all extensions.
-
Navigate to your app directory.
-
Run the following command.
Optionally, you can provide a name or message for the version using the
--versionand--messageflags.Terminal
shopify app deploy
Releasing an app version replaces the current active version that's served to stores that have your app installed. It might take several minutes for app users to be upgraded to the new version.
If you want to create a version, but avoid releasing it to users, then run the deploy command with a --no-release flag.
You can release the unreleased app version using Shopify CLI's release command, or through the Dev Dashboard.
If you want to create a version, but avoid releasing it to users, then run the deploy command with a --no-release flag.
You can release the unreleased app version using Shopify CLI's release command, or through the Dev Dashboard.
Anchor to Next stepsNext steps
- Learn more about how Shopify Functions work and the benefits of using Shopify Functions.
- Consult the API references for Shopify Functions.
- Learn how to use variables in your input query.
- Review the UX guidelines to learn how to implement delivery customizations in user interfaces.