Use extensions to surface app actions
By declaring and defining your app's actions in an app extension, Sidekick can take the merchant to the right page in your app to perform a rich action.
Anchor to Example: Edit email contentExample: Edit email content
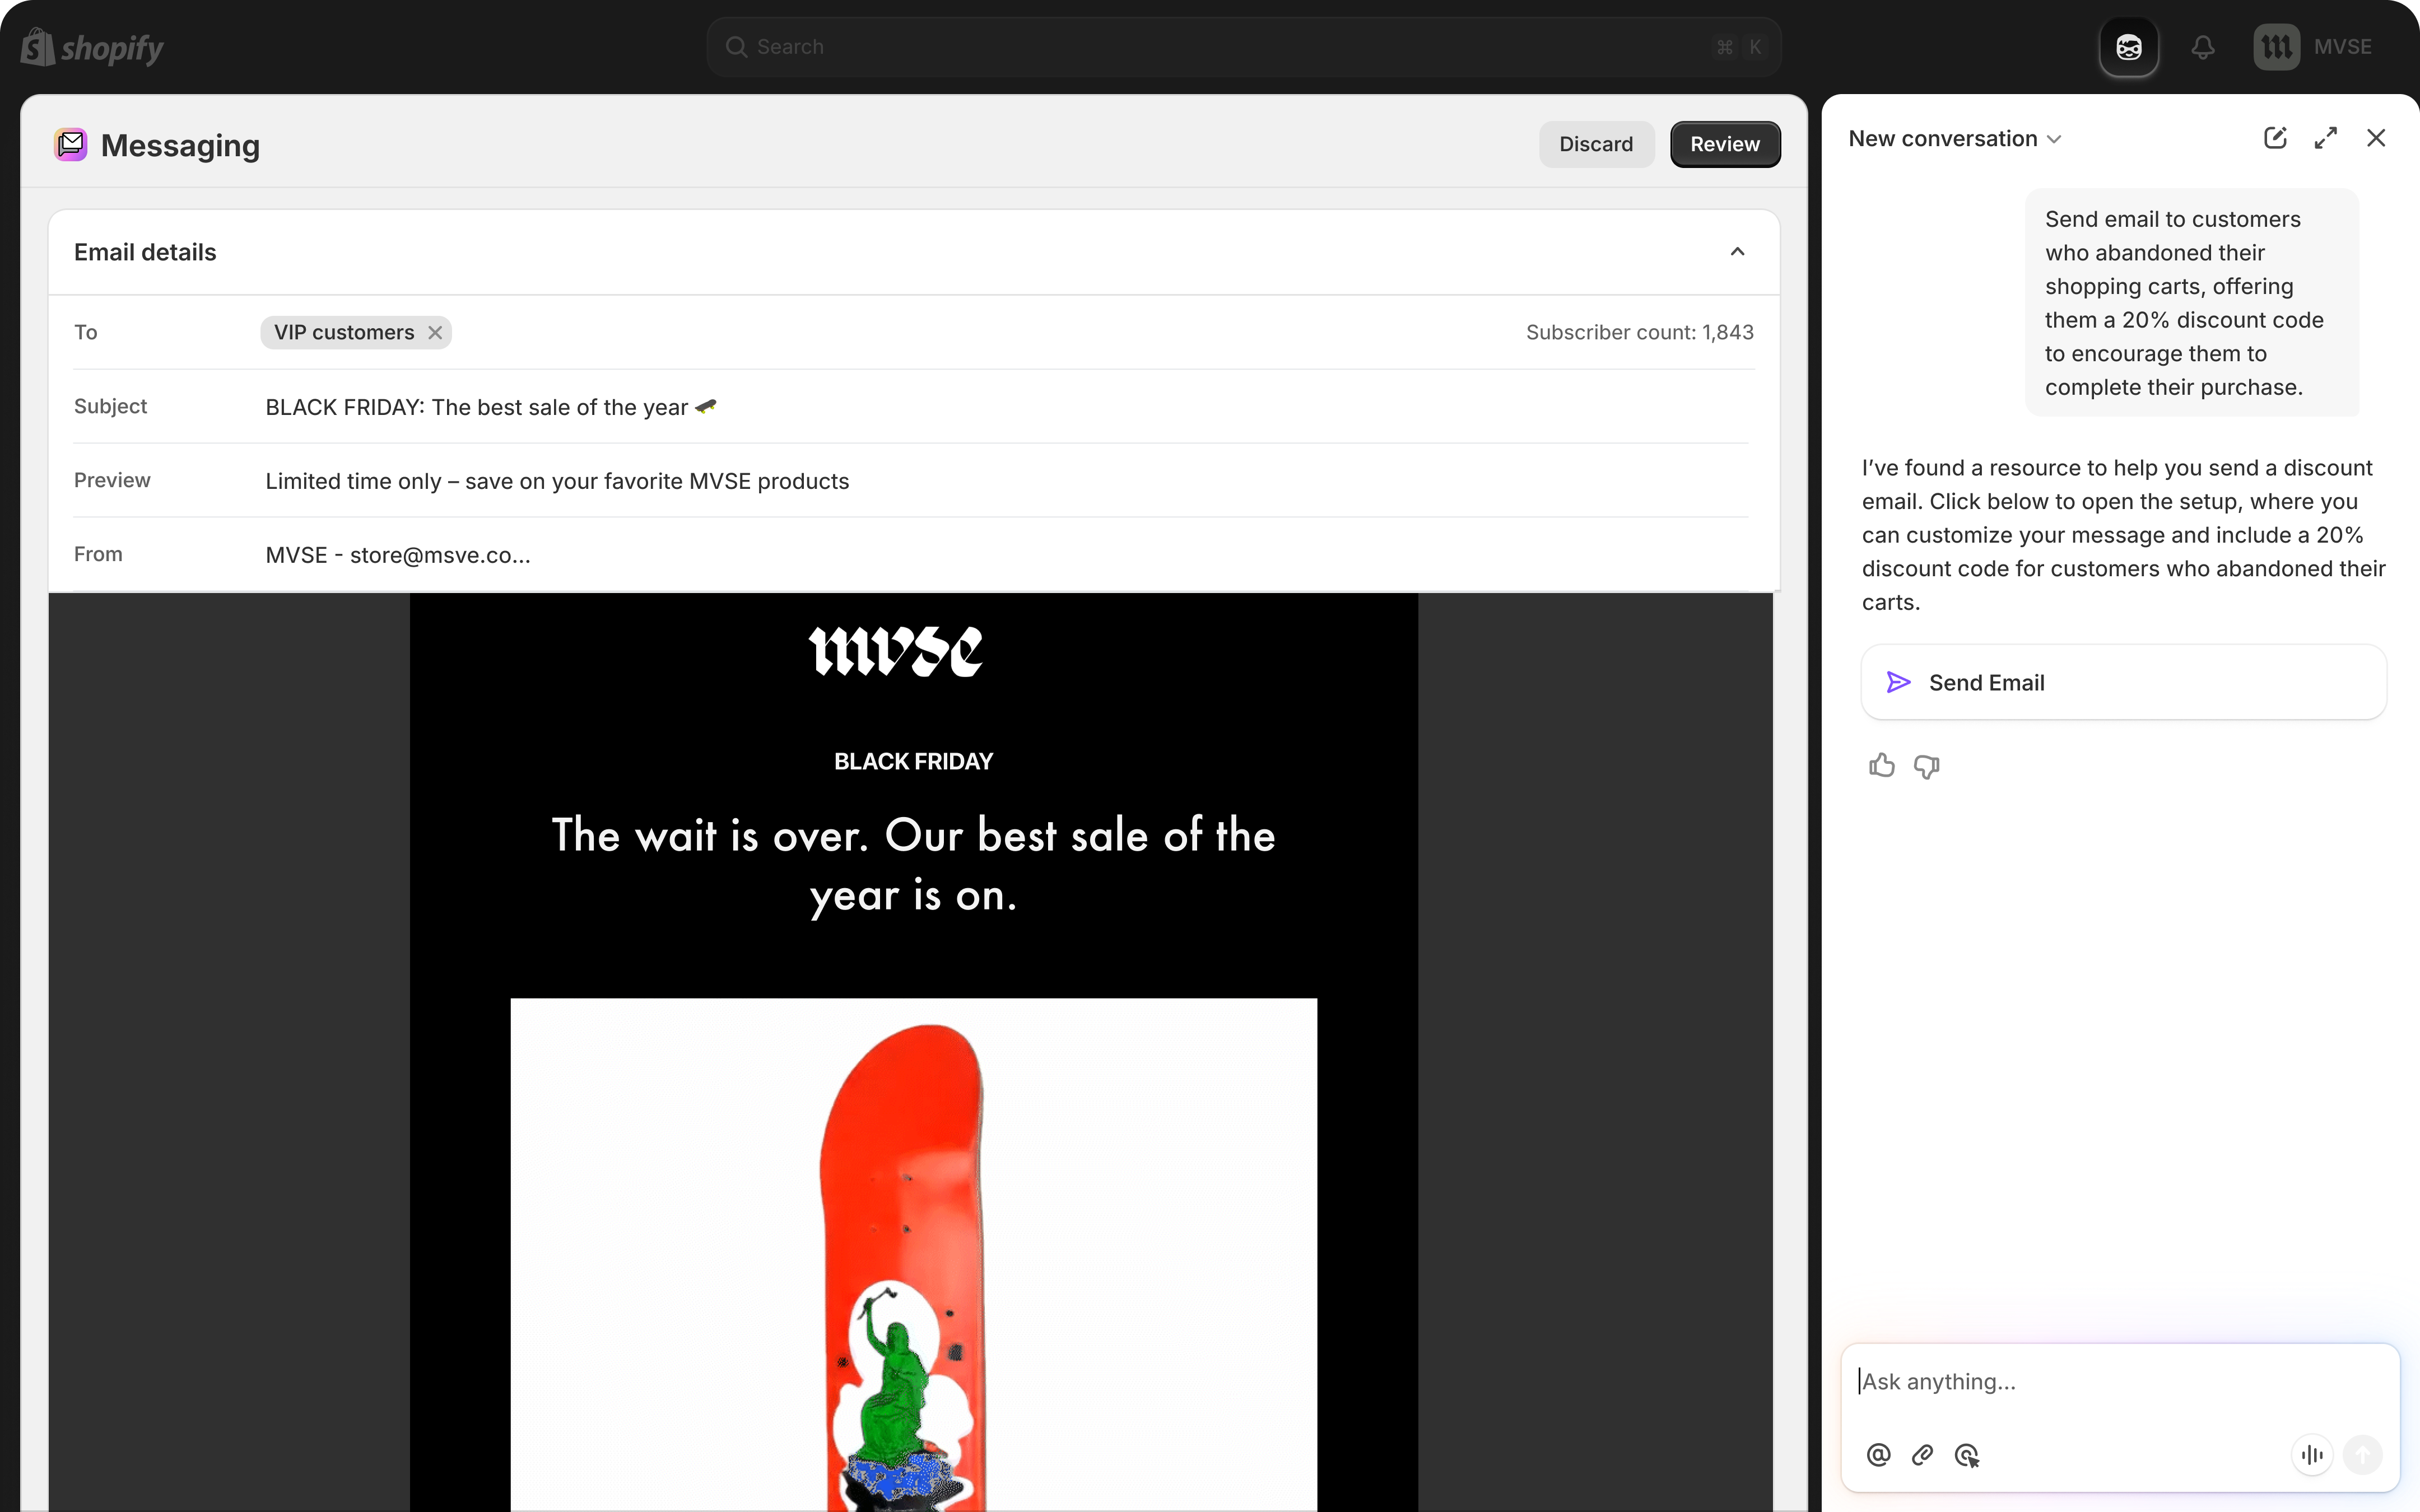
In this example, a merchant can ask Sidekick to edit the content of an email campaign. Sidekick takes the merchant to the Shopify Messaging app, navigated to the correct email campaign.
Anchor to Expose actions to SidekickExpose actions to Sidekick
Use app extensions to expose actions in your app. By providing your app's actions in an app extension, Sidekick can take the merchant to the right page in your app to perform a rich action.
Multiple app extension types are supported. Choose the right app extension type for your app.
| Extension type | Target | App Home support | Standalone app support |
|---|---|---|---|
| Admin link | admin.app.intent.link | ✅ | ❌ |
| UI extension | admin.app.intent.render | ✅ | ✅ |
Both targets declare the same intents and share the same tools, instructions, and schema files. The difference is how the action is performed when Sidekick invokes the intent:
admin.app.intent.link: Navigates the merchant to a URL in your app. Use this when the action is best performed by the merchant on an existing page you already render.admin.app.intent.render: Renders an admin UI extension inline. Use this when you want Sidekick to hand control to a focused, purpose-built extension surface instead of navigating away. Requires API version2026-04or later.
Anchor to RequirementsRequirements
- Create an app.
- For App Home, use the latest version of App Bridge.
- Use token exchange to get access tokens and Shopify managed installation for installs and scope grants, not the legacy OAuth install flow. See Authentication.
- Add an
extensions_summaryto yourshopify.app.toml. This is required for all apps with Sidekick-eligible extensions.
You can register a maximum of 5 intents and 20 tools for each app. The tool limit is shared across all extension types (data and action).
You can register a maximum of 5 intents and 20 tools for each app. The tool limit is shared across all extension types (data and action).
Anchor to Example: Allow Sidekick to edit email content with an admin linkExample: Allow Sidekick to edit email content with an admin link
Use an app extension to allow Sidekick to edit content in your app. When the intent fires, Sidekick navigates the merchant to the URL you define.
Anchor to Create an app extensionCreate an app extension
Use the Shopify CLI to create a Sidekick app action link extension. (For the UI-extension variant, admin.app.intent.render, see Example: Allow Sidekick to edit email content with a UI extension.)
App action link
The command creates a new extension template in your app's extensions directory with the following structure:
Edit extension folder structure
Modify shopify.extension.toml to include the name, handle, and type of your app extension.
extensions/open-email/shopify.extension.toml
admin.app.intent.link is a special target that is not tied to a Shopify resource that can be invoked from anywhere in the Shopify Admin.
The description field helps Sidekick understand when your extension is relevant. Be specific about what your extension does. A vague description means Sidekick won't reliably invoke your extension when merchants need it. See Writing effective extension descriptions for detailed guidance and examples.
admin.app.intent.link is a special target that is not tied to a Shopify resource that can be invoked from anywhere in the Shopify Admin.
The description field helps Sidekick understand when your extension is relevant. Be specific about what your extension does. A vague description means Sidekick won't reliably invoke your extension when merchants need it. See Writing effective extension descriptions for detailed guidance and examples.
The url may contain {placeholder} segments that are substituted at invocation time from values in your intent schema. Placeholders aren't filled automatically. You must declare a field with mapTo: "param" in the schema whose name (or fieldName alias) matches the placeholder. See Map intent values into the URL for the full mechanism.
Anchor to Register your extension as an intentRegister your extension as an intent
Add an intents configuration to your shopify.extension.toml with an action, type and schema.
application/email is used as an example type for this guide because this guide walks through editing an email campaign. App extensions support several app types for various popular use cases.
The type shown below (application/email) is illustrative. Don't copy it verbatim unless your extension is actually for email campaigns. Pick the type from the supported types table below that best describes what your extension does. A mismatched type means Sidekick won't reliably invoke your extension when merchants need it.
If none of the supported types fit your scenario, then discuss or propose a new intent type in the Shopify app intent types repository. Don't pick an unrelated type as a placeholder.
The type shown below (application/email) is illustrative. Don't copy it verbatim unless your extension is actually for email campaigns. Pick the type from the supported types table below that best describes what your extension does. A mismatched type means Sidekick won't reliably invoke your extension when merchants need it.
If none of the supported types fit your scenario, then discuss or propose a new intent type in the Shopify app intent types repository. Don't pick an unrelated type as a placeholder.
extensions/open-email/shopify.extension.toml
The following types are currently supported for app intents. Supported actions vary by intent family.
| Type | Description | Supported actions | Schema reference |
|---|---|---|---|
application/ad | Ad campaigns | create, edit | https://extensions.shopifycdn.com/shopifycloud/schemas/v1/application/ad.json |
application/campaign | Marketing campaigns | create, edit | https://extensions.shopifycdn.com/shopifycloud/schemas/v1/application/campaign.json |
application/email | Email campaigns | create, edit | https://extensions.shopifycdn.com/shopifycloud/schemas/v1/application/email.json |
application/faq | FAQ management | create, edit | https://extensions.shopifycdn.com/shopifycloud/schemas/v1/application/faq.json |
application/loyalty-program | Loyalty programs | create, edit | https://extensions.shopifycdn.com/shopifycloud/schemas/v1/application/loyalty-program.json |
application/optimization-plan | Optimization plans | create, edit | https://extensions.shopifycdn.com/shopifycloud/schemas/v1/application/optimization-plan.json |
application/quote | Quotes for B2B quote and negotiation apps | create, edit | https://extensions.shopifycdn.com/shopifycloud/schemas/v1/application/quote.json |
application/return | Returns management | create, edit | https://extensions.shopifycdn.com/shopifycloud/schemas/v1/application/return.json |
application/review | Product reviews | create, edit | https://extensions.shopifycdn.com/shopifycloud/schemas/v1/application/review.json |
application/shipment | Shipment tracking | create, edit | https://extensions.shopifycdn.com/shopifycloud/schemas/v1/application/shipment.json |
application/ticket | Support tickets | create, edit | https://extensions.shopifycdn.com/shopifycloud/schemas/v1/application/ticket.json |
shopify/Customer | Shopify customers | import, import+bulk | https://extensions.shopifycdn.com/shopifycloud/schemas/v1/shopify/customer/gid.json |
shopify/Discount | Shopify discounts | create, edit | https://extensions.shopifycdn.com/shopifycloud/schemas/v1/shopify/discount.json |
shopify/Order | Shopify orders | import, import+bulk | https://extensions.shopifycdn.com/shopifycloud/schemas/v1/shopify/order/gid.json |
shopify/Product | Shopify products | import, import+bulk | https://extensions.shopifycdn.com/shopifycloud/schemas/v1/shopify/product/gid.json |
shopify/* app intents aren't the same as Shopify admin route intents or native admin intents. shopify/Customer, shopify/Order, and shopify/Product are for app-provided import workflows and they support import and import+bulk. shopify/Discount supports create and edit for discounts your app backs with a Shopify Function. For schema examples, see Import Shopify resources with shopify/* intents.
If you'd like Shopify to support another type, then discuss or propose it in the Shopify app intent types repository.
Declaring an unsupported type (for example, application/my-resource) causes shopify app deploy to reject the extension with Intent is invalid: type '<value>' is not supported. There's no silent fallback.
Declaring an unsupported type (for example, application/my-resource) causes shopify app deploy to reject the extension with Intent is invalid: type '<value>' is not supported. There's no silent fallback.
Anchor to Declare the extension schemaDeclare the extension schema
Declare your schema in the JSON file referenced in shopify.extension.toml. The full intent schema definition can be inspected at https://extensions.shopifycdn.com/shopifycloud/schemas/v1/intent.json.
inputSchema is required and must reference a schema matching the type defined in shopify.extension.toml. For example, application/email should reference https://extensions.shopifycdn.com/shopifycloud/schemas/v1/application/email.json
The intent inputSchema must not declare required fields (at the top level or nested inside any property). Intents render UI for merchants to fill in missing information, so all fields are treated as optional at invocation time. Use description and other constraints (such as minLength, format, enum) to guide input instead.
inputSchema is required and must reference a schema matching the type defined in shopify.extension.toml. For example, application/email should reference https://extensions.shopifycdn.com/shopifycloud/schemas/v1/application/email.json
The intent inputSchema must not declare required fields (at the top level or nested inside any property). Intents render UI for merchants to fill in missing information, so all fields are treated as optional at invocation time. Use description and other constraints (such as minLength, format, enum) to guide input instead.
The schema has two top-level sections that an intent invocation populates:
value: the primary identifier for the resource being acted on (for example, the GID of the email campaign being edited). This becomes thevalueparameter ofintents.invoke({ value }).inputSchema: additional data the caller provides (for example, the recipient or subject). Properties underinputSchema.propertiesbecome thedataobject ofintents.invoke({ data }).
The value field, and each property in inputSchema.properties, can declare mapTo and fieldName to control how the value is transported when Sidekick opens your url, and matchValue to participate in disambiguation when multiple intents share the same type:action pair. See Map intent values into the URL for the URL transport mechanism, and matchValue for the disambiguation mechanism.
./email-schema.json
Anchor to Leaving the URL placeholder unmappedLeaving the URL placeholder unmapped
If your url contains a placeholder such as {id}, then something in the schema must map to it. The mapping must be either the top-level value field with mapTo: "param" and a matching fieldName, or an inputSchema property with mapTo: "param" (whose key matches the placeholder, or which declares a matching fieldName). Otherwise you'll get a runtime error such as "Missing ':id' param", which means the URL placeholder is never substituted. See Map intent values into the URL for the valid patterns.
Anchor to Removing ,[object Object], or its sibling keywords from ,[object Object]Removing $ref or its sibling keywords from inputSchema
$ref or its sibling keywords from inputSchemaThe inputSchema block uses JSON Schema 2020-12, which allows $ref alongside type and properties. This is intentional. Removing $ref, or removing the type/properties siblings alongside it, breaks schema validation and produces a deploy-time error: Intent is invalid: a $ref for the inputSchema matching the intent type must be present.
Anchor to Adding ,[object Object], to the intent ,[object Object]Adding required to the intent inputSchema
required to the intent inputSchemaDon't add a required array anywhere in the intent inputSchema, not at the top level and not nested inside any property (for example, on array items). This produces a deploy-time error (Intent is invalid: inputSchema must not have required fields). The required-forbidden rule applies only to intent schemas. Tool inputSchema allows required like normal JSON Schema.
Anchor to Leaving the URL placeholder unmappedLeaving the URL placeholder unmapped
If your url contains a placeholder such as {id}, then something in the schema must map to it. The mapping must be either the top-level value field with mapTo: "param" and a matching fieldName, or an inputSchema property with mapTo: "param" (whose key matches the placeholder, or which declares a matching fieldName). Otherwise you'll get a runtime error such as "Missing ':id' param", which means the URL placeholder is never substituted. See Map intent values into the URL for the valid patterns.
Anchor to Removing ,[object Object], or its sibling keywords from ,[object Object]Removing $ref or its sibling keywords from inputSchema
$ref or its sibling keywords from inputSchemaThe inputSchema block uses JSON Schema 2020-12, which allows $ref alongside type and properties. This is intentional. Removing $ref, or removing the type/properties siblings alongside it, breaks schema validation and produces a deploy-time error: Intent is invalid: a $ref for the inputSchema matching the intent type must be present.
Anchor to Adding ,[object Object], to the intent ,[object Object]Adding required to the intent inputSchema
required to the intent inputSchemaDon't add a required array anywhere in the intent inputSchema, not at the top level and not nested inside any property (for example, on array items). This produces a deploy-time error (Intent is invalid: inputSchema must not have required fields). The required-forbidden rule applies only to intent schemas. Tool inputSchema allows required like normal JSON Schema.
Anchor to Write your tools schemaWrite your tools schema
The tools declared in this tools.json aren't navigation tools. They execute while the intent's destination page is open.
The tools declared in this tools.json aren't navigation tools. They execute while the intent's destination page is open.
The tools declared in this tools.json execute while the intent's destination page is open at the route specified by the url for the admin.app.intent.link target. Navigation is already owned by admin.app.intent.link itself, so don't declare a tool that just duplicates the intent's action (for example, an edit_email tool on an application/email edit intent that only opens the editor).
Tools should expose the ability to read or mutate state while the merchant is on the page. Examples: design_email, apply_template, schedule_send. Each tool must be registered at runtime via shopify.tools.register from the route the intent's url opens, otherwise Sidekick has no handler to invoke.
Declare your tools in a JSON file referenced by the tools field in shopify.extension.toml. Tools define the actions Sidekick can perform while the intent is open. These should be specific to the intent context. For example, a design_email tool updates the visual design of the email campaign the merchant is currently editing.
The tool inputSchema is a standard JSON Schema. Unlike the intent inputSchema, it doesn't require a $ref to an application/* schema, and it can use required to mark mandatory fields just like any normal JSON Schema (see the data extension example for a tool that does this). Keep the two schemas distinct and don't conflate them.
./tools.json
Each tool name can be up to 64 characters. Each tool description can be up to 512 characters. You can register a maximum of 20 tools for each app, shared across all extensions (data and action).
Each tool name can be up to 64 characters. Each tool description can be up to 512 characters. You can register a maximum of 20 tools for each app, shared across all extensions (data and action).
Anchor to Map intent values into the URLMap intent values into the URL
When Sidekick invokes an intent, your app receives the request at the url declared in shopify.extension.toml. The intent schema controls where each value ends up: a URL path segment, the query string, the URL hash, or the request body.
Anchor to How placeholder substitution worksHow placeholder substitution works
A url can contain {placeholder} segments (for example, url = "/app/customers/{id}"). Placeholders are not filled in automatically. For each placeholder, the intent schema must declare a matching field with mapTo: "param". The match is by name:
- For an
inputSchemaproperty, the property's key is used by default. DeclarefieldNameonly when the key doesn't match the placeholder (seefieldNamebelow). - For the top-level
valuefield, you must always declarefieldName: "<placeholder>", becausevaluehas no schema key to use as a default.
If nothing in the schema maps to a placeholder, the literal {id} (or an empty segment) is sent to your app.
Anchor to Working with GIDsWorking with GIDs
When the value mapped to a param placeholder is a GID (a string starting with gid://), Sidekick takes everything after the last / and substitutes that bare tail identifier into the URL path. Both shapes that show up across these docs work the same way:
gid://shopify/EmailCampaign/123becomes123in/app/campaigns/123/edit.gid://application/email/123also becomes123.
Your route reads that bare identifier from path params (useParams() or your router's equivalent), not the full GID. The same parsing applies to any inputSchema property mapped to param. You don't need a resolver helper.
Non-GID strings are substituted as-is. Values mapped to query_param, hash, or form data destinations also pass through verbatim, without GID parsing. If you need the full GID at runtime, read it from the intent payload instead of the URL.
mapTo specifies how a value is transported when Sidekick constructs the request to your url. It's a string with one of the following values:
mapTo | Effect | Example |
|---|---|---|
form_data | Sends the value in the request body as form data. Rarely needed. This is the default for inputSchema properties when no mapTo is declared. | N/A |
hash | Appends the value to the URL's hash fragment. | /app/campaigns#edit |
param | Substitutes the value into a {placeholder} in the URL path. | /app/campaigns/{id} → /app/campaigns/4353532 |
query_param | Appends the value to the URL's query string. | /app/campaigns?status=draft |
mapTo is valid on the top-level value field and on any property inside inputSchema.properties.
Anchor to [object Object]fieldName
fieldNamefieldName is the target name at the destination specified by mapTo:
mapTo: "param": the placeholder name in the URL path (the text between{and}).mapTo: "query_param": the key used in the query string.mapTo: "form_data": the form field name.
If fieldName is omitted, the property key from the schema is used. Declare fieldName when your schema key doesn't match the destination name. For example, when an inputSchema property is called reviewId but needs to fill an {id} path placeholder:
The top-level value field always needs an explicit fieldName when mapped to param or query_param, because value isn't a property key that can be used as a default.
Anchor to [object Object]matchValue
matchValuematchValue specifies a value this field must equal for the intent to match during disambiguation. It's used when multiple intents share the same type:action pair. Shopify narrows to the intent whose matchValue equals the value provided in intents.invoke({ data, value }).
matchValue is a string and is valid on the top-level value field and on any property inside inputSchema.properties.
When an intent is invoked without a corresponding data or value field, Shopify still shows the intent as a candidate in the disambiguation modal, so users can pick between intents that declare a matchValue. When invoked with a data or value field, only intents whose matchValue equals the provided value are kept as candidates.
For example, an app that exposes two campaign-edit intents, one for SMS and one for email, can disambiguate by channel:
Invoking intents.invoke("edit:application/campaign", { data: { channel: "sms" } }) then routes directly to the SMS extension without prompting the user.
Anchor to Example: campaign edit with ,[object Object], substitutionExample: campaign edit with {id} substitution
{id} substitutionThis example registers an extension for editing a marketing campaign. The URL contains an {id} placeholder that's filled from the intent's value.
extensions/open-campaign/shopify.extension.toml
./campaign-schema.json
When Sidekick invokes this intent with a campaign GID, the value is substituted into the {id} placeholder before the request reaches your server. Any inputSchema properties (like name or budget_amount) are sent as form data by default.
Anchor to Example: rename a field with ,[object Object]Example: rename a field with fieldName
fieldNameIf an inputSchema property's key doesn't match the URL placeholder, use fieldName to map them. The following schema routes the reviewId property into the {id} path segment:
./review-schema.json
With url = "/app/reviews/{id}/edit", invocations that supply reviewId render as /app/reviews/<reviewId>/edit.
Anchor to Bind tool handlers at runtimeBind tool handlers at runtime
After declaring tools statically in tools.json, use the Tools API to bind handler functions at runtime.
The schema in tools.json only declares what the tool looks like to Sidekick. The handler is the code that actually runs when Sidekick invokes the tool.
For an admin_link app extension, the handler is registered from the React component for the route that the extension's url navigates to. Sidekick opens that page, the page mounts, and the page registers the handler. This mirrors the data extension flow, where the handler is registered from the JavaScript module declared by module = "./src/index.js".
For an admin_link app extension, the handler is registered from the React component for the route that the extension's url navigates to. Sidekick opens that page, the page mounts, and the page registers the handler. This mirrors the data extension flow, where the handler is registered from the JavaScript module declared by module = "./src/index.js".
Use useEffect so the handler is bound when the page mounts and unregistered when the merchant navigates away. shopify.tools.register returns a cleanup function that handles the unregistration:
The handler closure captures the route's state (here, campaignId), so re-running the effect when that state changes replaces the handler with one bound to the new campaign. The cleanup function unregisters it when the component unmounts.
See the Tools API reference for the full surface, including unregister, clear, and additional lifecycle examples.
Anchor to Read the incoming intentRead the incoming intent
When your extension opens for an app intent, read the incoming payload from shopify.intents.request. Read the current value synchronously from shopify.intents.request.value (it's null when your app isn't running inside an intent workflow). The payload contains the action, type, value, and data fields for the invocation.
If your extension stays mounted across intent transitions, use shopify.intents.request.subscribe(callback) to react to updates without polling.
The same payload is also appended to the landing URL as an ?intent=<URL-encoded JSON> query parameter on the initial page load. Use it only when server-side rendering, where App Bridge isn't available yet: read it from the incoming request URL in, for example, a Remix loader or Next.js getServerSideProps. Everywhere else, read shopify.intents.request and subscribe to updates, because the query parameter is only present on that first load and goes stale if the host updates the current intent without reloading the iframe. See the request section of the Intents API reference for the full payload shape.
Anchor to Resolve the intentResolve the intent
When a merchant finishes, fails, or cancels the workflow your extension renders for an app intent, resolve the intent using the Intents API response methods. This returns control to the surface that invoked your intent and delivers the result.
See the Intents API reference for the full response surface.
Anchor to Write instructions for using the app extensionWrite instructions for using the app extension
Define instructions for how Sidekick should use your app extension in an instructions.md file.
instructions.md is optional, but is highly recommended for providing context and guidance to Sidekick about your app extension.
instructions.md is optional, but is highly recommended for providing context and guidance to Sidekick about your app extension.
./instructions.md
The description field has a 256-token limit. The instructions.md file has a 2,048-token limit.
The description field has a 256-token limit. The instructions.md file has a 2,048-token limit.
An intent is bound to exactly one pathname: the url declared on your extension's admin.app.intent.link target. The intent modal represents work happening at that pathname, and the platform enforces this by closing the modal whenever the merchant navigates away from it.
Any navigation that changes the pathname inside an intent modal closes it. This applies to every navigation mechanism that produces a different pathname, including:
- Server-side redirects (for example, an HTTP
302from a loader or action that points at a different pathname). - Client-side navigation via
useNavigate(),<Link>,<Form>, or equivalent router APIs that target a different pathname. - Setting
window.locationto a different pathname.
The modal closes silently. No error is surfaced. If your intent disappears immediately after loading, a pathname change is the most likely cause.
Updating the search string or hash on the same pathname (for example, /app/customers?id=123) does not close the modal. Use that to switch UI state without leaving the intent.
Any navigation that changes the pathname inside an intent modal closes it. This applies to every navigation mechanism that produces a different pathname, including:
- Server-side redirects (for example, an HTTP
302from a loader or action that points at a different pathname). - Client-side navigation via
useNavigate(),<Link>,<Form>, or equivalent router APIs that target a different pathname. - Setting
window.locationto a different pathname.
The modal closes silently. No error is surfaced. If your intent disappears immediately after loading, a pathname change is the most likely cause.
Updating the search string or hash on the same pathname (for example, /app/customers?id=123) does not close the modal. Use that to switch UI state without leaving the intent.
Anchor to Render different UI states at the same pathnameRender different UI states at the same pathname
Because an intent is pinned to a single pathname, switch between UI states using query parameters, loader data, or component state instead of pathname changes. For example, render a list view and a detail form at the same route, driven by a ?id=123 query string or inline component state:
app/routes/app.customers.jsx
When the merchant finishes their work, call shopify.intents.response.ok(data) to resolve the intent. The invoking surface closes the modal, so you don't need to navigate yourself.
Anchor to End-to-end example: search, open, and edit an email campaignEnd-to-end example: search, open, and edit an email campaign
This walkthrough connects the two halves of the Sidekick app extensions surface: the data extension that returns resource links, and the action-link extension on this page that opens the editor. It uses the same application/email example shown earlier on this page so the moving parts line up with what you've already seen.
The trip has five turns:
- The merchant asks Sidekick a question. Sidekick decides that an email-related question matches the app's
extensions_summaryand invokes the data extension'ssearch_campaignstool. search_campaignsreturns resource links withmimeType: "application/email". Sidekick presents the results to the merchant.- Because the link's
mimeType(application/email) matches aneditintent on the action-link extension, Sidekick offers to edit one of the campaigns and asks the merchant which. After the merchant replies (for example, "edit the first campaign"), Sidekick invokes the intent with that campaign's resource-linkurias thevalue(for example,gid://application/email/123). - Shopify opens the intent's
url(/edit/{id}) in the intent modal. Because the schema declaresmapTo: "param", Sidekick strips the GID and substitutes the bare tail, so the route receives/edit/123. The page mounts and callsshopify.tools.register("design_email", …). - The merchant asks Sidekick to change something about the design. Sidekick invokes
design_emailwith the proposed update. The handler stages the change into form state and returns. The merchant clicks Save themselves; Sidekick never commits silently.
Anchor to 1. The data extension returns resource links1.
search_campaigns lives in the data extension you built in the data extension guide. Its handler returns resource links whose mimeType matches the intent type declared in the next step:
extensions/tools/src/index.js
The mimeType (application/email) is what makes each result clickable. Sidekick matches it to the action-link extension's intent type in the next step. The _meta field carries the small amount of summary data the model needs to reason about the result without a separate fetch.
Anchor to 2. The action-link extension declares the intent and the in-page tool2.
The extensions/open-email extension you scaffolded earlier on this page already has the right shape. Its shopify.extension.toml declares the landing URL and intent:
extensions/open-email/shopify.extension.toml
The full schema was shown earlier in Declare the extension schema, with all the optional inputSchema.properties for an email campaign. The piece that matters for this walkthrough is the top-level value field, which maps the GID Sidekick passes into the {id} placeholder via mapTo: "param" and fieldName: "id".
The extension's tools.json declares design_email, the in-page tool that runs after the page is open. It doesn't redeclare navigation; that's already handled by admin.app.intent.link and the url above. The full tool definition is in Write your tools schema earlier on this page.
Anchor to 3. The app route registers the in-page tool3.
When the merchant clicks a search result, Shopify opens /edit/<id>. Because mapTo: "param" strips the GID before substitution, the route receives the bare tail identifier (for example, 123), not the full GID. No URL parsing helper is needed; see Working with GIDs for the contract.
app/routes/edit.$id.tsx
The tool's response includes ok: true and a note that tells Sidekick the change is staged, not saved. Sidekick relays that to the merchant so they know to click Save themselves.
Anchor to Verify the round trip locallyVerify the round trip locally
Run this end-to-end check before you ship. Each step builds on the previous one. If a step fails, fix it before moving on.
shopify app devstarts and prints both extensions as ready.- Open the Sidekick preview link printed by
devfor theadmin.app.tools.datatarget. Ask Sidekick a question that should hitsearch_campaigns(for example, "show me my best-performing campaigns from last month"). - Confirm Sidekick presents the results from your tool (typically as a text summary, not raw JSON). That confirms the tool returned valid resource links.
- Ask Sidekick to edit one (for example, "edit the first one"). The intent modal opens at
/edit/<id>with the bare ID substituted into the URL. If you see a literal{id}or an empty path segment, your schema'smapTo/fieldNameis misconfigured. See Map intent values into the URL. - With the editor open, ask Sidekick to change something about the design (for example, "switch this to the two-column layout"). Sidekick invokes
design_email; the change appears staged in the form. - Click Save in the form. The change is committed by your app, not by Sidekick.
Anchor to Putting it all togetherPutting it all together
After following this tutorial, your extensions folder structure should look like this:
Folder structure
Anchor to Example: Allow Sidekick to edit email content with a UI extensionExample: Allow Sidekick to edit email content with a UI extension
When you want Sidekick to open a dedicated UI instead of navigating to a URL, create an admin UI extension with the admin.app.intent.render target. The intent declaration, tools, instructions, and schema are identical to the admin link path.
The admin.app.intent.render target requires API version 2026-04 or later, and Shopify CLI 3.94.0 or later for the app_action template.
The admin.app.intent.render target requires API version 2026-04 or later, and Shopify CLI 3.94.0 or later for the app_action template.
Anchor to Create an app extensionCreate an app extension
Use the Shopify CLI to create a Sidekick app action UI extension.
App action UI extension
The command creates a new extension template in your app's extensions directory with the following structure:
Edit extension folder structure
Anchor to Configure the UI extension targetConfigure the UI extension target
Use type = "ui_extension" and point the target at admin.app.intent.render. Unlike the admin link, this target renders your extension's module JavaScript file, so url isn't used.
extensions/open-email/shopify.extension.toml
admin.app.intent.render is a special target that isn't tied to a Shopify resource and can be invoked by Sidekick from anywhere in the Shopify admin. At least one intent is required on the target. An extension without an intent will fail validation.
The description field helps Sidekick understand when your extension is relevant. Be specific about what your extension does. A vague description means Sidekick won't reliably invoke your extension when merchants need it. See Writing effective extension descriptions for detailed guidance and examples.
admin.app.intent.render is a special target that isn't tied to a Shopify resource and can be invoked by Sidekick from anywhere in the Shopify admin. At least one intent is required on the target. An extension without an intent will fail validation.
The description field helps Sidekick understand when your extension is relevant. Be specific about what your extension does. A vague description means Sidekick won't reliably invoke your extension when merchants need it. See Writing effective extension descriptions for detailed guidance and examples.
Anchor to Write your UI extension moduleWrite your UI extension module
The module field points at your extension's JavaScript. Render your UI like any other App Home UI extension, read the incoming intent payload from shopify.intents.request.value, and call shopify.intents.response.ok (or .error / .closed) to resolve the intent and return control to Sidekick when the merchant completes the workflow.
extensions/open-email/src/IntentExtension.jsx
Host callbacks in UI extensions don't await returned promises. If your submit handler needs to do asynchronous work (call your app server, write to a database) before the intent resolves, pass the in-flight promise to event.waitUntil(promise) so Shopify keeps the surface alive until it settles. Don't make the callback itself async and don't await shopify.intents.response.ok — the host won't honor either one.
Host callbacks in UI extensions don't await returned promises. If your submit handler needs to do asynchronous work (call your app server, write to a database) before the intent resolves, pass the in-flight promise to event.waitUntil(promise) so Shopify keeps the surface alive until it settles. Don't make the callback itself async and don't await shopify.intents.response.ok — the host won't honor either one.
The schema, tools, and instructions files work identically to the admin-link target. The app_action template scaffolds them as intent-schema.json, tools.json, and instructions.md. Their contents follow the same shape as the admin link example's schema, tools schema, and instructions file.
Anchor to Import Shopify resources with ,[object Object], intentsImport Shopify resources with shopify/* intents
shopify/* intentsThe email content editing example uses an application intent (application/email), where your app defines the intent payload, and Sidekick navigates the merchant into your app to complete the action.
App extensions also support Shopify resource intents, where your app creates or imports Shopify-native resources and returns their Global IDs (GIDs). For shopify/* types, apps register import for one resource or import+bulk for many resources at once. Shopify's native admin intents handle creating or editing most Shopify resources. For discounts, an app can instead back the resource with a Shopify Function and register create and edit directly. See Create and edit discounts with shopify/Discount intents.
Use a Shopify resource intent when your app creates or imports a Shopify resource through your own workflow. inputSchema carries the data your app needs, and outputSchema describes the GID of the resulting Shopify resource. A typical example is a print-on-demand app that creates a custom-printed Shopify Product from design details.
The Sidekick import workflows shown here omit a top-level value. They create or import Shopify resources, then return the created GIDs through outputSchema. Admin-intent handoffs that pass existing Shopify resource GIDs to partner apps are a separate invoker-side flow. See admin intents.
Anchor to Choose between ,[object Object], and ,[object Object], intentsChoose between application/* and shopify/* intents
application/* and shopify/* intentsUse this table to choose the right intent family:
| Intent family | Use when | Examples | $schema to use |
|---|---|---|---|
application/* | Your app owns the data shape (form fields, content payloads, free-form values) | application/email, application/ticket | intent.json |
shopify/* | Your app creates or imports Shopify resources and returns Shopify GIDs | shopify/Product, shopify/Customer, shopify/Order | shopify-intent.json (single) or shopify-intent-bulk.json (bulk) |
Declare Shopify resource names in PascalCase, such as shopify/Product. Intent type names are compared case-insensitively for lookup and duplicate detection.
Anchor to Register a Shopify resource intentRegister a Shopify resource intent
In shopify.extension.toml, set type to a shopify/* resource type and action to import. Point schema at a JSON file that uses the shopify-intent.json meta-schema:
extensions/customize-tshirt/shopify.extension.toml
Anchor to Declare the import schemaDeclare the import schema
These Sidekick import examples use two required top-level keys:
inputSchema: your app's custom input fields. Properties become thedataobject ofintents.invoke({ data }). Don't addrequiredfields. Unlikeapplication/*intents, theshopify-intent.jsonmeta-schema doesn't require a$refoninputSchema.outputSchema: describes the success response. For single intents, declareproperties.idas a$refto the GID schema for the resource declared astype. The merchant or Sidekick reads this back usingshopify.intents.response.ok.
The following example uses shopify/Product as the output resource:
./product-import-schema.json
Anchor to Bulk imports with ,[object Object]Bulk imports with import+bulk
import+bulkTo import many resources in a single intent invocation, set action = "import+bulk" and use the shopify-intent-bulk.json meta-schema. outputSchema.properties.ids is the array of GIDs your app returns on success.
The +bulk suffix identifies a bulk variant of a verb. For Shopify resource intents, import+bulk applies import to many resources at once.
Register the bulk variant with a static url:
extensions/customize-tshirt-bulk/shopify.extension.toml
Define the bulk schema with an array of output GIDs:
./product-import-bulk-schema.json
Anchor to Folder structureFolder structure
With both variants registered, your extensions directory has one extension per import variant. Each extension routes to a static path for its import workflow:
extensions/
Anchor to Supported Shopify resource intentsSupported Shopify resource intents
The following shopify/* types are supported:
| Type | Supported actions | GID schema |
|---|---|---|
shopify/Customer | import, import+bulk | https://extensions.shopifycdn.com/shopifycloud/schemas/v1/shopify/customer/gid.json |
shopify/Order | import, import+bulk | https://extensions.shopifycdn.com/shopifycloud/schemas/v1/shopify/order/gid.json |
shopify/Product | import, import+bulk | https://extensions.shopifycdn.com/shopifycloud/schemas/v1/shopify/product/gid.json |
The single-resource and bulk meta-schemas (shopify-intent.json and shopify-intent-bulk.json) are inspectable at the same extensions.shopifycdn.com host as the existing intent.json schema.
Anchor to Common mistakes to avoidCommon mistakes to avoid
Review these common schema and configuration mistakes before you deploy. Each mistake causes a deploy-time error that points to the mismatched field or schema.
Anchor to Wrong meta-schema for the actionWrong meta-schema for the action
action = "import" requires "$schema": ".../v1/shopify-intent.json", and action = "import+bulk" requires "$schema": ".../v1/shopify-intent-bulk.json". Mixing them produces a deploy-time error such as Shopify resource type 'shopify/Product' requires $schema to be shopify-intent.json or ... with bulk action requires $schema to be shopify-intent-bulk.json.
Anchor to Referencing a GID schema that isn't publishedReferencing a GID schema that isn't published
Only the resources in Supported Shopify resource intents have GID schemas you can $ref in outputSchema. Pointing at, for example, shopify/widget/gid.json fails because the schema doesn't reference a registered GID schema.
Anchor to Forgetting the GID ,[object Object], on ,[object Object]Forgetting the GID $ref on outputSchema
$ref on outputSchemaoutputSchema.properties.id.$ref (single) or outputSchema.properties.ids.items.$ref (bulk) is required and must match the resource declared as type in shopify.extension.toml. Returning a bare string instead produces an error like outputSchema.properties.id.$ref must contain a $ref to a Shopify GID schema.
Anchor to Using ,[object Object], and shopify-intent meta-schemas togetherUsing application/* and shopify-intent meta-schemas together
application/* and shopify-intent meta-schemas togetherapplication/* types must use intent.json. Setting "$schema": ".../v1/shopify-intent.json" on an application/email intent produces application type 'application/email' requires $schema to be intent.json. The reverse is also enforced.
Anchor to Create and edit discounts with ,[object Object], intentsCreate and edit discounts with shopify/Discount intents
shopify/Discount intentsshopify/Discount lets your app create or edit discounts backed by a Shopify Function. Like the import intents above, it uses the shopify-intent.json meta-schema, but it doesn't run an import: create and edit open your app's discount create or edit surface for the merchant. Register discount intents on an admin.app.intent.link target, using the app-link flow shown below.
If your discount Shopify Function includes a UI extension on the discount settings target (admin.discount-details.function-settings.render), then Shopify displays that discount in the discount type picker, so you don't need to register a shopify/Discount app intent link for it. Register a shopify/Discount app intent link when your React Router app provides the create or edit page instead.
If your discount Shopify Function includes a UI extension on the discount settings target (admin.discount-details.function-settings.render), then Shopify displays that discount in the discount type picker, so you don't need to register a shopify/Discount app intent link for it. Register a shopify/Discount app intent link when your React Router app provides the create or edit page instead.
Anchor to Register a discount intentRegister a discount intent
Set type = "shopify/Discount" and action to create or edit in shopify.extension.toml. Point url at any stable, unique page in your app for this discount type. The path is entirely yours to choose. It's where Shopify sends the merchant when the intent opens.
extensions/create-discount/shopify.extension.toml
A discount intent link only has to open your page, so this example declares no tools. Add a tools.json and register handlers at runtime only when you want Sidekick to fill in or adjust the discount form after the page opens.
A discount intent link only has to open your page, so this example declares no tools. Add a tools.json and register handlers at runtime only when you want Sidekick to fill in or adjust the discount form after the page opens.
Anchor to Declare the discount schemaDeclare the discount schema
Use the shopify-intent.json meta-schema and $ref the discount baseline (shopify/discount.json) from your inputSchema. The baseline supplies functionId so you don't need to redeclare it. Add your own properties alongside.
./discount-schema.json
functionId: setmatchValueto theidof the Shopify Function that backs this discount. Look it up with theshopifyFunctionsAdmin API query and use the returnednode.id(a UUID such as01234567-89ab-cdef-0123-456789abcdef). WithmatchValueset, acreate:shopify/Discountinvocation carrying a matchingfunctionIdresolves straight to this intent. Without a match, the invocation opens the discount type picker (seematchValue).functionIdis also passed to your app as intent data. To transport it into yoururlor query string, add amapTosuch asparamorquery_param.outputSchema.properties.id:$refthe discount GID schema (shopify/discount/gid.json), which acceptsDiscountNode,DiscountCodeNode, andDiscountAutomaticNodeGIDs.
For edit:shopify/Discount, also declare a top-level value that $refs shopify/discount/gid.json to receive the GID of the discount being edited.
Anchor to Help merchants choose a discount intentHelp merchants choose a discount intent
Native discount types and app-provided discounts share the create:shopify/Discount intent, so invoking it without a type or a matching functionId opens the discount type picker that lists the native discount types alongside eligible app discounts. Merchants encounter this picker more often for discounts than for other resources, so make each intent easy to choose:
- Point each intent at a
urlthat resolves to a single discount type. Register a separate discount intent per discount type, within your app's intent limit. Avoid a single intent that relies on an unresolved placeholder to represent many functions: it appears in the picker but has no page to open. - Set
matchValueonfunctionIdso an invocation that passes a matchingfunctionIdnarrows straight to your intent and skips the picker. - The picker uses your Function extension's title and icon, so keep them clear and specific.