Customized bundles can be used by merchants to create complex product bundle offerings, such as letting customers mix and match items or select from a wider range of bundling options.
This guide shows you how to add a customized bundle using Shopify Functions.
What you'll learn
In this tutorial, you'll learn how to do the following tasks:
- Set up your environment to use functions.
- Create a
cart_transformfunction.
Anchor to RequirementsRequirements
- You're a user with app development permissions.
- You've created a development store.
- You've created an app using Shopify CLI. If you previously installed Shopify CLI, then make sure that you're using the latest version. If you plan to create a UI for your extension, then start with the React Router app template.
- You've installed Node.js 16 or higher.
- You've installed your app on the development store.
- You're familiar with the Cart Transform Function API.
- You're using API version 2025-07 or higher for your function.
Anchor to Rust-specific requirementsRust-specific requirements
The following requirements are specific to Rust-based development with Shopify Functions.
-
You've installed Rust.
On Windows, Rust requires the Microsoft C++ Build Tools. Make sure to select the Desktop development with C++ workload when installing the tools.
-
You've installed the
wasm32-unknown-unknowntarget:Terminal
rustup target add wasm32-unknown-unknown
Anchor to Metafields versus line item propertiesMetafields versus line item properties
When you build custom bundles with cart transforms, you can store bundle data using metafields or line item properties. Choose metafields when you need secure, merchant-defined bundles with fixed compositions. Choose line item properties when you need flexible, buyer-customizable bundles, but ensure you implement proper validation and don't rely solely on the properties for critical business logic.
| Metafields | Line item properties | |
|---|---|---|
| Best for | Fixed bundles where the bundle composition is predetermined by the merchant | Mix-and-match bundles where buyers can customize the bundle composition |
| Pros |
|
|
| Cons |
|
|
Anchor to LimitationsLimitations
- A bundle can have up to 150 components.
- Bundles can have up to three options. Combined options are considered one option.
- You can't combine quantity options.
- After an app has assigned components to a bundle, only that app can manage the components of the bundle.
- Nested bundles aren't supported. A bundle can't have components and be part of another bundle simultaneously.
Anchor to Step 1: Generate a new extensionStep 1: Generate a new extension
To create a cart transform extension, you can use Shopify CLI, which generates starter code for building your extension and automates common development tasks.
-
Navigate to your app directory:
Terminal
cd <directory> -
Run the following command to create the app extension:
Terminal
shopify app generate extension --template cart_transform --name demo-cart-transform-extension
-
Choose the language that you want to use. For this tutorial, you should select either Rust or JavaScript.
Shopify defaults to Rust as the most performant and recommended language choice to stay within the platform limits. For more information, refer to language considerations.
Terminal
? What would you like to work in?> (1) Rust(2) JavaScript(3) TypeScript(4) Wasm
-
Navigate to
extensions/demo-cart-transform-extension:Terminal
cd extensions/demo-cart-transform-extension
Anchor to Step 2: Define the input of your functionStep 2: Define the input of your function
run.graphql defines the input for the function target.
The following example shows an input that retrieves information about buyer's cart like merchandise, quantity etc.
Replace the contents of src/run.graphql file with the following code.
Customized bundle example
src/run.graphql
Resolved input
The Function API references provide information on the available fields for the input query.
CartTransform only supports a subset of cart fields. For the list of supported cart fields, refer to the cart input field.
CartTransform only supports a subset of cart fields. For the list of supported cart fields, refer to the cart input field.
Anchor to Step 3: Define the business logic of your functionStep 3: Define the business logic of your function
In this example, our function will output expand operations for cart lines where merchandise has a metafield referencing other bundle components.
Replace the contents of src/main.rs file with the following code.
main.rs
Replace the contents of src/run.rs file with the following code.
run.rs
Explore more examples in the function-examples repository.
Explore more examples in the function-examples repository.
Anchor to Step 4: Update your app access scopesStep 4: Update your app access scopes
You need to request the write_cart_transforms and write_products access scopes to run the mutations in this guide.
-
In
shopify.app.tomlin the root of your app, add thewrite_cart_transformsscope.shopify.app.toml
# This file stores configurations for your Shopify app.scopes = "write_cart_transforms,write_products" -
Save your configuration file. If
app devis running, the scope changes will be applied automatically. If not, start the command:Terminal
shopify app dev
Anchor to Step 5: Create the cartTransform objectStep 5: Create the cart
To activate your function, create a cartTransform
object on the store where you installed your app. You can do this using the cartTransformCreate GraphQL mutation.
You can use curl to make following GraphQL requests. Only use the access token of the app for which you are building this extension.
You can use curl to make following GraphQL requests. Only use the access token of the app for which you are building this extension.
-
Use your function handle in GraphQL mutations instead of querying for the function ID.
Your function handle is defined in
shopify.extension.tomlashandle:shopify.extension.toml
[[extensions]]name = "your-cart-transform-name"handle = "your-function-handle"type = "function"uid = "3d664979-ccd6-e9dd-4497-41289ece62373715032a"NoteIf you're upgrading to API version 2025-10 or later, you no longer need to query for function IDs. Use your stable function handle instead, which remains consistent across environments.
Note:If you're upgrading to API version 2025-10 or later, you no longer need to query for function IDs. Use your stable function handle instead, which remains consistent across environments.
-
Run the following mutation. Replace
YOUR_FUNCTION_HANDLE_HEREwith the handle of your function:mutation.graphql
mutation {cartTransformCreate(functionHandle: "YOUR_FUNCTION_HANDLE_HERE") {cartTransform {idfunctionId}userErrors {fieldmessage}}}You should receive a GraphQL response that includes the ID of the new
cartTransformobject.TipIf you receive a
Could not find Functionerror, then confirm the following:shopify app devis running.- The function handle is correct.
- Your app has the
write_cart_transformsaccess scope.
Tip:If you receive a
Could not find Functionerror, then confirm the following:shopify app devis running.- The function handle is correct.
- Your app has the
write_cart_transformsaccess scope.
Anchor to Step 6: Create metafield definition to store bundle componentsStep 6: Create metafield definition to store bundle components
mutation.graphql
Variables
Anchor to Step 7: Create bundle products along with the componentsStep 7: Create bundle products along with the components
In this tutorial, we will take the example of a meal bundle which contains a burger and fries.
You can use curl to make following GraphQL requests. Only use access token of the app for which you are building this extension.
You can use curl to make following GraphQL requests. Only use access token of the app for which you are building this extension.
-
Create bundle component products, i.e. burger and fries.
mutation.graphql
mutation($productInput: ProductInput!) {productCreate(input: $productInput) {product {variants(first: 1) {edges {node {id}}}}}}Variables
{"productInput": {"status": "ACTIVE","published": true,"title": "Burger"}}mutation.graphql
mutation($productInput: ProductInput!) {productCreate(input: $productInput) {product {variants(first: 1) {edges {node {id}}}}}}Variables
{"productInput": {"status": "ACTIVE","published": true,"title": "Fries"}} -
Create a bundle parent product, i.e. Meal Bundle. This example sets
requires_componentson the variant of the bundle totrue. This is required when the variants is meant to be sold as a bundle only. It prevents the variant from being sold as a regular product in case the function doesn't output an operation. For example, the variantMeal Bundleshould always be sold as a bundle with components and not as a regular product.mutation.graphql
mutation($productInput: ProductInput!) {productCreate(input: $productInput) {product {variants(first: 1) {edges {node {id}}}}}}Variables
{"productInput": {"status": "ACTIVE","published": true,"title": "Meal Bundle","variants": [{"requiresComponents": true,"metafields": [{"namespace": "custom","key": "component_reference","type": "list.variant_reference","value": "[\"gid://shopify/ProductVariant/BURGER_VARIANT_ID\", \"gid://shopify/ProductVariant/FRIES_VARIANT_ID\"]"}]}],"claimOwnership": {"bundles": true}}}
We are claiming the ownership of the bundle parent product here. This is required if you need to render the product configuration extension in admin.
We are claiming the ownership of the bundle parent product here. This is required if you need to render the product configuration extension in admin.
Anchor to Step 8: Install the extension on a dev storeStep 8: Install the extension on a dev store
To test your function, you need to make it available to your dev store.
- If you're developing a function in a language other than JavaScript or TypeScript, ensure you have configured
build.watchin your function extension configuration.
-
Navigate back to your app root:
Terminal
cd ../..
-
Use the Shopify CLI
devcommand to start the dev preview:Terminal
shopify app devYou can keep the preview running as you work on your function. When you make changes to a watched file, Shopify CLI rebuilds your function and updates the function extension's drafts, so you can immediately test your changes.
-
Follow the CLI prompts to preview your app on your development store.
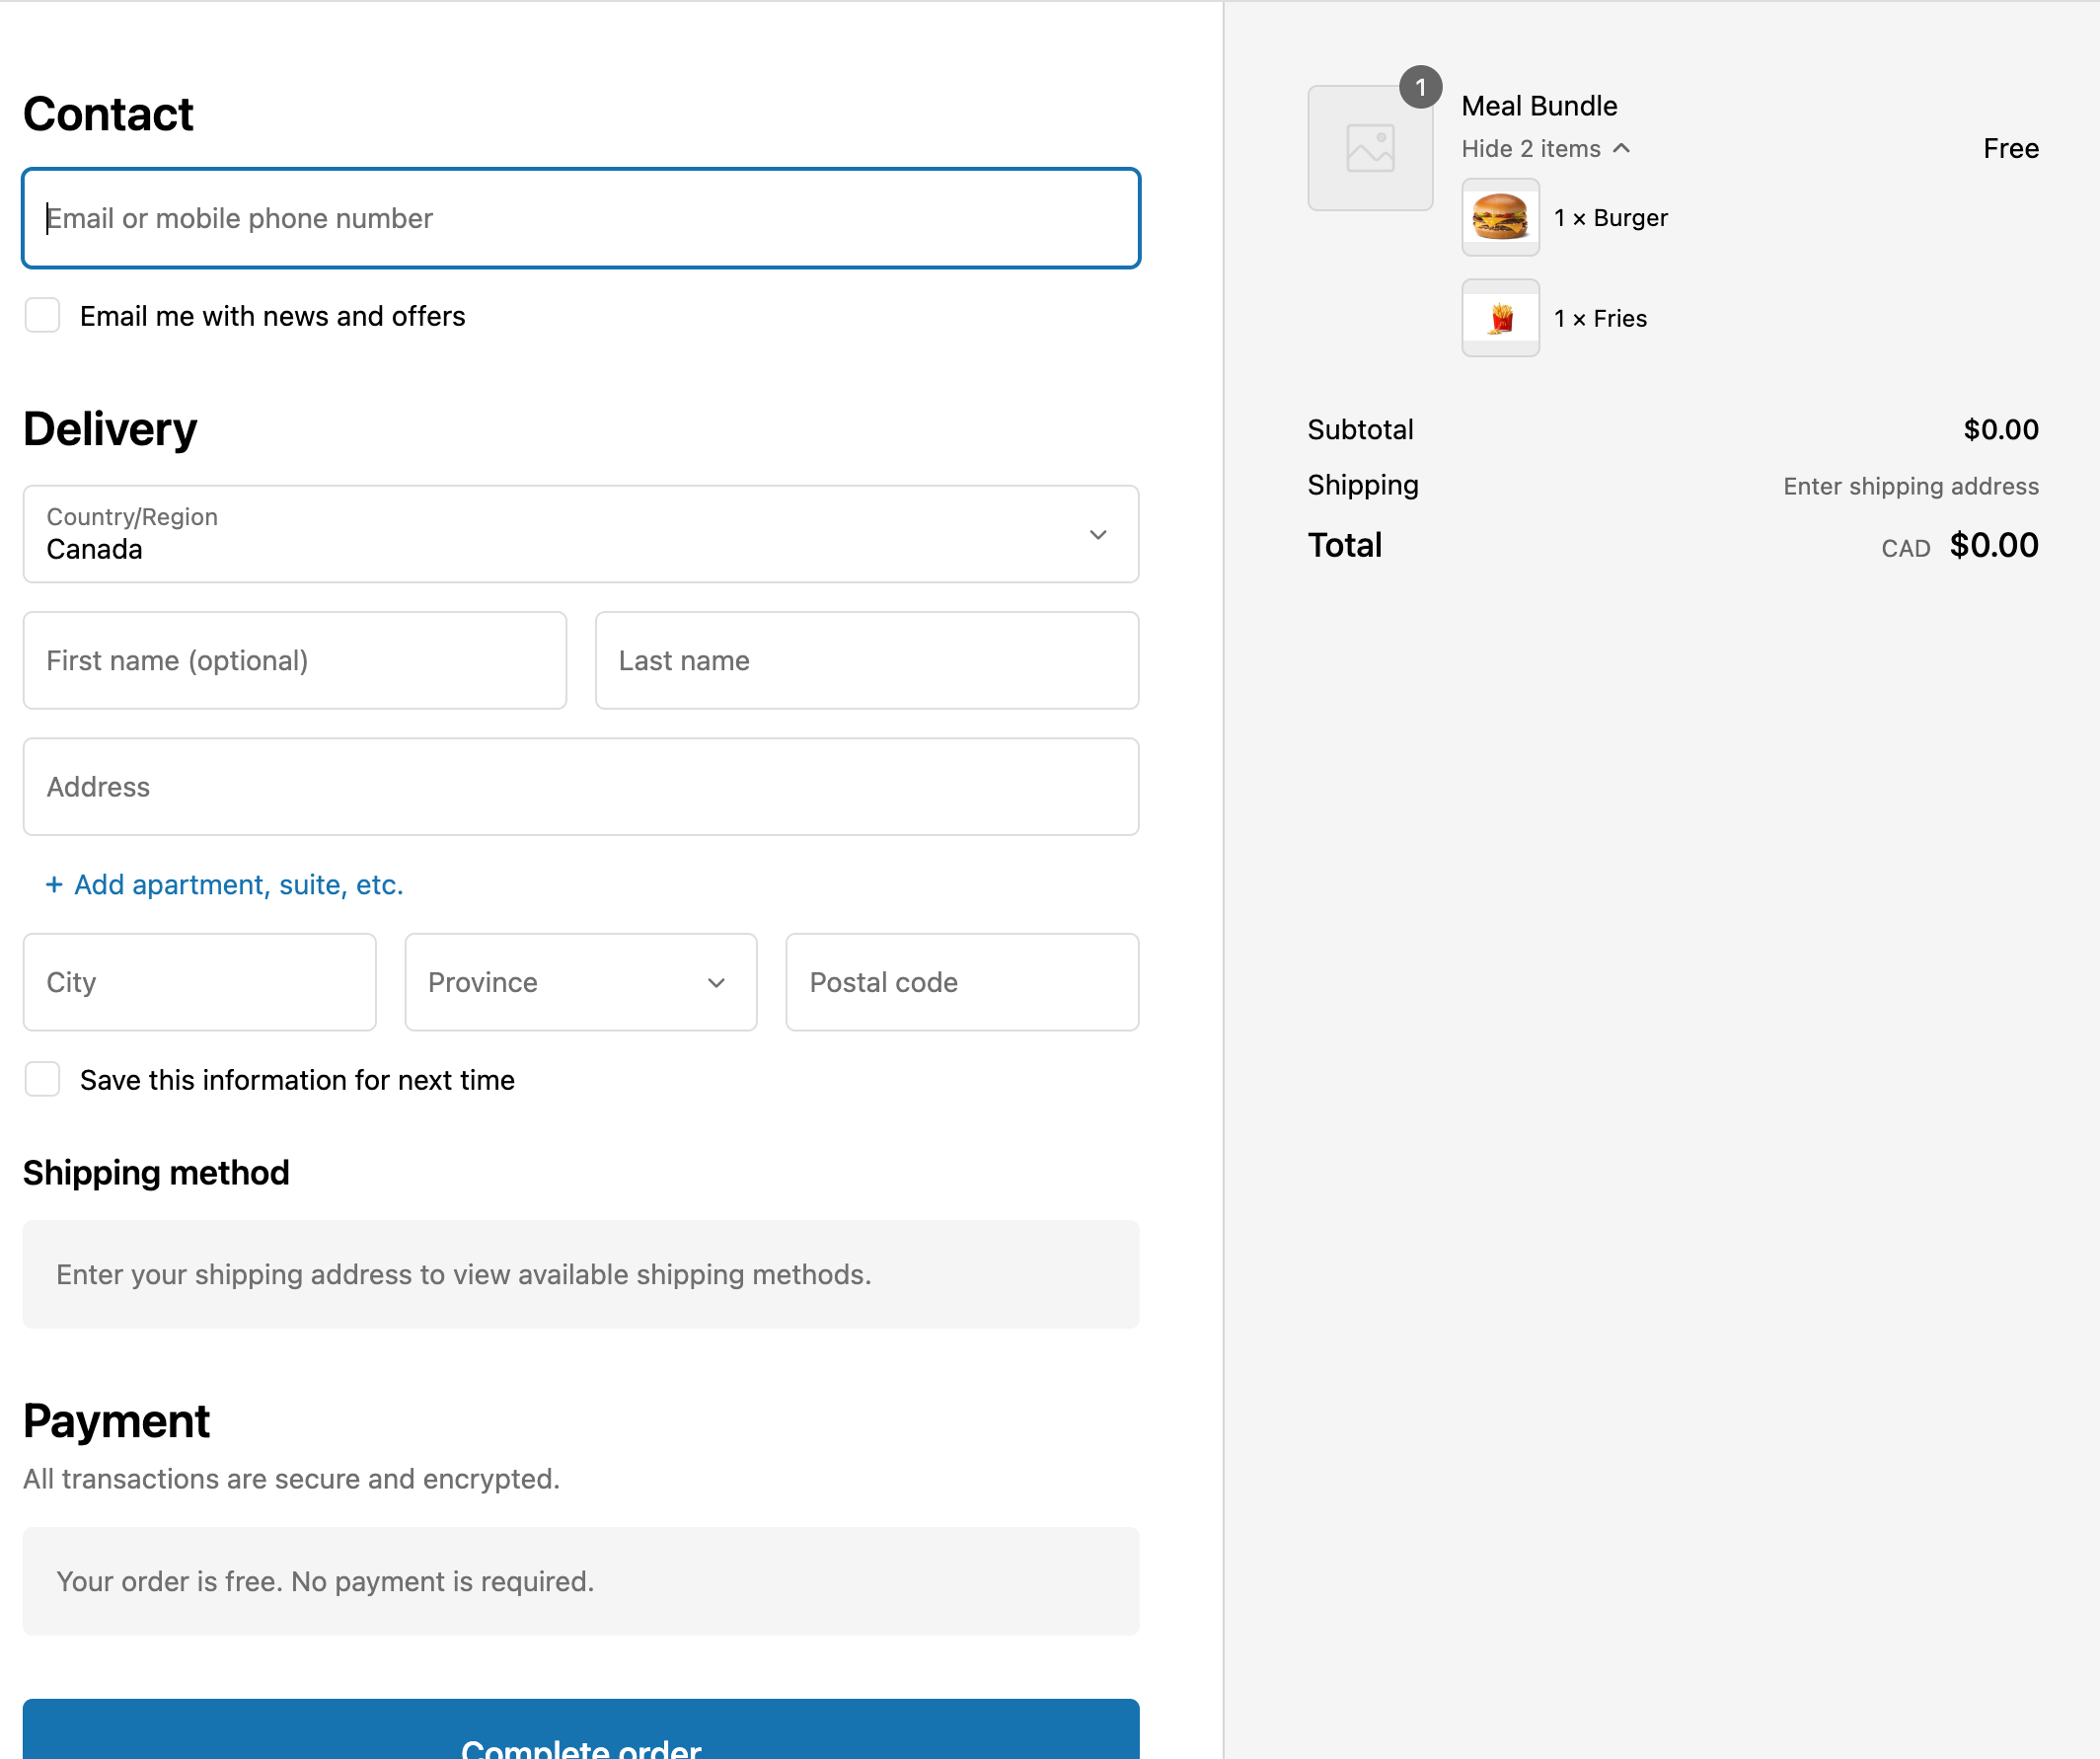
Anchor to Step 9: Preview the functionStep 9: Preview the function
Follow the steps below to test your function on your dev store.
- Navigate to your online storefront.
- Add the meal bundle product to your cart.
- Navigate to checkout.
- You will now see that your meal bundle product is converted into a bundle which includes a burger and fries.
Anchor to Step 10: Deploy the extensionStep 10: Deploy the extension
When you're ready to release your changes to users, you can create and release an app version. An app version is a snapshot of your app configuration and all extensions.
-
Navigate to your app directory.
-
Run the following command.
Optionally, you can provide a name or message for the version using the
--versionand--messageflags.Terminal
shopify app deploy
Releasing an app version replaces the current active version that's served to stores that have your app installed. It might take several minutes for app users to be upgraded to the new version.
If you want to create a version, but avoid releasing it to users, then run the deploy command with a --no-release flag.
You can release the unreleased app version using Shopify CLI's release command, or through the Dev Dashboard.
If you want to create a version, but avoid releasing it to users, then run the deploy command with a --no-release flag.
You can release the unreleased app version using Shopify CLI's release command, or through the Dev Dashboard.
Anchor to Next stepsNext steps
- Learn how to add a product configuration extension for bundles in the Shopify admin.
- Learn how to use variables in your input query.