Build a credit card payments extension with a checkout UI extension
UI extensibility for payments extensions is currently in invite-only beta, and Shopify will need to enable the beta for your extension.
UI extensibility for payments extensions is currently in invite-only beta, and Shopify will need to enable the beta for your extension.
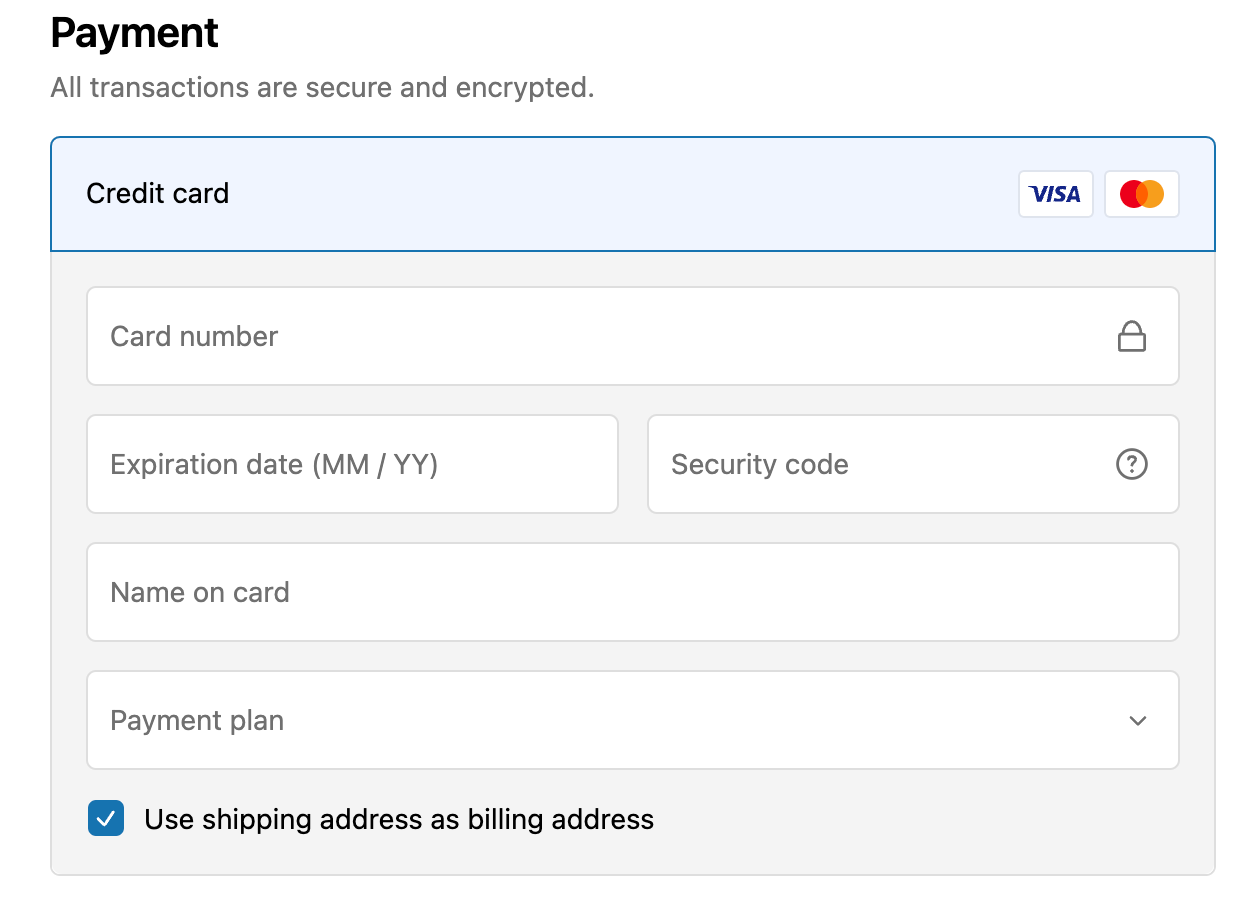
Checkout UI extensions enable Partners to define additional fields required for processing credit cards with a payments extension. Partners can then collect all essential information upfront, such as an installments payment plan, directly on the checkout page before a payment is initiated. This improvement simplifies the checkout process and offers a smoother buyer experience.
Anchor to What you'll learnWhat you'll learn
This document builds upon the credit card payments extension tutorial, which you may refer to as needed for additional guidance.
This document builds upon the credit card payments extension tutorial, which you may refer to as needed for additional guidance.
In this tutorial, you'll learn how to do the following tasks:
- Create a checkout UI extension
- Create a credit card payments extension with extensibility
- Explore the payment, refund, void, reject and capture session flows, and how to implement them yourself
Anchor to RequirementsRequirements
- Install Shopify CLI
- Create a Shopify Partner account and apply to become a payments partner
- Create a dev store
- Create an encryption certificate
Anchor to Step 1: Scaffold an appStep 1: Scaffold an app
To build an extensible credit card payments extension, you will need to create a new credit card app or use an existing credit card app with extensibility features turned on by Shopify.
If you opt to create a new app, begin by using the Shopify CLI to set up your app. As a first step, we recommend deploying a skeleton app to establish a base for customization.
Anchor to Step 2: Create a checkout UI extensionStep 2: Create a checkout UI extension
Your checkout UI extension should not request scopes that enable network access. For more details on the restrictions applicable to access scopes, please refer to the restrictions section.
Your checkout UI extension should not request scopes that enable network access. For more details on the restrictions applicable to access scopes, please refer to the restrictions section.
After creating your app, generate a checkout UI extension and deploy your app to Shopify. This extension will be used to collect additional information that's required to process a payment.
-
Use the Shopify CLI to scaffold a checkout UI extension for your app.
-
Name your extension and choose to work in TypeScript Preact.
NoteA sample extension, written in Typescript Preact, is shown below in the Sample Checkout UI Extension section. Please make sure to use the target and APIs as shown in the example.
Note:A sample extension, written in Typescript Preact, is shown below in the Sample Checkout UI Extension section. Please make sure to use the target and APIs as shown in the example.
-
After you generate the extension, deploy your app. This will allow you to link the checkout UI extension with your payments app extension in the next section.
-
Navigate to your app in Shopify Partners (Apps > Your App).
Anchor to Step 3: Create a payments extensionStep 3: Create a payments extension
Your Shopify app becomes a payments app after you've created and configured your payments extension.
-
Run the following command to start generating your payments extension:
Terminal
shopify app generate extension -
When prompted for Type of extension, select Payments extensions > Credit Card and name your extension.
Anchor to Step 4: Configure your payments app extensionStep 4: Configure your payments app extension
Configuration of an extensible credit card payments app extension is similar to a Credit Card payments app extension.
Your payments app extension configures the following fields:
Field | Description |
|---|---|
payment_session_url required | The URL that receives payment and order details from the checkout. |
refund_session_url required | The URL that refund session requests are sent to. |
capture_session_url required | The URL that capture session requests are sent to. This is only used if your payments app supports merchant manual capture. |
void_session_url required | The URL that void session requests are sent to. This is only used if your payments app supports merchant manual capture or void payments. |
confirmation_callback_url optional | The URL that confirm session requests are sent to. This URL is required if your payments app supports 3-D Secure authentication. |
supported_countries required | The countries where your payments app is available. Includes list of ISO 3166 (alpha-2) country codes where your app is available for merchants to install. Ensure the countries match the geographic requirements in your app listing when submitting your app for review. |
supports_moto required | Enables Mail Order/Telephone Order (MOTO), allowing merchants to manually process transactions using a customer's credit card information. The moto attribute in payment method data is only available in API version 2024-07 and later. |
supports_3ds required | 3-D Secure support is mandated in some instances. For example, you must enable the 3-D Secure field if you plan to support payments in countries which have mandated 3-D Secure. |
supported_payment_methods required | The payment methods (for example, Visa) that are available with your payments app. |
supports_installments required | Enables installments |
supports_deferred_payments required | Enables deferred payments |
merchant_label required | The name for your payment provider extension. This name is displayed to merchants in the Shopify admin when they search for payment methods to add to their store. Limited to 50 characters. |
test_mode_available required | Enables merchants using your payments app to test their setup by simulating transactions. To test your app on a dev store, your payment provider in the Shopify admin must be set to test mode. |
api_version required | The Payments Apps GraphQL API version used by the payment provider app to receive requests from Shopify. You must use the same API version for sending GraphQL requests. You can't use the unstable version of the API in production. API versions are updated in accordance with Shopify's general API versioning timelines. |
multiple_capture optional | Enables merchants using your payment provider app to partially capture an authorized payment multiple times up to the full authorization amount. This is used only if your payments app supports merchant manual capture. |
encryption_certificate_fingerprint required | The certificate that Shopify uses to generate the ephemeral key and encrypt the credit card information of the customer. Refer to manage encryption certificates section to learn more. |
ui_extension_handle required | The UI extension that renders your payments app in checkout. This value can only be a UI extension linked to this specific payments app. |
checkout_payment_method_fields required | The fields your payments app will accept from buyers in checkout (for example, installment details, payment plan). Each field is composed of a key name, and a data type. The data type defines the input that a buyer can provide. |
The UI Extension and UI Extension Field Definitions attributes are new app extension configurations. You'll want to select the UI extension you created in Create a Checkout UI Extension as the value for the UI Extension field.
The UI Extension and UI Extension Field Definitions attributes are new app extension configurations. You'll want to select the UI extension you created in Create a Checkout UI Extension as the value for the UI Extension field.
The UI extension generated in Create a checkout UI extension will determine what fields, validation, and form submission behavior is presented to buyers during checkout.
Anchor to UI ExtensionUI Extension
This is where you link the checkout extension you previously built with your new payment app extension to tie them together.
| Property name | Description |
|---|---|
ui_extension_handle required | The UI extension that renders your payments app in checkout. This value can only be a UI extension linked to this specific payments app. |
Anchor to UI Extension Field DefinitionsUI Extension Field Definitions
Specify the fields your UI extensions should collect to ensure the payment method validates and receives the correct data from the front end.
| Property name | Description |
|---|---|
checkout_payment_method_fields required | The fields your payments app will accept from buyers in checkout (for example, installment details, payment plan). Each field is composed of a key name, and a data type. The data type defines the input that a buyer can provide. |
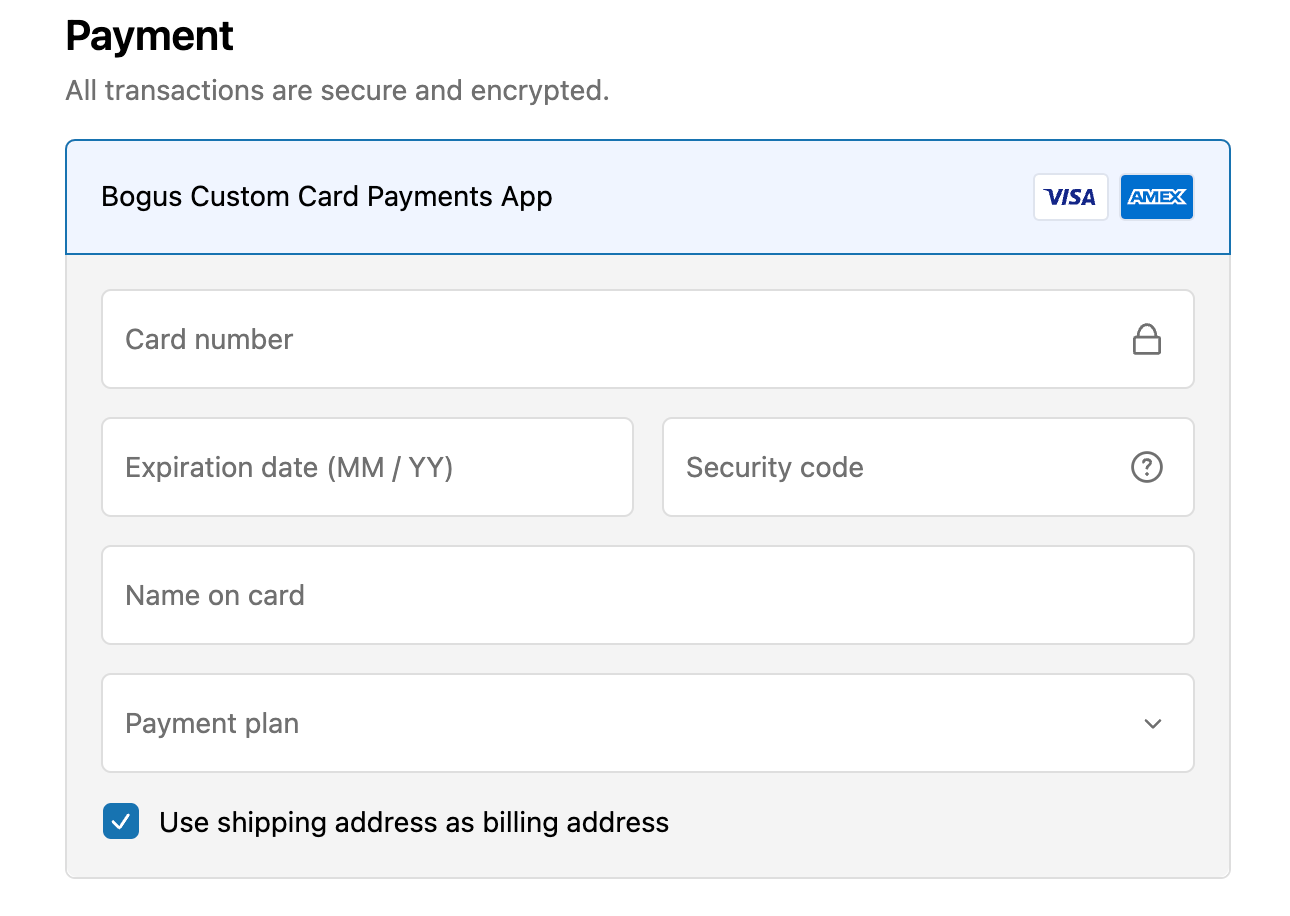
Example UI extension field definitions
The example field definitions configure a checkout form that appears as follows:
Anchor to Step 5: Set up your payments appStep 5: Set up your payments app
Anchor to Update your app configurationUpdate your app configuration
Shopify apps are embedded by default, but payments apps are an exception to this, because they don't need to render anything in Shopify admin. In shopify.app.toml, update the embedded and set it to false.
The write_payment_gateways and write_payment_sessions scopes are automatically granted through the payment extension. Omit them from your shopify.app.toml file on initial deployment. In later deployments, you can add these scopes to request merchant permission for your payment extension.
Anchor to Step 6: Deploy your extensionStep 6: Deploy your extension
The write_payment_gateways and write_payment_sessions scopes are automatically granted to your app through the payment extension. Therefore, on initial deployment of your app, you should omit the scopes from your shopify.app.toml file.
However, you can include these scopes in later deployments, if you intend to use the scopes within the shopify.app.toml file to request permission from merchants to install your payment extension.
Create and release an app version with the deploy command.
-
Navigate to your app directory.
-
Run the following command:
Terminal
shopify app deployAn app version created using Shopify CLI contains the following:
-
The app configuration from the local configuration file.
-
The local version of the app's extensions. If you have an extension in your deployed app, but the extension code doesn't exist locally, then the extension isn't included in your app version.
Releasing an app version replaces the current active version that's served to stores with your app installed. It might take several minutes for app users to be upgraded to the new version.
If you want to create a version, but want to avoid releasing it to users, then run the deploy command with a --no-release flag.
You can release the unreleased app version using Shopify CLI's release command, or through the Dev Dashboard.
If you want to create a version, but want to avoid releasing it to users, then run the deploy command with a --no-release flag.
You can release the unreleased app version using Shopify CLI's release command, or through the Dev Dashboard.
Anchor to Step 7: Start your development serverStep 7: Start your development server
-
Start
app devif it's not already running:Terminal
shopify app devIn your terminal, select your dev store. You can use the generated URL to test your payments app by using it in your payments app configuration. If you want a consistent tunnel URL, then you can use the
--tunnel-urlflag with your own tunnel when starting your server. -
Press
pto open the app in your browser. This brings you to your development store's admin.
Anchor to Step 8: Preview payment extensions on a dev storeStep 8: Preview payment extensions on a dev store
Once this version has been released, follow these steps to install your app on your dev store:
-
From the app splash page, enter an account name.
-
Select Ready > Unstable and click Submit.
-
In the banner, click Return to Shopify.
-
Enable test mode.
-
Click Activate.
Anchor to Explore the payment processing flowsExplore the payment processing flows
The payments app functions similarly to the credit card payment method, allowing you to gather additional information from the buyer at the outset to facilitate payment processing. The primary distinction is that checkout UI extension data is included in the start_payment_session body.
Outlined below is a comprehensive diagram depicting the potential flow for processing an extensible credit card payment. It's important to note that the pending state is optional; you can directly proceed to either resolve or reject the payment if there is no need to place it in a pending state. For further details on processing credit card payments, please refer to this resource.
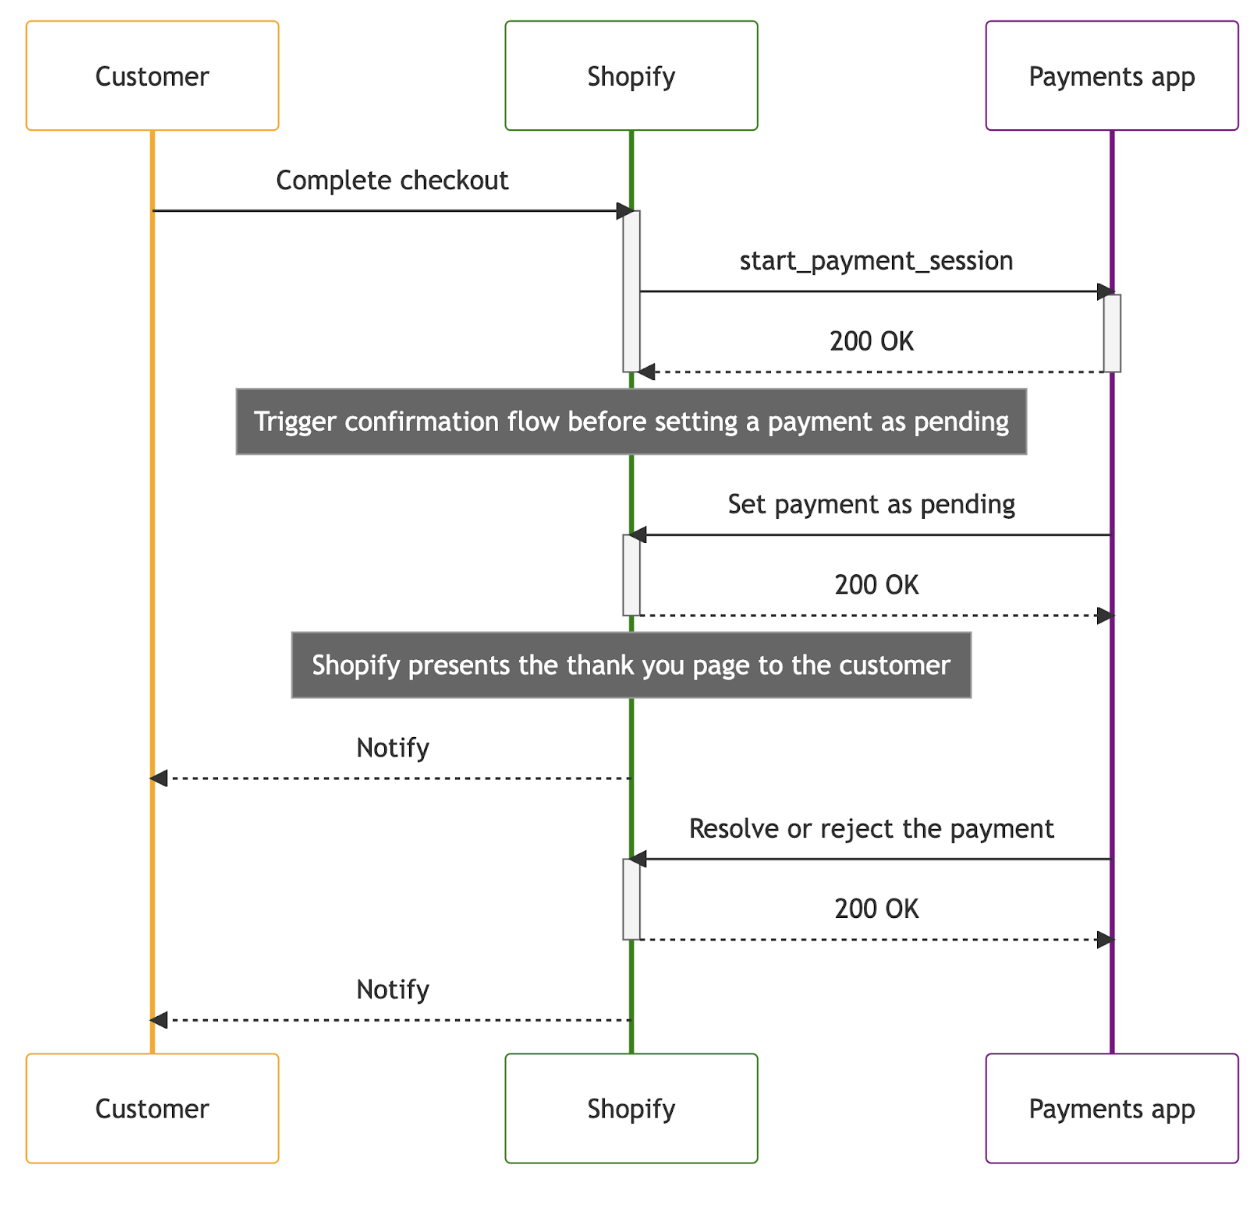
Once we start the payment session with your payments app, that initiation will also contain the metadata in a shape similar to what was specified within the field definitions. A sample payment session payload of what is to be expected can be seen below.
Anchor to Payment sessionPayment session
Payments with payments apps are processed asynchronously. When the buyer completes their checkout, a request will be sent from Shopify to the Payment session URL defined in Configure your payments app extension, with the checkout and payment details. The Payments app should respond with HTTP 2xx to indicate that the payment session was started, and should begin processing the extensible credit card payment at this point.
The new metadata we are passing through payment session would be contained within the payment_method request parameters under attributes:
Example payment method request parameters
Start session
Request header
Request body
Response body
Anchor to Payment session with localized fieldsPayment session with localized fields
For certain countries that require additional fields on orders, localized_fields are included in the payload inside the transaction_metadata object. In the case of Brazil, localized_fields contains the CPF value. As a result of this, payment app developers won't need to manually add a CPF field to the payments app.
Make sure you're using the 2025-10 version or higher in your payments app extension to access this feature.
Make sure you're using the 2025-10 version or higher in your payments app extension to access this feature.
Example transaction metadata for localized fields
Start session
Request header
Request body
Response body
Anchor to ResolveResolve
After the payments app has responded to the initial start payment session request, it should begin processing the payment. Since this is an asynchronous process, the payments app will be performing the next step independently, through the paymentSessionResolve mutation on the Payments Apps GraphQL API. This mutation will resolve the payment session, indicating that the payment was successful.
POST https://{shop}.myshopify.com/payments_apps/api/unstable/graphql.json
Mutation
Input variables
JSON response
After this, the payment will be marked as resolved in Shopify.
Anchor to RejectReject
If a payment was unsuccessful for any reason, then payments app must use the paymentSessionReject mutation.
POST https://{shop}.myshopify.com/payments_apps/api/unstable/graphql.json
Mutation
Input variables
JSON response
Anchor to ErrorError
This section describes the reasons you can use to reject a payment session.
Anchor to Refund SessionRefund Session
The refund flow begins with an HTTP POST request sent from Shopify to the payments app's refund session URL. Shopify must receive an HTTP 201 (Created) response for the refund session creation to be successful. For more information about refund sessions and how to reject or resolve refund sessions, refer to Explore refund sessions.
Example request body:
Example request body
Anchor to ResolveResolve
After the app successfully processes the refund request, the refundSessionResolve mutation automatically resolves the refund. The id argument corresponds to the gid of the refund.
Example GraphQL mutation:
POST https://{shop}.myshopify.com/payments_apps/api/unstable/graphql.json
Mutation
Input variables
JSON response
After this, the refund will be marked as resolved in Shopify.
Anchor to RejectReject
If the app can't process a refund, then it needs to reject it. You should only reject a refund in the case of final and irrecoverable errors. Otherwise, you can attempt to process the refund again.
The refund is rejected using the refundSessionReject mutation.
As part of the rejection, a reason why the refund was rejected must be included as part of RefundSessionRejectionReasonInput.
POST https://{shop}.myshopify.com/payments_apps/api/unstable/graphql.json
Mutation
Input variables
JSON response
Anchor to Capture SessionCapture Session
A capture can only be performed when the payment initiated by Shopify has a kind property with a value of authorization. With an authorization, the app places a hold on funds and then replies to Shopify's capture request.
The capture flow begins with an HTTP POST request sent from Shopify to the payments app's capture session URL. You can read more about capture sessions and how to reject or resolve capture sessions here.
Example request body:
Example request body
Anchor to ResolveResolve
After the app successfully processes the capture request, the captureSessionResolve mutation automatically resolves the capture. The id argument corresponds to the gid of the capture.
Example GraphQL mutation:
POST https://{shop}.myshopify.com/payments_apps/api/unstable/graphql.json
Mutation
Input variables
JSON response
After this, the capture will be marked as resolved in Shopify.
Anchor to RejectReject
If you don't want to process a capture request, then you should reject it. You might want to reject a capture if authorization has expired or if you suspect that the request is fraudulent or high risk. You should only reject a capture in the case of final and irrecoverable errors. Otherwise, you should re-attempt to resolve the capture.
The app rejects a capture using the captureSessionReject mutation.
As part of the rejection, you need to include a reason why the capture was rejected as part of CaptureSessionRejectionReasonInput.
Example GraphQL mutation:
POST https://{shop}.myshopify.com/payments_apps/api/unstable/graphql.json
Mutation
Input variables
JSON response
Anchor to Void SessionVoid Session
A void can only be performed when the payment initiated by Shopify has a kind property with a value of authorization.
The void flow begins with an HTTP POST request sent from Shopify to the payments app's void session URL. You can read more about void sessions and how to reject or resolve void sessions here.
Example request body:
Example request body
Anchor to ResolveResolve
After the app successfully processes the void request, the voidSessionResolve mutation automatically resolves the void. The id argument corresponds to the gid of the void.
Example GraphQL mutation:
POST https://{shop}.myshopify.com/payments_apps/api/unstable/graphql.json
Mutation
Input variables
JSON response
After this, the void will be marked as resolved in Shopify.
Anchor to RejectReject
If your app can't process a void request, then you should reject it. You should only reject a void in the case of final and irrecoverable errors. Otherwise, you can attempt to resolve the void again.
You can reject a void using the voidSessionReject mutation. As part of the rejection, you need to include a reason why the void was rejected as part of VoidSessionRejectionReasonInput.
Example GraphQL mutation:
POST https://{shop}.myshopify.com/payments_apps/api/unstable/graphql.json
Mutation
Input variables
JSON response
Anchor to Sample Checkout UI ExtensionSample Checkout UI Extension
Update to the latest version of checkout UI extensions so you can use web components. The legacy checkout-ui-extensions-react package is no longer required.
Update to the latest version of checkout UI extensions so you can use web components. The legacy checkout-ui-extensions-react package is no longer required.
The following example demonstrates a checkout UI extension for a credit card payments app. It uses hooks, such as useApplyPaymentMethodAttributesChange and usePaymentMethodAttributeValues from the Preact-specific package.
extensions/<extension-name>/src/Checkout.jsx
You must specify the target you're rendering to (purchase.checkout.payment-option-item.hosted-fields.render-after) in the shopify.extension.toml file in your extension directory. The standardAPI is a good starting point to see what is available for your checkout extension. A list of available components can be found here.
You must specify the target you're rendering to (purchase.checkout.payment-option-item.hosted-fields.render-after) in the shopify.extension.toml file in your extension directory. The standardAPI is a good starting point to see what is available for your checkout extension. A list of available components can be found here.
Anchor to BIN Range ConfigurationBIN Range Configuration
This example exposes the BIN number entered by buyers to the checkout UI extension so the extension can make decisions about what to display. To get the BIN number entered for the credit card on checkout, the following code can be used:
BIN Range Example
Anchor to RestrictionsRestrictions
-
Payments extensions using checkout UI extensions should not request scopes enabling network access. This will result in the extension being rejected during review. Instead of fetching data using an external network call, consider storing the data using Metafields for your app & accessing the same later.
-
Companion app:
- If access to order data is needed for any reason, a companion app may be used to request and gain access to the data from the merchant by requesting read_all_orders scope for that app. The only scopes that payments app extension should not request for are
write_checkout_extension_paymentsandwrite_payment_sessions. - If the companion app is using web pixels, you will need to request access to the consent feature to ensure that the pixel fires consistently. Please ask partner manager to get you the access.
- If access to order data is needed for any reason, a companion app may be used to request and gain access to the data from the merchant by requesting read_all_orders scope for that app. The only scopes that payments app extension should not request for are
Anchor to Tutorial complete!Tutorial complete!
Congratulations! You set up a credit card payments extension with UI extensibility.