Block schema
Theme blocks support the {% schema %} Liquid tag. This tag is used to define the following block attributes and settings:
These attributes and settings enable different customization options and preconfigurations of the block inside the theme editor.
The following is an example of a block schema that opts-in to supporting nested blocks with its block attribute, defines some background-related settings, and assembles different variations of those settings with its presets attribute:
/blocks/slide.liquid
Each block can have only a single {% schema %} tag, which must contain only valid JSON and can only use the attributes listed below. The schema tag can be placed anywhere within the block file, but it can't be nested inside another Liquid tag. It doesn't output its contents, or render any Liquid included inside it.
Having more than one {% schema %} tag, or placing it inside another Liquid tag, will result in an error.
Having more than one {% schema %} tag, or placing it inside another Liquid tag, will result in an error.
Anchor to namename
The name attribute determines the block title that's shown in the theme editor. For example, the following schema returns the following output:
Output

Anchor to Showing dynamic block titles in the theme editorShowing dynamic block titles in the theme editor
In specific cases, the theme editor can display an input setting value as the title of a block in the theme editor sidebar. This can help merchants to identify and rearrange blocks in a section.
The theme editor checks the id values of the settings in a block to determine the best one to use for the block title.
The theme editor uses settings with the following id values, in the following order of precedence:
headingtitletext
If a setting with a matching id value doesn't exist, then the block name is used as the title.
For example, the following block with a setting id of text displays in the sidebar with the title Welcome to our store.
File
Anchor to settingssettings
You can create block-specific settings to enable merchants to customize the block with the settings object:
/blocks/slide.liquid
All block setting IDs must be unique within each block. Having duplicate IDs within a block throws an error.
All block setting IDs must be unique within each block. Having duplicate IDs within a block throws an error.
Anchor to Accessing block settingsAccessing block settings
Block settings can be accessed through the block object. Refer to Access settings to learn more.
Anchor to blocksblocks
Theme blocks can accept other app and theme blocks as children using the blocks attribute of their schema:
The "@app" type denotes that this block accepts app blocks. App blocks enable app developers to create blocks for merchants to add app content to their theme without having to directly edit theme code.
The "@theme" type denotes that this block is compatible with other theme-defined blocks that live in the /blocks folder of the theme.
Theme blocks can also be made individually accessible by explicitly referencing them.
Unlike sections, which can define blocks locally using the blocks attribute of their schema, Theme blocks can't define local blocks in the blocks attribute of their schema.
You can feature the most relevant theme blocks in the block picker for quicker access.
You can feature the most relevant theme blocks in the block picker for quicker access.
Anchor to Rendering nested blocksRendering nested blocks
You can render a block's child blocks by using the {% content_for 'blocks' %} Liquid tag:
In the example above, each block's content is outputted by the {% content_for 'blocks' %} tag in the order stored in the JSON template.
Theme blocks can be nested up to 8 levels deep, excluding the section level.
Theme blocks can be nested up to 8 levels deep, excluding the section level.
Anchor to Recommended blocksRecommended blocks
You can highlight specific theme blocks in the block picker to make them easier to find. To do this, include the @theme block type along with your recommended blocks in the blocks array.
In this example, the text, button, and _marquee blocks appear immediately in the picker. Other available theme blocks remain accessible by selecting Show all.
Anchor to presetspresets
Presets are predefined block configurations that merchants can select when adding blocks to a JSON template. Presets help you quickly provide merchants with different layouts and use cases by adjusting block settings. Additionally, presets of a block may reference other child blocks and assemble them in any number of configurations.
Presets appear in the Add block picker as follows:
Add block interface
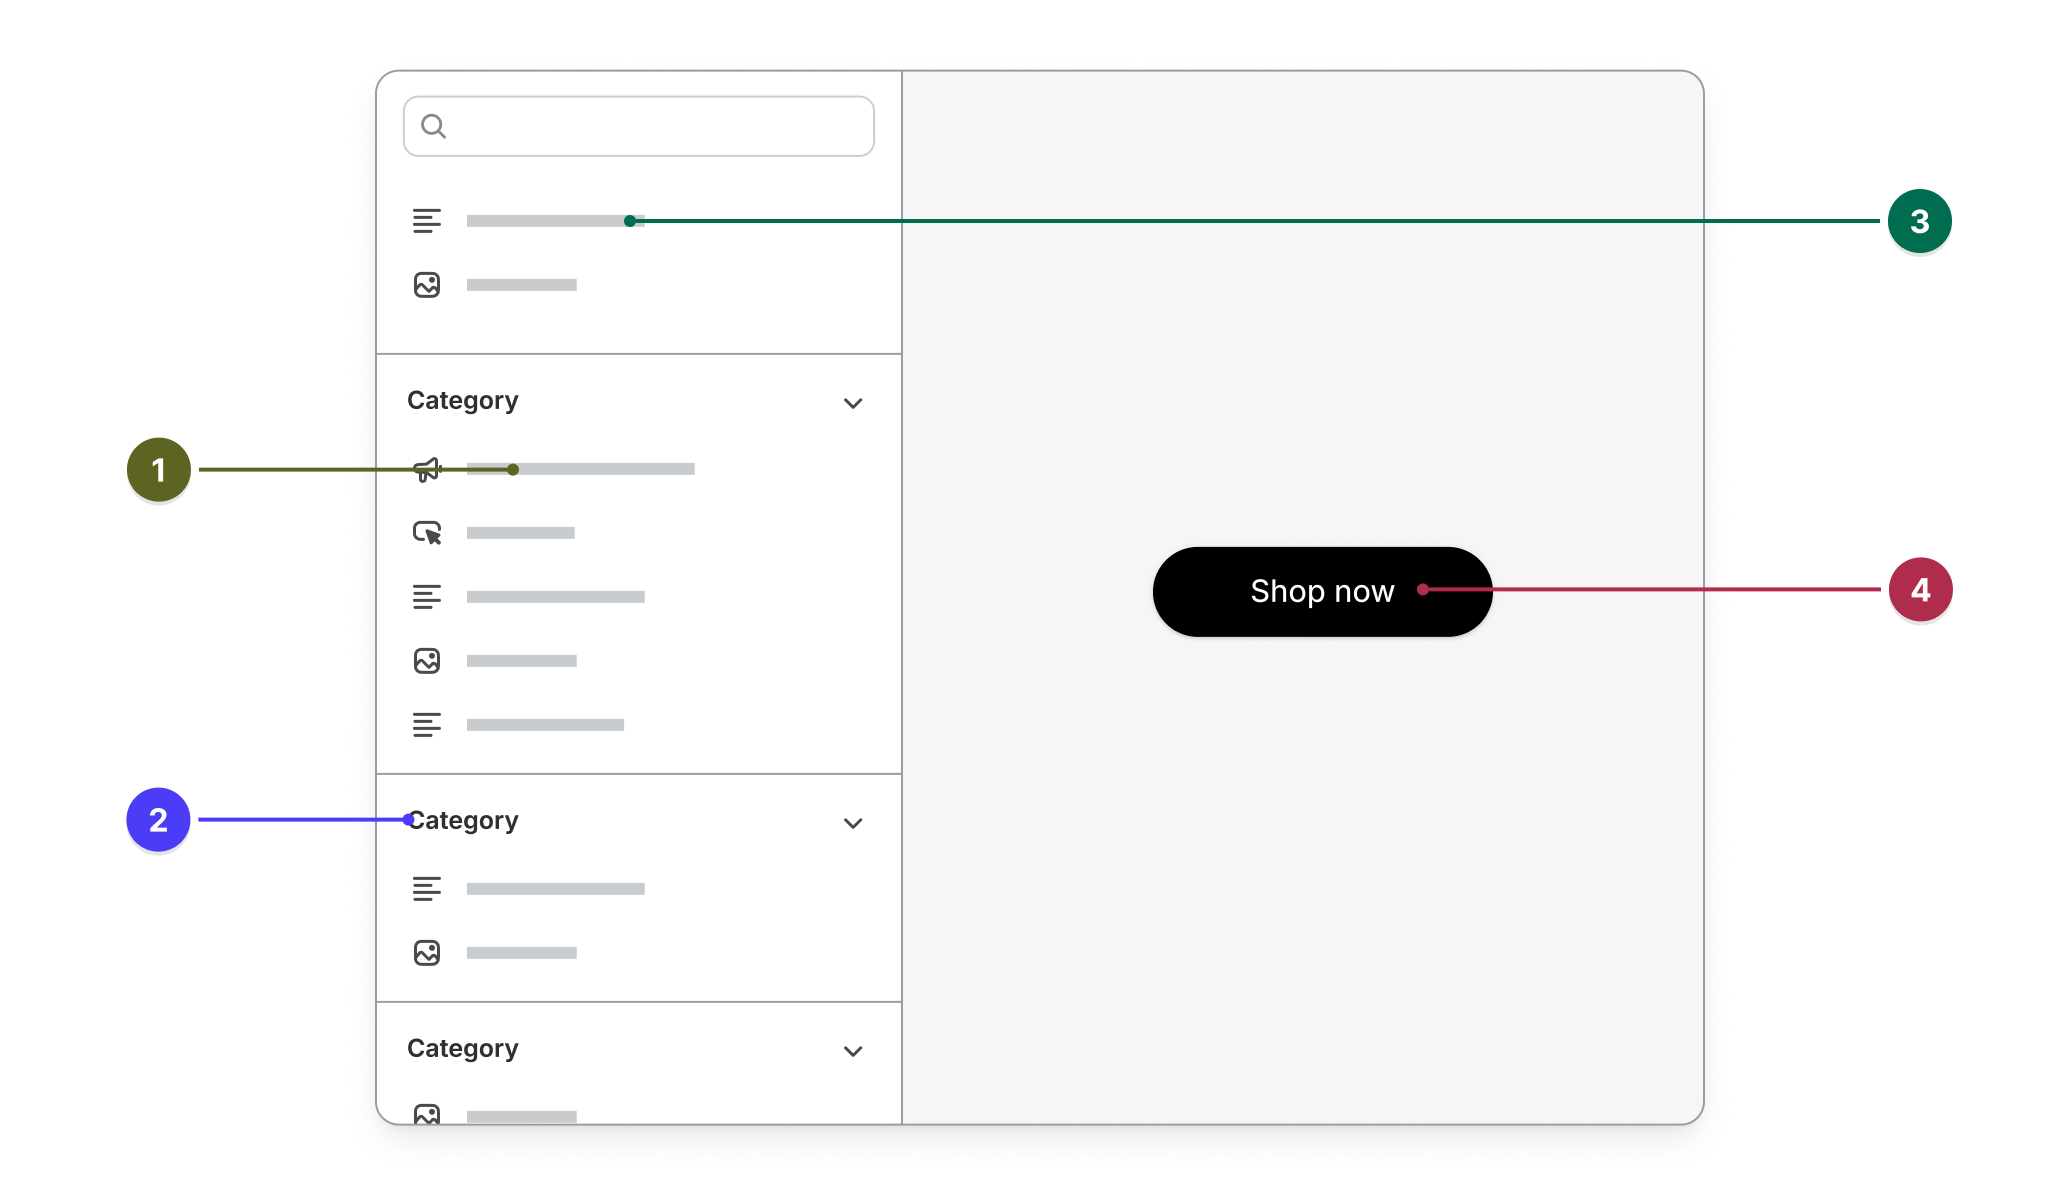
| Number | Description |
|---|---|
| 1 | Presets appear alphabetically based on their name attribute. |
| 2 | Presets can optionally be grouped into collapsible categories using the category attribute. |
| 3 | Uncategorized presets are always displayed first. |
| 4 | The theme editor automatically generates a preset preview. You can further customize this preview using visual preview mode. |
Block presets have the following attributes:
| Attribute | Description | Required |
|---|---|---|
name | The preset name displayed in the theme editor's Add block picker and sidebar, and is persisted in the JSON template when you add a block. | Yes |
category | Groups related presets together in the theme editor's Add block picker. | No |
settings | Default values for settings you want to pre-populate. Each entry includes the setting name and its value. | No |
blocks | Default blocks included in the preset. Each block entry must include a type attribute matching the block type, and a settings object formatted similarly to the settings attribute above. Optionally, include a name attribute to display when merchants add the block in the editor. | No |
Here's an example of how presets are defined within a block schema, assuming that the theme also contains a text block located in the /blocks/text.liquid Liquid file:
/blocks/slide.liquid
By default, when Shopify renders a block, it's wrapped in a <div> element with a unique id attribute:
If you don't want to use a <div>, then you can specify which kind of HTML element to use with the tag attribute.
For example, the following schema returns the following output:
Output
The tag attribute accepts any string up to a limit of 50 characters. It can also be used to render custom HTML elements.
The tag attribute accepts any string up to a limit of 50 characters. It can also be used to render custom HTML elements.
Anchor to Rendering blocks without a wrapperRendering blocks without a wrapper
In some advanced use cases, you might want more control over the tag and the attributes that are passed to it. For example, dynamically setting a tag or class name based on the settings of the block. In these scenarios, you can render blocks without a wrapper by setting the tag attribute to null.
When the tag attribute is set to null, Shopify doesn't wrap the contents of the block in a wrapper element, and instead directly outputs the contents of the block.
Blocks that make use of "tag": null should contain a single top level HTML tag within the same Liquid file. Only a single HTML element can be tagged with {{ block.shopify_attributes }}. This element should be the topmost HTML element in the file. This is important to allow the theme editor to move the entirety of the block's markup to a new index when merchants re-order blocks without leaving orphaned HTML elements.
Blocks that make use of "tag": null should contain a single top level HTML tag within the same Liquid file. Only a single HTML element can be tagged with {{ block.shopify_attributes }}. This element should be the topmost HTML element in the file. This is important to allow the theme editor to move the entirety of the block's markup to a new index when merchants re-order blocks without leaving orphaned HTML elements.
Output
For blocks to be compatible with the theme editor, the top level HTML element must be tagged with the {{ block.shopify_attributes }} Liquid tag. This adds the necessary data attributes for the block to be identified by the theme editor. Shopify's theme editor uses that attribute to identify blocks in its JavaScript API.
Shopify automatically adds this attribute for you when it renders the wrapper around blocks, but when the tag attribute is set to null, you must ensure that the top level HTML element of your block has this attribute for it to be compatible with the theme editor.
Shopify automatically adds this attribute for you when it renders the wrapper around blocks, but when the tag attribute is set to null, you must ensure that the top level HTML element of your block has this attribute for it to be compatible with the theme editor.
Anchor to classclass
When Shopify renders a block, it's wrapped in an HTML element with the shopify-block class. You can append other classes by using the class attribute: