Subscriptions API migration guide
This guide outlines the process of migrating a legacy subscriptions app to one that is integrated to Shopify Checkout and that merchants can access directly in the Shopify admin.
Migrating to Shopify comes with a set of UX guidelines and requirements to ensure the best possible merchant experience. For more information, refer to UX guidelines for building migration experiences.
Anchor to What you'll learnWhat you'll learn
This tutorial covers the following concepts:
- Merchant eligibility for subscriptions
- Create selling plans and selling plan groups for your subscriptions
- Create checkout discount codes
- Create delivery profiles for shipping
- Charging taxes
- Add code to the storefront
- Determine customer payment methods status
- Extract Paypal payment methods from Braintree
Anchor to Merchant eligibility for subscriptionsMerchant eligibility for subscriptions
To be eligible to use Shopify subscriptions, merchants need to meet the qualifying criteria. You can execute the following request using the GraphQL Admin API to determine if a shop is eligible to use the new APIs for subscriptions.
POST https://{shop}.myshopify.com/api/{api_version}/graphql.json
GraphQL request
JSON response
Anchor to Create selling plans and selling plan groups for your subscriptionsCreate selling plans and selling plan groups for your subscriptions
To create selling plans for your products, you can use the SellingPlan object. Selling plans can then be grouped into a SellingPlanGroup object that's associated with specific products.
For more information, refer to Selling plans.
Subscriptions that include bundles of different products aren't supported.
Subscriptions that include bundles of different products aren't supported.
Anchor to Create checkout discount codesCreate checkout discount codes
If your checkout currently uses discount codes, then those discount codes need to be created on Shopify. To programmatically add these discount codes to the store, you can use the PriceRule and PriceRuleDiscountCode objects.
For more information, refer to Subscription discounts.
Free shipping discount codes on Shopify need to have a max limit added. If you're migrating existing discount codes, then you need to ask the merchant what value they want to use for this maximum limit.
Free shipping discount codes on Shopify need to have a max limit added. If you're migrating existing discount codes, then you need to ask the merchant what value they want to use for this maximum limit.
Anchor to Create delivery profiles for shippingCreate delivery profiles for shipping
To set up delivery methods on the store, you can use the DeliveryProfile object. A delivery profile stores information about what delivery methods and rates apply to specific products. If the store's products are physical items that need to be shipped, then delivery profiles let you show these shipping methods at checkout.
If your app has defined subscription-specific delivery settings, then these delivery settings need to be added to Shopify using the DeliveryProfile object to continue being available at checkout.
For specific instructions on setting up delivery profiles and associating them with products, refer to Manage delivery profiles.
Anchor to Charging taxesCharging taxes
If your app enables merchants to create custom taxation rules for their subscription products, then these tax rules need to be created in the Shopify admin to continue to be applicable.
To learn more about creating tax rules on Shopify, refer to the merchant documentation about Taxes.
Anchor to Add code to the storefrontAdd code to the storefront
Customers need to be able to purchase products as a subscription from the online store. To make subscription products available from the online store, you need to enable customers to select selling plan from the online store product pages.
The Shopify storefront needs to allow selecting a selling plan, and the "add to cart" button needs to include the selling plan ID when it adds the product to the cart to create subscription orders. The selling plan details, including the ID, selling plan group, pricing, and options, are all available through the Liquid reference. These selling plan details can be included in a call to the POST /cart/add.js Ajax API.
For more information, refer to Showing selling plan groups and selling plans on a product page.
For information on the UX guidelines and requirements around presenting selling plans to customers, refer to Online store Subscription UX guidelines and the Pre-orders and try before you buy UX guidelines.
Some themes provide default support for subscriptions, making code injection redundant. Theme injections should be optional for the merchant to prevent displaying duplicate subscriptions.
Some themes provide default support for subscriptions, making code injection redundant. Theme injections should be optional for the merchant to prevent displaying duplicate subscriptions.
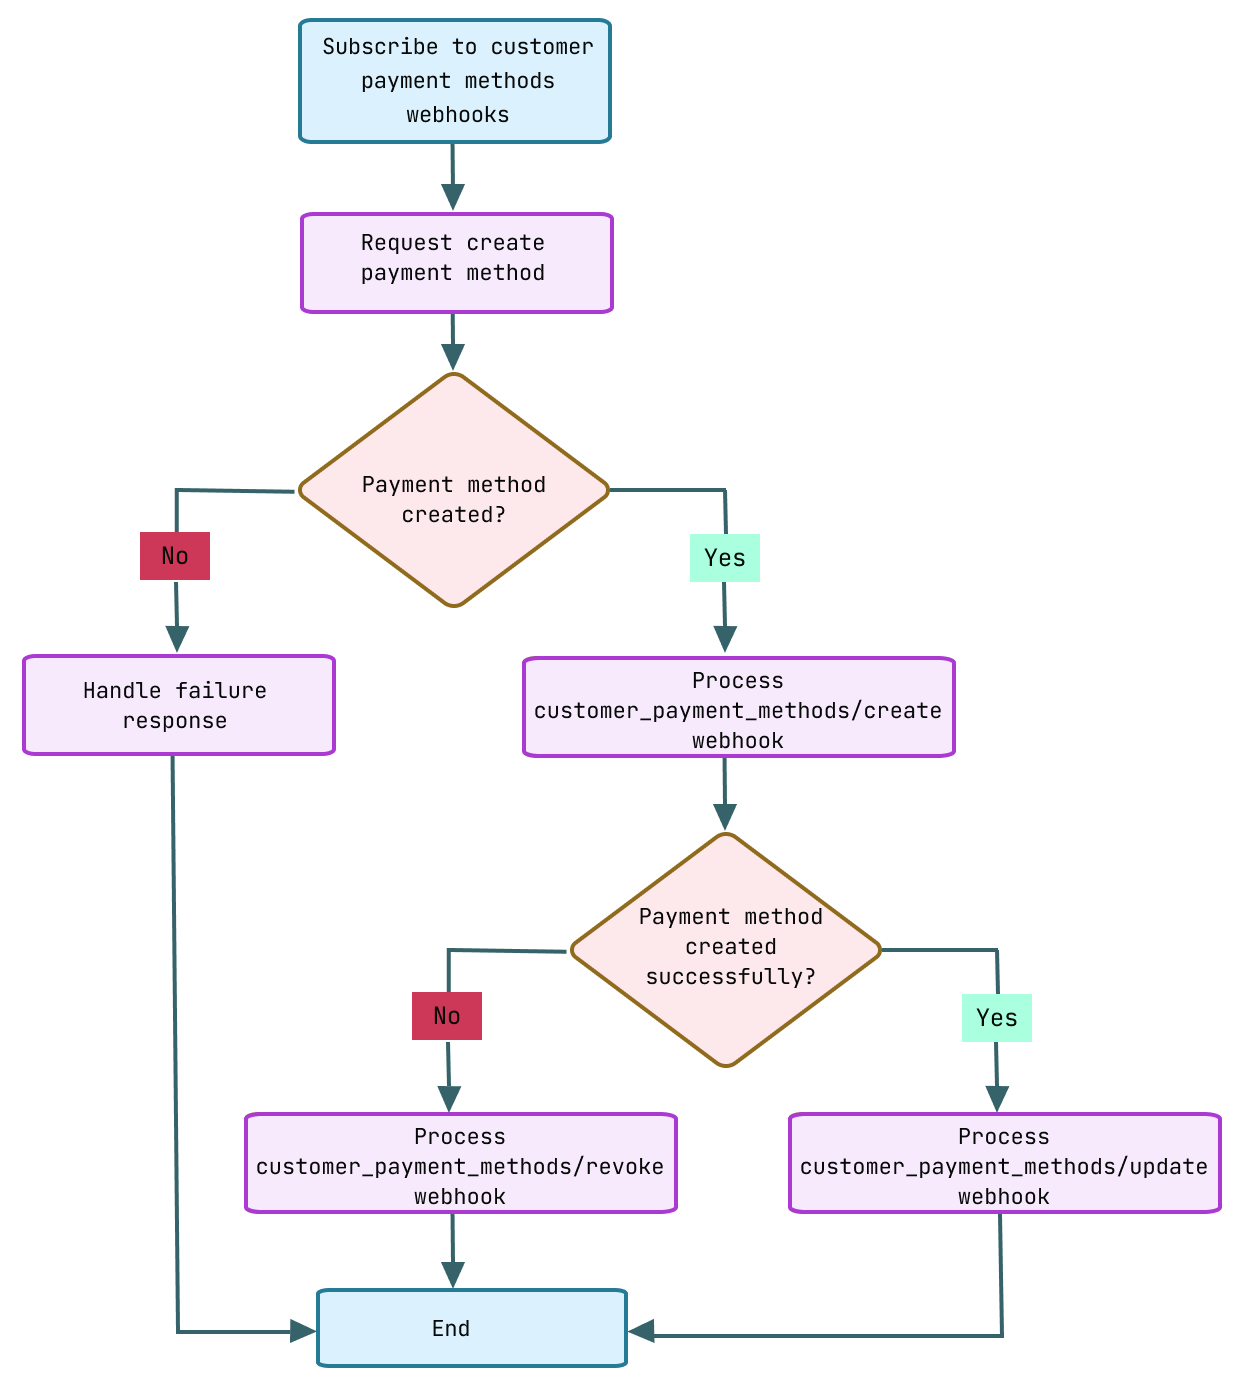
Anchor to Determine customer payment methods statusDetermine customer payment methods status
We process the payment methods with background jobs to improve processing time. Therefore, the initial response of a mutation to create a payment method might return a bogus payment method. Use the following steps to keep track of the payment method status during migration:
- Subscribe to customer payment methods webhooks to get updates as each payment method is imported.
- Execute GraphQL queries to create customer payment methods. The specific GraphQL queries depend on the payment gateway that you're migrating from.
- Listen for webhooks to determine whether the payment methods have been imported successfully.
To subscribe to a webhook event, refer to Webhooks.
To subscribe to a webhook event, refer to Webhooks.
Anchor to Extract Paypal payment methods from BraintreeExtract Paypal payment methods from Braintree
We don't support migrating PayPal payment methods from Braintree. However, we support PayPal Express as a subscription gateway. Before creating new Paypal Express payment methods, you need to extract the PayPal payment methods information from the Braintree customers.
Braintree enables you to export the list of customers and credit card payment methods to a CSV file. However, the export doesn't give you the list of PayPal payment methods.
You need to extract the list of PayPal payment methods using the Braintree SDK. To extract Paypal payment methods, query for the customer information using the Customers resource to get their payment methods list.
You can obtain the merchant_id, public_key, and private_key in your Braintree dashboard.
You can obtain the merchant_id, public_key, and private_key in your Braintree dashboard.
The following is a minimal Ruby code snippet to extract a PayPal payment method from a customer. While this method isn't scalable if you have a large number of customers, it's a good starting point to build on.
Anchor to Next stepsNext steps
- Learn how to migrate existing customer information to Shopify.
- Learn how to migrate existing subscription contracts to Shopify.