Build for combined listings
Combined listings are available only to stores on a Shopify Plus plan.
Combined listings are available only to stores on a Shopify Plus plan.
This guide shows you how to create, query, and edit combined listings using the GraphQL Admin API's productSet mutation.
Anchor to What you'll learnWhat you'll learn
In this tutorial, you'll learn how to do the following tasks:
-
Use the GraphQL Admin API to create a parent product
-
Add child products to the combined listing
-
Query all combined listings
-
Add a child product to an existing combined listing
-
Remove a child product from an existing combined listing
-
Change the option value of a child product in an existing combined listing
-
Combine adding, editing, and removing child products into one mutation
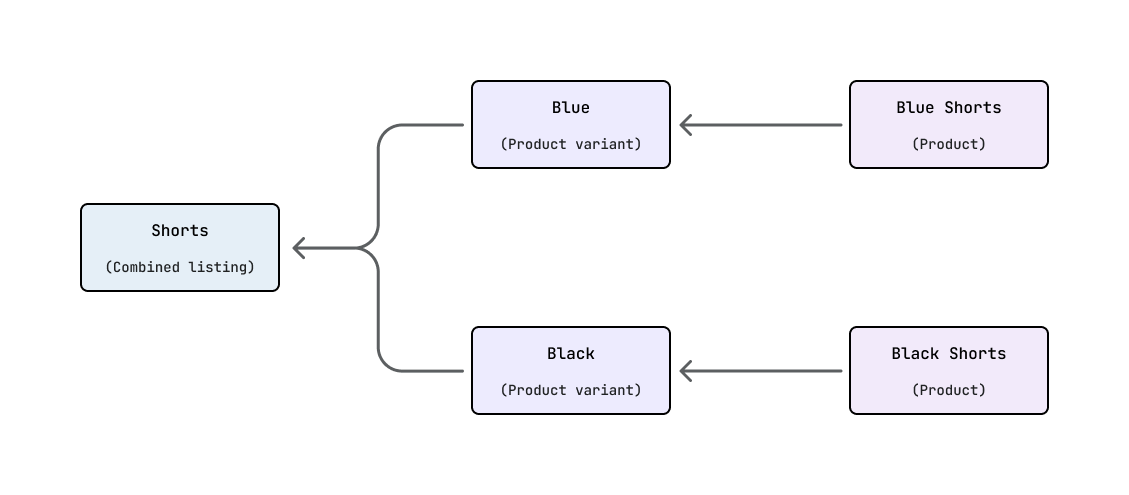
We're going to do that by creating a combined listing for a pair of shorts that come in four different colors. The combined listing will have a parent product that represents the shorts and four child products that represent each of the colors.
Anchor to RequirementsRequirements
- You've created an app on your dev store.
- Your app can make authenticated requests to the GraphQL Admin API.
- Your app has the
write_productsaccess scope. For more information on requesting access scopes when your app is installed, refer to Getting started with OAuth. - Your app uses the
unstableGraphQL API for theproductstype, and theproductSetandcombinedListingUpdatemutations. - The store is on a Shopify Plus plan.
- You already have products in your store that you want to combine.
Anchor to How it worksHow it works
A combined listing is modeled on a single parent product that has variants that point to one or more child products using the CombinedListingRole type and the combinedListingUpdate mutation.
Anchor to Step 1: Create a parent productStep 1: Create a parent product
Creating a combined listing starts with creating a parent product. You'll use the productSet mutation to create that combined listing.
You should already have created the child products that you want to combine before you create the parent product.
You should already have created the child products that you want to combine before you create the parent product.
For the shorts, you'll create a new product called "Shorts" with a combinedListingRole of PARENT. This creates the parent product, but does not yet associate the child products. You'll associate child products in a subsequent step.
POST https://{shop}.myshopify.com/api/{api_version}/graphql.json
GraphQL mutation
Variables
JSON response
Anchor to Step 2: Add child products to the combined listingStep 2: Add child products to the combined listing
With the combined listing created, you'll add the child products to the combined listing using the combinedListingUpdate mutation.
For the child products you already have, you'll need to get their IDs to add them to the parent product that you created.
POST https://{shop}.myshopify.com/api/{api_version}/graphql.json
GraphQL mutation
Variables
JSON response
Anchor to Step 3: Query all combined listingsStep 3: Query all combined listings
After creating a combined listings, you can use the products query to retrieve only combined listing parents and their children. With this, you can pull just the Shorts parent product and its children.
POST https://{shop}.myshopify.com/api/{api_version}/graphql.json
GraphQL query
Variables
JSON response
Anchor to Step 4: Add a child product to an existing combined listingStep 4: Add a child product to an existing combined listing
Your team has come up with a new color of Shorts and you want to add it to the combined listing so your customers can easily buy it. You can do that by using the same mutation you used to add child products earlier and add the new child product to the productsAdded field for the combinedListingUpdate mutation.
By default, new colors are added to the end of the parent product's option values. Alternatively, you can supply optionsAndValues to change the order of both options and option values. We'll do that here to put your new pink shorts at the front of the color option.
POST https://{shop}.myshopify.com/api/{api_version}/graphql.json
GraphQL mutation
Variables
JSON response
Anchor to Step 5: Remove a child product from an existing combined listingStep 5: Remove a child product from an existing combined listing
Later, you decide to stop selling the orange shorts. You can remove the orange shorts by using the productsRemovedIds argument for the combinedListingUpdate mutation.
POST https://{shop}.myshopify.com/api/{api_version}/graphql.json
GraphQL mutation
Variables
JSON response
Anchor to Step 6: Change the option value of a child product in an existing combined listingStep 6: Change the option value of a child product in an existing combined listing
As part of a larger change the team decides to change the option value "Blue" to "Navy", this isn't a new product, but just a name change. In that case, we want to modify the name of the color option value while using the same product. You'll need to update the name of the child product separately, but you'll also want to modify the color option value on the parent product. You can do that by using the productsEdited argument on the combinedListingUpdate mutation.
POST https://{shop}.myshopify.com/api/{api_version}/graphql.json
GraphQL mutation
Variables
JSON response
Anchor to Step 7: Combine adding, editing, and removing child products into one mutationStep 7: Combine adding, editing, and removing child products into one mutation
You can combine adding child products, changing options and option values on existing child products, and removing child products into a single mutation. With a single mutation you save time compared to sending multiple mutations.
POST https://{shop}.myshopify.com/api/{api_version}/graphql.json
GraphQL mutation
Variables
JSON response
Anchor to Next StepsNext Steps
- Learn more about the
combinedListingUpdatemutation.