Build a print UI extension
This tutorial shows you how to create a print extension that lets merchants generate and preview documents before printing.
Anchor to What you'll learn:What you'll learn:
- Create a backend service that serves print-ready documents.
- Build a POS UI extension with preview and print capabilities.
- Implement error handling for a reliable printing experience.
- Test your extension in a development environment.
Requirements
Scaffold an app that uses the React Router template.
Generate a POS UI extension using Shopify CLI.
If you plan to include order, customer, or any other Shopify admin data in your prints, you'll need additional access scopes. This tutorial doesn't include any admin data as the core focus is to build the extension itself, so no additional access scopes are required.
If you plan to include order, customer, or any other Shopify admin data in your prints, you'll need additional access scopes. This tutorial doesn't include any admin data as the core focus is to build the extension itself, so no additional access scopes are required.
Project
Anchor to Create a route to serve printable documentsCreate a route to serve printable documents
First, create a new route file at app/routes/print.ts that serves your printable documents. This example uses React Router, but you can adapt the concepts to your preferred framework.
Need help setting up a React Router server? Check out the Shopify App React Router documentation.
Let's walk through each part of the implementation:
Set up the route and handle authentication with Shopify.
Process URL parameters to determine which documents to generate.
Generate HTML content with proper styling for each document type.
Return a properly formatted response with CORS headers.
- Use only static HTML and CSS - JavaScript won't execute in print documents.
- Include all styles in the
<head>section or inline. - Use
@media printCSS rules for print-specific styling. - Ensure proper CORS headers are set for POS access.
- Use only static HTML and CSS - JavaScript won't execute in print documents.
- Include all styles in the
<head>section or inline. - Use
@media printCSS rules for print-specific styling. - Ensure proper CORS headers are set for POS access.
When returning multiple documents, use CSS page breaks to ensure proper printing:
When returning multiple documents, use CSS page breaks to ensure proper printing:
When using Cloudflare tunnels for development, wrap email addresses in HTML comments to prevent obfuscation:
<!--email_off-->example@email.com<!--/email_off-->
When using Cloudflare tunnels for development, wrap email addresses in HTML comments to prevent obfuscation:
<!--email_off-->example@email.com<!--/email_off-->
Anchor to Build the extension tileBuild the extension tile
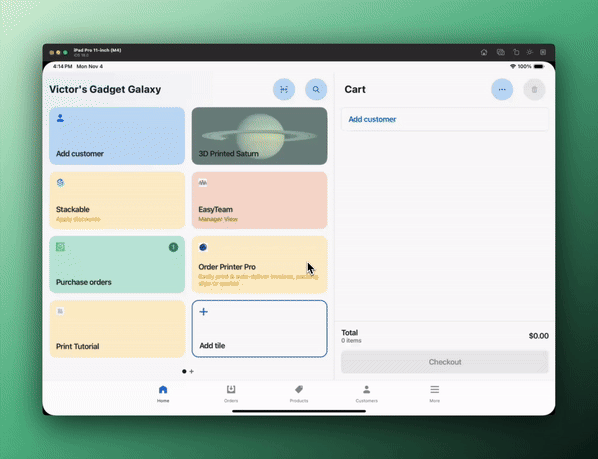
Build a tile component on the POS smart grid that launches your extension.
Anchor to Build the extension modalBuild the extension modal
Next, you'll build a modal component where users interact with your app. You'll add the functionality that implements the printing workflow.
Initialize the loading and document list state.
Set up document selection with a choice list component.
Handle document selection and URL updates.
Implement print functionality with error handling.
- The tile component uses
shopify.action.presentModal()to open the modal. - The choice list component with checkboxes for document selection.
- Clicking Print calls
shopify.print.print(src), which displays the print preview. - Loading states and error handling ensure a smooth user experience.
- The tile component uses
shopify.action.presentModal()to open the modal. - The choice list component with checkboxes for document selection.
- Clicking Print calls
shopify.print.print(src), which displays the print preview. - Loading states and error handling ensure a smooth user experience.
Anchor to Configure your extensionConfigure your extension
Configure your extension with the necessary permissions and settings in the shopify.extension.toml file:
Anchor to Testing your extensionTesting your extension
To test your print extension:
Navigate to your app directory:
Start your development server:
Press p to open the Dev Console.
In the extension list for your app, click on the Mobile preview link to view a QR code for previewing your extension in POS.
Click the Print Tutorial tile.
Select a template, press next, and then print.
Congratulations! You've built a print extension that generates, previews, and prints custom documents.
Use your browser's developer tools to monitor network requests and check for any CORS or authentication issues.
Use your browser's developer tools to monitor network requests and check for any CORS or authentication issues.
Anchor to Deploy and releaseDeploy and release
Refer to Deploy app extensions for more information.