Manage inventory quantities and states
This guide shows you how to use the GraphQL Admin API to sync and maintain accurate inventory quantities, and transition products to different inventory states.
Anchor to RequirementsRequirements
- Your app can make authenticated requests to the GraphQL Admin API.
- Your app has the
read_inventoryandwrite_inventoryaccess scopes. Learn how to configure your access scopes using Shopify CLI. - Your store has existing products.
- You're familiar with the different inventory states.
- You're using API version 2023-01 or higher. To schedule changes to inventory quantities, you need to use API version 2024-01 or higher.
Anchor to Inventory object relationshipsInventory object relationships
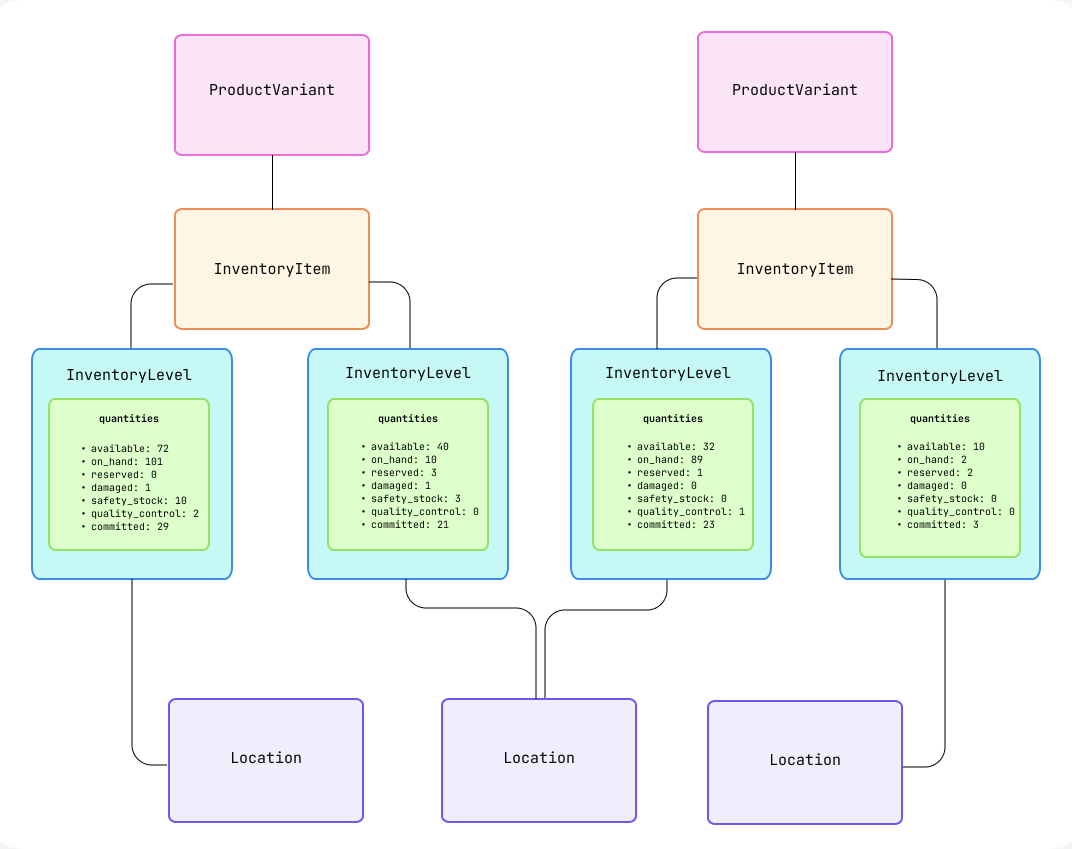
Before you begin managing inventory quantities and states, it's helpful to understand the relationships between inventory objects. The following diagram illustrates the relationships between inventory objects in the GraphQL Admin API:
| API object | Description |
|---|---|
| ProductVariant | Contains merchandising information, such as price, description, and images. Think of this as the product information that you might want a customer to see. All product variants have a 1:1 relationship with their associated inventory item. |
| InventoryItem | Contains information about the physical product, such as its SKU. Think of this as the backend information used for managing inventory, shipping, and fulfillments. Inventory items are associated with one or many inventory levels. An inventory item has an inventory level for each location where the item is stocked. |
| InventoryLevel | The actual quantities of an item that are in a specific inventory state. Inventory levels connect one inventory item to one location. Each inventory level holds the available quantity for its inventory item at the associated location. |
| Location | A geographical location where a merchant does business, such as a retail store or warehouse. Locations can have many inventory levels. Each location has one inventory level for each inventory item that the location stocks. |
Anchor to Step 1: Retrieve IDs for inventory locations and inventory itemsStep 1: Retrieve IDs for inventory locations and inventory items
You can use the locations query to retrieve the IDs of inventory locations and inventory items. To retrieve inventory at fulfillment service app locations, you need to use the shop query instead of the locations query.
An inventory level represents the quantities of an inventory item that's associated with a location. An inventory item represents the goods that are available to be shipped to a customer. You'll use the IDs for inventory levels and inventory items to query inventory quantities in the next step.
Anchor to [object Object], querylocations query
locations queryThe following example shows how to retrieve the first three locations and their associated inventory levels. The response returns a set of parameterized global IDs.
The InventoryLevel object has a global ID that contains parameters because the InventoryLevel object is associated with the InventoryItem object.
For example, if the InventoryLevel object's ID is 69407473686 and the InventoryItem object's ID is 32889739542550, then the global ID resolves to the following structure: gid://shopify/InventoryLevel/69407473686?inventory_item_id=32889739542550.
POST https://{shop}.myshopify.com/admin/api/{api_version}/graphql.json
GraphQL query
JSON response
Anchor to [object Object], queryshop query
shop queryThe following example shows how to retrieve the first three fulfillment service app locations and their associated inventory levels. The response returns a set of parameterized global IDs.
POST https://{shop}.myshopify.com/admin/api/{api_version}/graphql.json
GraphQL query
JSON response
Anchor to Step 2: Query inventory quantitiesStep 2: Query inventory quantities
You can use the following queries to retrieve inventory quantities:
- Query inventory quantities for an item at a specific location
- Query inventory quantities for an item at multiple locations
Anchor to Query inventory quantities for an item at a specific locationQuery inventory quantities for an item at a specific location
You can use the inventoryLevel query to retrieve inventory quantities for an item at a specific location.
Each inventory level belongs to one inventory item and has one location. For every location where an inventory item can be stocked, there's an inventory level that represents the inventory item's quantities relating to that location.
The following example query retrieves the quantity of an inventory item that's available at a specific location. The response shows 11 items that are available at the location.
POST https://{shop}.myshopify.com/admin/api/{api_version}/graphql.json
GraphQL query
JSON response
Anchor to Query inventory quantities for an item at multiple locationsQuery inventory quantities for an item at multiple locations
You can use the inventoryItem query to retrieve inventory quantities for an item at multiple locations.
The following example query retrieves the quantity of an inventory item that are available, on-hand, reserved, and committed at the first five locations. The response shows 72 available items, 101 on-hand items, 0 reserved items, and 29 committed items at the locations.
POST https://{shop}.myshopify.com/admin/api/{api_version}/graphql.json
GraphQL query
JSON response
Anchor to Step 3: Manage inventory quantitiesStep 3: Manage inventory quantities
You can use the following mutations to manage inventory quantities:
- Set inventory quantities on hand: Explicitly set the quantity of inventory that's in the
availableoron-handstate. - Adjust inventory quantities: Add or remove quantities of inventory that are in the
availablestate. - Move inventory quantities between states: Transition inventory quantities between the
availablestate and thereserved,damaged,safety_stock, andquality_controlstates, or between unavailable states (reserved,damaged,safety_stock, andquality_control). - Schedule changes to inventory quantities: Create a scheduled change that states the dates associated with upcoming changes to inventory quantities.
You can't use the Admin API to adjust or move inventory quantities in the committed state. Inventory quantities in the committed state are only affected by the creation and fulfillment of a merchant's orders.
You can't use the Admin API to adjust or move inventory quantities in the committed state. Inventory quantities in the committed state are only affected by the creation and fulfillment of a merchant's orders.
Anchor to Set inventory quantities on handSet inventory quantities on hand
The on_hand state represents the total number of units that are physically stocked at a location. The on_hand state equals the sum of inventory quantities in the following states:
availablecommittedreserveddamagedsafety_stockquality_control
You set inventory in the on_hand state to maintain an accurate count of physical inventory. For example, you might need to set inventory in the on_hand state in the following scenarios:
- Inventory was received outside of a purchase order
- A stocktake was completed and inventory needs to be adjusted accordingly
You can use the inventorySetQuantities mutation to set available and on-hand inventory quantities at a location to a given value. In the reason field in the mutation's input, you can specify one of the following reasons for adjusting inventory quantities:
| Reason | Description |
|---|---|
correction | Used to correct an inventory error or as a general adjustment reason. |
cycle_count_available | Used to specify an adjusted inventory count due to a discrepancy between the actual inventory quantity and previously recorded inventory quantity. |
damaged | Used to remove units from inventory count due to damage. |
movement_created | Used to specify that an inventory transfer or a purchase order has been created. |
movement_updated | Used to specify that an inventory transfer or a purchase order has been updated. |
movement_received | Used to specify that an inventory transfer or a purchase order has been received. |
movement_canceled | Used to specify that an inventory transfer or a purchase order has been canceled. |
other | Used to specify an alternate reason for the inventory adjustment. |
promotion | Used to remove units from inventory count due to a promotion or donation. |
quality_control | Used to specify that on-hand units that aren't sellable because they're currently in inspection for quality purposes. |
received | Used to specify inventory that the merchant received. |
reservation_created | Used to reserve, or temporarily set aside unavailable units. |
reservation_deleted | Used to remove the number of unavailable units that have been reserved. |
reservation_updated | Used to update the number of unavailable units that have been reserved. |
restock | Used to add a returned unit back to available inventory so the unit can be resold. |
safety_stock | Used to specify that on-hand units are being set aside to help guard against overselling. |
shrinkage | Used when actual inventory levels are less than recorded due to theft or loss. |
The following example shows how to set the on-hand inventory quantity to 102. The response shows the delta of incrementing the on-hand inventory quantity by 1 because the previous inventory count in the on_hand state was 101.
POST https://{shop}.myshopify.com/admin/api/{api_version}/graphql.json
GraphQL mutation
JSON response
Anchor to Adjust inventory quantitiesAdjust inventory quantities
You can use the inventoryAdjustQuantities mutation to increment or decrement the total amount of inventory that's in the available, damaged, quality_control, reserved, or safety_stock state at a location. For example, a merchant might need to adjust inventory quantities in the following cases:
| State that needs adjustments | Use cases |
|---|---|
available |
|
damaged |
|
quality_control |
|
reserved |
|
safety_stock |
|
The following example shows how to increase the quantity of available inventory units by 2 at a location. The response shows the delta of incrementing the available inventory quantity by 2.
POST https://{shop}.myshopify.com/admin/api/{api_version}/graphql.json
GraphQL mutation
JSON response
Anchor to Using referenceDocumentUri for inventory traceabilityUsing reference
The referenceDocumentUri field is a freeform URI that indicates why and what caused an inventory change to happen. It's a powerful way to enable complete audit trails for inventory adjustments. referenceDocumentUri transforms inventory adjustments from a "black box" into a transparent system where you can trace every change back to its source.
Note: The main difference between a URL and a URI is that a URL specifies the location of a resource on the internet, while a URI can be used to identify any type of resource. All URLs are URIs, but not all URIs are URLs. In this context, you can use either URLs (like
https://myapp.com/order/12345) or other URI formats (likegid://myapp/Order/12345).
referenceDocumentUri is accepted on the GraphQL Admin API's inventoryAdjustQuantities, inventorySetQuantities, and inventoryMoveQuantities mutations.
Using referenceDocumentUri provides the following for merchants:
- Complete audit trail: Trace every inventory change back to the system and document that initiated it.
- Context for changes: Understand not just what changed, but why it changed by linking to the specific business document or transaction.
- Compliance requirements: Satisfy regulatory requirements with traceable inventory adjustments.
- Quick troubleshooting: Instantly identify which system made each adjustment during discrepancy investigations.
Using referenceDocumentUri provides the following for app devs:
- Brand visibility: Your app name appears directly in the Shopify admin inventory history
- Reduced support tickets: Merchants can self-serve by understanding which system made adjustments
- Clear accountability: Connect each inventory change to its originating business logic, making it easier to debug and explain app behavior
Anchor to Format specificationFormat specification
While the referenceDocumentUri field accepts various formats including URLs, our preferred format is the Global ID (GID) format. For example: gid://warehouse-app/PurchaseOrder/PO-2024-001
You can add optional query parameters to include additional context like location, user, or timestamp:
Where your URI appears
The referenceDocumentUri is visible in two key places:
- Inventory adjustment history - Merchants see your URI in the adjustment history page, providing immediate context for each change
- Analytics reports - The new inventory adjustment reports in Analytics > Reports include your URI for comprehensive tracking
Benefits of using GID format
- Enhanced popover experience: When using GID format (e.g.,
gid://appName/PurchaseOrder/123456789), Shopify automatically parses it to display a meaningful title in the adjustment history popover - Consistent structure: Uniform format across all your integrations
- Clear identification: Namespace and entity are immediately recognizable
- Future-ready: Better support for upcoming features and integrations
Examples of accepted formats
gid://my-wms-app/PurchaseOrder/PO-2024-001(Preferred GID format)gid://3pl-system/CycleCount/CC-2024-0125(Preferred GID format)gid://pos-app/Transaction/TXN-STORE1-98765?location=west(Preferred GID format with query parameter)gid://erp/StockAdjustment/ADJ-2024-001(Preferred GID format)https://myapp.com/order/12345(URL format - also accepted)id://appChange/12345(Custom ID format - also accepted)
GID format validation regex (if using GID format)
Anchor to Integration examplesIntegration examples
Here are example referenceDocumentUri formats for common integration types:
WMS (Warehouse Management System) Integration:
- Purchase orders:
gid://warehouse-app/PurchaseOrder/PO-2024-001 - Stock transfers:
gid://warehouse-app/Transfer/TR-2024-1234 - Stock adjustments:
gid://warehouse-app/Adjustment/ADJ-2024-567
3PL (Third-Party Logistics) Integration:
- Cycle counts:
gid://3pl-system/CycleCount/CC-2024-0125 - Receiving:
gid://3pl-system/Receipt/REC-2024-789 - Returns processing:
gid://3pl-system/Return/RET-2024-012
POS (Point of Sale) Integration:
- Sales transactions:
gid://pos-app/Transaction/TXN-STORE1-98765 - Stock takes:
gid://pos-app/StockTake/ST-STORE1-2024-03 - Transfers between stores:
gid://pos-app/Transfer/XFER-ST1-ST2-456
ERP Integration:
- Sync jobs:
gid://erp-connector/SyncJob/SYNC-2024-11-21-001 - Stock adjustments:
gid://erp/StockAdjustment/ADJ-2024-001 - Manufacturing orders:
gid://erp/ManufacturingOrder/MO-2024-789
For complete mutation examples, see the inventoryAdjustQuantities, inventorySetQuantities, and inventoryMoveQuantities reference documentation.
Anchor to Best practicesBest practices
-
Prefer GID format for consistency: While other formats are accepted, using GID format provides consistency and future compatibility
-
Use meaningful namespaces: Choose a namespace that clearly identifies your app or system (e.g.,
warehouse-app,erp-connector) -
Use descriptive entity types: Make it clear what type of document caused the adjustment (e.g.,
PurchaseOrder,CycleCount,StockTransfer) -
Include relevant metadata in IDs: Consider including dates, locations, or user information:
gid://inventory-manager/SafetyStock/SS-2024-11-21-loc-456gid://wms/Adjustment/ADJ-2024-11-21-user-123
-
Maintain consistency: Use the same format across all your integrations for easier troubleshooting
-
Document your URIs: Keep internal documentation of your URI patterns for support teams
Anchor to Migrating existing integrationsMigrating existing integrations
To add referenceDocumentUri to your existing integrations:
-
Audit current usage: Review your existing inventory adjustment code to identify where
referenceDocumentUriis missing or incorrectly formatted -
Plan your namespace: Choose a consistent namespace for your app (avoid generic names like "app" or "system")
-
Update incrementally: You don't need to update all your code at once. Start with new features and high-volume adjustments
-
Common migration patterns to GID format (recommended but not required):
// Old: No referenceDocumentUrireferenceDocumentUri: undefined// Using URLs (still supported)referenceDocumentUri: "https://myapp.com/order/12345"// Recommended: Convert to GID format for consistencyreferenceDocumentUri: "gid://myapp/Order/12345"// Old: Using the app ID directlyreferenceDocumentUri: "gid://shopify/App/123456"// Recommended: Use meaningful referencesreferenceDocumentUri: "gid://myapp/StockAdjustment/ADJ-2024-001" -
Test thoroughly: Verify that your new URIs are accepted by the API and appear correctly in merchant inventory histories
For examples of using referenceDocumentUri with inventory mutations, see:
Anchor to Move inventory quantities between statesMove inventory quantities between states
You can use the inventoryMoveQuantities mutation to transition inventory quantities between the available state and the reserved, damaged, safety_stock, and quality_control states, or between unavailable states (reserved, damaged, safety_stock, and quality_control).
For example, a merchant might need to move inventory quantities between states in the following cases:
| From state | To state | Description |
|---|---|---|
available | reserved | Inventory is currently being inspected or repaired. Use draft orders instead of moving inventory manually. If a merchant is using Shopify POS and needs to set inventory aside for a customer, then you should use a draft order rather than manually moving inventory to the reserved state. |
available | damaged | A third-party logistics provider finds and reports damaged inventory. |
available | safety_stock | Inventory is being set aside to insure against fluctuations in demand. |
available | quality_control | Inventory is being measured to meet quality standards. |
reserved | available | A stocktake was completed and inventory needs to be adjusted accordingly. |
damaged | available | A previously damaged inventory unit that was set aside has been repaired. |
safety_stock | available | Extra inventory is available to help with fluctuations in demand. |
quality_control | available | An inventory unit has met quality standards and is ready to be sold. |
Inventory quantities in a reserved, damaged, safety_control, or quality_control state display as Unavailable to merchants that are tracking inventory in the Shopify admin.
Inventory quantities in a reserved, damaged, safety_control, or quality_control state display as Unavailable to merchants that are tracking inventory in the Shopify admin.
The following example shows how to move a quantity of 2 inventory units from the available to the reserved state.
POST https://{shop}.myshopify.com/admin/api/{api_version}/graphql.json
GraphQL mutation
JSON response
Anchor to Schedule changes to inventory quantitiesSchedule changes to inventory quantities
You can schedule changes to inventory quantities using the InventorySetScheduledChanges mutation. This involves defining the dates associated with upcoming changes to inventory quantities.
For example, if an app user creates a purchase order and adds incoming quantities for a specified inventory item at a location, then they can also create a scheduled change that states the date that the quantities are expected to be transitioning from incoming to available. Information about scheduled changes to inventory quantities can help merchants make better buying or selling decisions.
The InventorySetScheduledChanges mutation won't automatically change inventory quantities. To change inventory quantities, you still need to use other inventory mutations, such as InventoryAdjustQuantitites, inventorySetQuantities, or inventoryMoveQuantities.
The InventorySetScheduledChanges mutation won't automatically change inventory quantities. To change inventory quantities, you still need to use other inventory mutations, such as InventoryAdjustQuantitites, inventorySetQuantities, or inventoryMoveQuantities.
The following example shows how to create a scheduled change that defines the date that quantities are expected to be transitioning from incoming to available.
POST https://{shop}.myshopify.com/admin/api/{api_version}/graphql.json
GraphQL mutation
JSON response
Anchor to Compare and swapCompare and swap
Some inventory mutations, such as inventoryAdjustQuantities, inventoryMoveQuantities, inventorySetQuantities, inventorySetOnHandQuantities, and productVariantsBulkUpdate, implement compare and swap.
The changeFromQuantity field enables concurrency control by allowing you to specify the quantity that you expect to be present before your change is applied. If the current quantity doesn't match the value that you provide, then the mutation fails with a CHANGE_FROM_QUANTITY_STALE error, preventing unintended overwrites.
Anchor to Example of why compare and swap is necessaryExample of why compare and swap is necessary
The following example uses inventorySetQuantities to demonstrate why compare and swap is necessary:
- Suppose that you have 100 red shoes available in one of your store locations.
- You query the current available inventory from Shopify's APIs and determine that there are 100 units.
- You want to adjust inventory by -10 using
inventorySetQuantities. - Before you can do that, another process changes the inventory. 20 units are sold, so there are now 80 units.
- You want to adjust inventory by -10 (thinking the current quantity is 100), so you set the inventory to 90 using
inventorySetQuantities. - Result: The final available inventory value is 90, but it should be 70 (20 units lost).
To prevent this scenario, you should pass in changeFromQuantity: 100. When you call inventorySetQuantities, the current available quantity (80) is compared against the changeFromQuantity (100). Because they don't match, the process has changed the current quantity concurrently, so the request is denied.
Anchor to Opting out of compare and swapOpting out of compare and swap
We recommend that you implement compare and swap to avoid inventory inaccuracies. However, there is one scenario where you should opt out:
- If you don't care about the current quantity because you're the source of truth, then you don't need to implement compare and swap and should opt out. For example, you might know definitively what the new quantity should be, or you might need to ensure your adjustment is applied regardless of any concurrent changes made by other processes.
Anchor to Next stepsNext steps
- Learn about other types of fulfillment apps that you can create to integrate into order management, fulfillment, and returns workflows.