Create and update a cart with the Storefront API
A cart contains the merchandise that a customer intends to purchase, and the estimated cost associated with the cart. You can use the Storefront API to interact with a cart during a customer's session.
This guide shows how to create a cart and retrieve it, update cart line items and customer information, and retrieve a checkout URL.
Anchor to RequirementsRequirements
- You've completed the Getting started with the Storefront API guide.
- You've created products and product variants in your store.
- You're using version 2022-10 or higher of the Storefront API. To set metafields on a cart, you need to use version 2023-04 or higher of the Storefront API.
Anchor to Cart object relationshipsCart object relationships
Before you start building a cart, we recommend familiarizing yourself with the following API objects and their relationships:
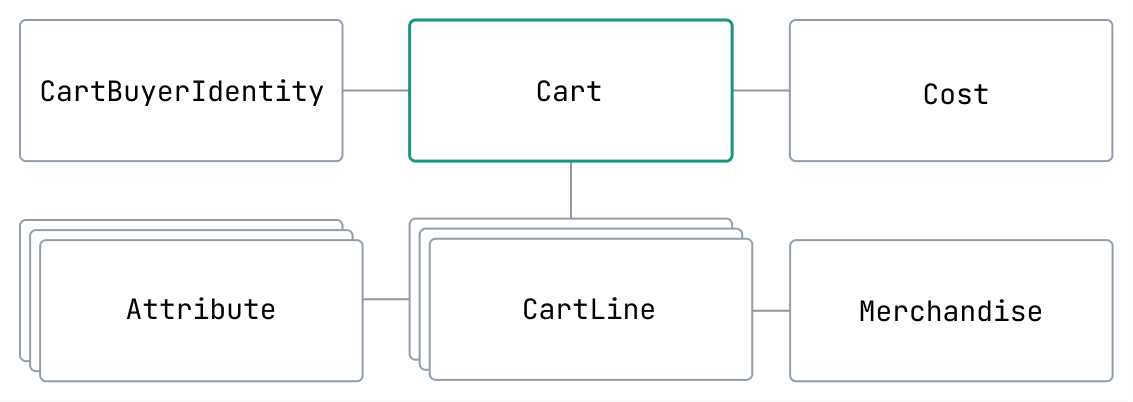
| Object | Description |
|---|---|
| Cart | An object that contains the merchandise that a customer intends to purchase. |
| CartBuyerIdentity | Identifies the customer that is interacting with the cart. It includes a customer access token that associates the customer with the cart, and a set of preferences that can be used to prefill a checkout session. |
| Cost | The estimated costs that the customer will pay at checkout. The costs are subject to change and changes display at checkout. Merchants can configure the prices of products on a per country basis in their Shopify admin. The prices that display on a storefront are determined in the following ways:
|
| Attribute | An array of custom information for a cart line. Attributes are returned as key-value pairs. |
| CartLine | A list of line item objects, each containing information about an item in the cart. |
| Merchandise | A product variant. It represents one version of a product with several options. |
Anchor to Cart IDCart ID
The cart ID consists of a token and a secret key parameter in the form of <token>?key=<secret>. When you work with any Cart API, you must always provide the full ID.
Example: gid://shopify/Cart/Z2NwLXVzLWV4YW1wbGU6MDEyMzQ1Njc4OTAxMjM0NTY3ODkw?key=examplekey1234567890
Shopify may change the format and length of cart tokens at any time. Apps must be built to handle cart tokens of any format.
Shopify may change the format and length of cart tokens at any time. Apps must be built to handle cart tokens of any format.
The key serves as a verification mechanism for the cart builder, ensuring the protection of the buyer's private data. If you do not include the secret key during a query, the buyer's private details (such as email or address) will be removed from the cart response. Additionally, if you attempt to modify the cart through a mutation without a key, the mutation will fail with an error message indicating the cart does not exist.
Never expose the secret part of the ID. Treat it like a password—don't include it in shareable links, public pages, or any client-side code.
Never expose the secret part of the ID. Treat it like a password—don't include it in shareable links, public pages, or any client-side code.
Anchor to Step 1: Create a cart and add a line itemStep 1: Create a cart and add a line item
You can use the cartCreate mutation to create a new cart and add a line item to the cart. In the input, include the line item quantity (quantity) and the product variant ID (merchandiseId), and specify any attributes (attributes) associated with the cart.
If your storefront has context about the buyer that's interacting with the cart (buyerIdentity), you can define a preferred delivery method (deliveryMethod) in the mutation's input. Preferences are fields that Shopify can use to accelerate and personalize the checkout process, and best optimize conversions.
To use pick-up points as a delivery method preference, a buyerIdentity.countryCode is required to ensure the buyer's country matches with the pick-up point country
To use pick-up points as a delivery method preference, a buyerIdentity.countryCode is required to ensure the buyer's country matches with the pick-up point country
In the response, request the added line item's ID, merchandise, attributes, address, and other preferences to verify that all information was added correctly. You can also request information about the costs associated with the cart:
POST https://{shop}.myshopify.com/api/{api_version}/graphql.json
GraphQL mutation
JSON response
Anchor to Step 2: Retrieve a cartStep 2: Retrieve a cart
You can use the cart query to retrieve a cart stored on Shopify. In the query, supply the cart ID as your input.
The following example shows how to retrieve a cart by its ID:
POST https://{shop}.myshopify.com/api/{api_version}/graphql.json
GraphQL query
JSON response
Anchor to Step 3: Increase an item's quantityStep 3: Increase an item's quantity
You can use the cartLinesUpdate mutation to add another product variant of the same type to the cart.
In the mutation's input, include the cart ID, cart line ID, and the new quantity value that you want to set. In the response, request the ID and quantity of the line items to verify that it was updated correctly.
The following example shows how to increase a line item's quantity in a cart to three:
POST https://{shop}.myshopify.com/api/{api_version}/graphql.json
GraphQL mutation
JSON response
Anchor to Step 4: Set metafields on a cartStep 4: Set metafields on a cart
Metafields are a flexible way for your app to add and store additional information about a cart. You can create metafields to extend the cart schema with custom values and logic at checkout. For example, you might want to attach custom structured metadata on a cart, and read it from a checkout extension to deliver a customized end-to-end buyer experience.
You can use the cartMetafieldsSet mutation to create and update metafields on a cart. In the mutation's input, supply the cart ID in the ownerId field, and define the parts of the metafield.
POST https://{shop}.myshopify.com/api/{api_version}/graphql.json
GraphQL mutation
JSON response
Anchor to Step 5: Update customer information and customer preferences for guest checkout journeysStep 5: Update customer information and customer preferences for guest checkout journeys
You can use the cartBuyerIdentityUpdate mutation to associate customer information and their checkout preferences with the cart, such as a customer's email, phone number, country, preferred delivery method, and pickup location.
Cart delivery addresses can be managed with four mutations:
cartDeliveryAddressesAddcartDeliveryAddressesUpdatecartDeliveryAddressesRemovecartDeliveryAddressesReplace
In the mutation's input, supply the cart ID and the buyerIdentity attributes related to the customer (for example, email, phone, and countryCode), along with any preferences for prefilling checkout like preferred delivery method or pickup location. In the response, request the same information to verify it was updated correctly.
POST https://{shop}.myshopify.com/api/{api_version}/graphql.json
GraphQL mutation
JSON response
Anchor to Step 6: Authenticate customer for logged-in checkoutsStep 6: Authenticate customer for logged-in checkouts
You can authenticate the customer by setting a valid customerAccessToken in the cartBuyerIdentityUpdate mutation or during cart creation. If you append the customerAccessToken to the cart, then the buyer will be logged in when they're redirected to checkout.
This covers authenticating the buyer using the buyer identity on the cart. For an alternative using sso=silent or help choosing between approaches, see Authenticate buyers in checkout.
This covers authenticating the buyer using the buyer identity on the cart. For an alternative using sso=silent or help choosing between approaches, see Authenticate buyers in checkout.
POST https://{shop}.myshopify.com/api/{api_version}/graphql.json
GraphQL mutation
JSON response
Anchor to Step 7: Retrieve a checkout URLStep 7: Retrieve a checkout URL
When the buyer is ready to complete checkout, you can query the Cart object for the checkoutUrl by supplying the cart's ID as your input. The response includes a URL that redirects customers through Shopify's web checkout.
When the customer access token is set on the cart, the obtained checkoutUrl allows the authenticated buyer to navigate to a logged-in checkout experience. For security reasons, the checkoutUrl should be requested when the buyer is ready to navigate to checkout and can be re-requested if it is stale.
To preserve the buyer's logged-in checkout experience, you must include the Shopify-Storefront-Buyer-IP header in your Storefront API call when making server side requests. For more information, refer to Making server-side requests.
POST https://{shop}.myshopify.com/api/{api_version}/graphql.json
GraphQL query
JSON response
Anchor to Next stepsNext steps
- Use the
warningsreturn field to manage automatic changes to your cart. - Learn how create a cart and a subscription line item.
- Query international prices for products and orders, and explicitly set the context of a cart and checkout.
- Manage customer accounts with the Storefront API.
- Learn about the different tools that you can use to create unique buying experiences anywhere your customers are, including websites, apps, and video games.
- Use
@deferto fetch carrier-calculated rates for the cart.