Build a Shopify app using React Router
After you scaffold an app, you can add your own functionality to pages inside and outside of the Shopify admin.
In this tutorial, you'll scaffold an app that makes QR codes for products. When the QR code is scanned, it takes the user to a checkout that's populated with the product, or to the product page. The app logs every time the QR code is scanned, and exposes scan metrics to the app user.
Follow along with this tutorial to build a sample app, or clone the completed sample app.
Anchor to What you'll learnWhat you'll learn
In this tutorial, you'll learn how to do the following tasks:
- Use Shopify metaobjects to store app data using the GraphQL Admin API.
- Use the @shopify/shopify-app-react-router package to authenticate users and query data.
- Use web components to create a UI that adheres to Shopify's App Design Guidelines.
- Use App Bridge to add interactivity to your app.
Requirements
Scaffold an app that uses the React Router template.
qrcodeEnables creation of QR codes.
@shopify/polaris-iconsProvides placeholder images for the UI.
tiny-invariantEnables loaders to easily throw errors.
Project


Anchor to Define the QR code data modelDefine the QR code data model
To store your QR codes, you'll use Shopify metaobjects. Metaobjects let you define custom data structures that are stored in Shopify and accessed through the GraphQL Admin API.
Anchor to Add the metaobject definitionAdd the metaobject definition
Define a $app:qrcode metaobject type in your shopify.app.toml file. The metaobject should contain the following fields:
title: The app user-specified name for the QR code.product: A product reference for the product that this QR code is for.product_variant: A variant reference used to create the destination URL.destination: The destination for the QR code (product page or cart).scans: The number of times the QR code has been scanned.
Set admin = "merchant_read_write" on the metaobject's access configuration so that merchants can view QR code data in the Shopify admin.
When you run shopify app dev, Shopify CLI automatically creates the metaobject definition on your dev store based on the configuration in shopify.app.toml.
Anchor to Verify access scopesVerify access scopes
Your app requires the following scopes in the [access_scopes] section of shopify.app.toml:
write_metaobject_definitions: Allows the app to create and manage metaobject type definitions.write_metaobjects: Allows the app to create and manage metaobject entries.write_products: Needed for the product picker.
Anchor to Get QR code and product dataGet QR code and product data
After you define your metaobject, add code to retrieve and manage QR code data using the GraphQL Admin API.
Anchor to Create the modelCreate the model
Create a model to get, save, delete, and validate QR codes.
Create an /app/models folder. In that folder, create a new file called QRCode.server.js.
Anchor to Get QR codesGet QR codes
Create a function to get a single QR code for your QR code form, and a second function to get multiple QR codes for your app's index page. You'll create a QR code form later in this tutorial.
Use GraphQL queries to fetch metaobjects by handle or by type. The getQRCode function uses the metaobjectByHandle query to fetch a single QR code, while getQRCodes uses the metaobjects query to list all QR codes.
Each query should retrieve the metaobject fields (title, product, product_variant, destination, scans) and use inline fragments to resolve product and variant references for display data like the product title, image, and handle.
Anchor to Get the QR code imageGet the QR code image
A QR code takes the user to /qrcodes/$id/scan, where $id is the handle of the QR code. Create a function to construct this URL with a shop query parameter, and then use the qrcode package to return a base 64-encoded QR code image src.
Anchor to Get the destination URLGet the destination URL
Scanning a QR code takes the user to one of two places:
- The product details page.
- A checkout with the product in the cart.
Create a function that accepts a QR code object and the shop domain, and conditionally constructs the destination URL depending on the destination that the merchant selects.
Anchor to Save QR codesSave QR codes
Create a function to create or update a QR code using the metaobjectUpsert GraphQL mutation. The function should accept a handle, the form data, and the graphql client.
The metaobjectUpsert mutation creates a new metaobject if the handle doesn't exist, or updates it if it does. Pass the QR code fields (title, product, product_variant, destination) as metaobject field values.


Anchor to Delete QR codesDelete QR codes
Create a function to delete a QR code using the metaobjectDelete GraphQL mutation. The function should accept the metaobject's global ID and the graphql client.
Anchor to Increment the scan countIncrement the scan count
Create a function to increment the scan count for a QR code using the metaobjectUpdate GraphQL mutation. The function should accept the metaobject's global ID, the current scan count, and the graphql client.
Anchor to Validate QR codesValidate QR codes
To create a valid QR code, the app user needs to provide a title, and select a product and destination. Add a function to ensure that, when the user submits the form to create a QR code, values exist for all of the required fields.
The action for the QR code form returns errors from this function.
Anchor to Generate a unique handleGenerate a unique handle
Create a slugify helper that converts a string to a URL-safe slug by lowercasing it, replacing non-alphanumeric characters with hyphens, and trimming leading or trailing hyphens.
Then create a generateHandle function that combines the slugified title with a base-36 timestamp to produce a unique handle for each QR code metaobject.
The handle is used as the metaobject's identifier when saving and retrieving QR codes. Using a timestamp suffix ensures that handles are unique even when titles are the same.
Anchor to Create a QR code formCreate a QR code form
Create a form that enables the app user to manage QR codes.
To create this form, you'll use a Route module, web components and App Bridge.
Anchor to Set up the form routeSet up the form route
Create a form that can create, update, or delete a QR code.
In the app > routes folder, create a new file called app.qrcodes.$id.jsx.
Anchor to Dynamic segmentsDynamic segments
This route uses a dynamic segment route to match the URL for creating a new QR code and editing an existing one.
If the user is creating a QR code, the URL is /app/qrcodes/new. If the user is updating a QR code, then the URL is /app/qrcodes/{id}, where {id} is the $id route parameter containing the handle of the QR code that the user is updating.
Anchor to React Router layoutsReact Router layouts
The React Router template includes a layout at app/routes/app.jsx. This layout should be used for authenticated routes that render inside the Shopify admin. It's responsible for configuring App Bridge and web components, and authenticating the user using shopify-app-react-router.
Anchor to Authenticate the userAuthenticate the user
Authenticate the route using shopify-app-react-router.
If the user isn't authenticated, authenticate.admin handles the necessary redirects. If the user is authenticated, then the method returns an admin object.
You can use the authenticate.admin method for the following purposes:
- Getting information from the session, such as the
shop. - Accessing the GraphQL Admin API.
- Within methods to require and request billing.
Anchor to Return a JSON responseReturn a JSON response
Return JSON data that can be used to populate the QR code form.
If the id parameter is new, then return JSON with an empty title, a default destination, and the shop domain. If the id parameter isn't new, then it contains the metaobject's handle — use getQRCode to fetch the QR code metaobject by that handle and return the data to populate the form.
Anchor to Manage the form stateManage the form state
Maintain the QR code form state using the following variables:
initialFormState: The initial state of the form. This only changes when the user submits the form. This state is copied fromuseLoaderDatainto React state.formState: When the user changes the title, selects a product, or changes the destination, this state is updated. This state is copied fromuseLoaderDatainto React state.errors: If the app user doesn't fill all of the QR code form fields, then the action returns errors to display. This is the return value ofvalidateQRCode, which is accessed through theuseActionDatahook.isDirty: Determines if the form has changed. This is used to enable save buttons when the app user has changed the form contents, or disable them when the form contents haven't changed.
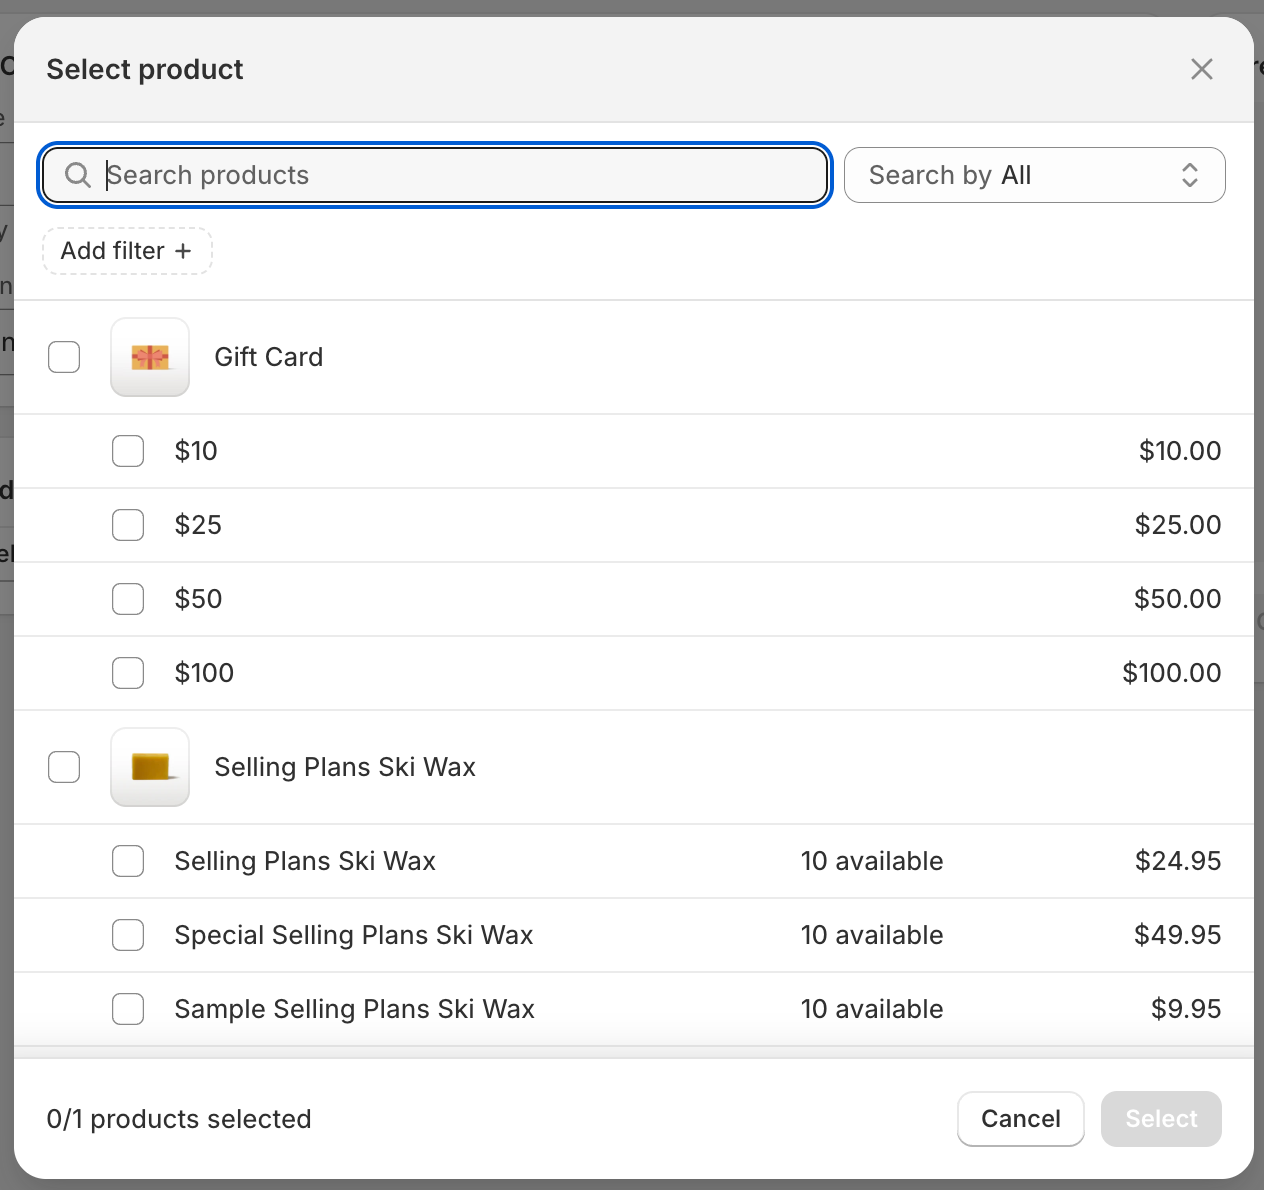
Anchor to Add a product selectorAdd a product selector
Using the App Bridge ResourcePicker action, add a dialog that allows the user to select a product. Save the selection to form state.
Anchor to SubmitSubmit
Use useSubmit to add the ability to save and delete a QR Code.
When saving, copy the data that the metaobject needs from formState. When deleting, submit the metaobject's global ID so the action can pass it to deleteQRCode.
Anchor to Lay out the formLay out the form
Using web components, build the layout for the form. Use the page, section, and box components with slot="aside" to structure the page. The page should have two columns.
Polaris is Shopify's unified system for building app interfaces. Using web components ensures that your UI is accessible, responsive, and displays consistently with the Shopify admin.
Use the page component to display a title that indicates to the user whether they're creating or editing a QR code. Include a breadcrumb link to go back to the QR code list.
Anchor to Add a title fieldAdd a title field
Use the text field component for updating the title. It should setFormState, have some details and show title errors from useActionData.
Anchor to Add a way to select the productAdd a way to select the product
If the user hasn't selected a product, then display a button component with an onClick for selectProduct.
If the user has selected a product, use the image component to display the product image. Use the clickable, box, image, and icon components to display the product image. Use the box and stack components to layout the UI.
Anchor to Add destination optionsAdd destination options
Use the select component to render different destinations. It should setFormState when onChange occurs.
If the user is editing a QR code, use the link component to link to the destination URL in a new tab.
Anchor to Display a preview of the QR codeDisplay a preview of the QR code
After saving a QR code, or when editing an existing QR code, provide ways to preview the QR code that the app user created.
Use the box component with slot="aside" to position the preview as an aside.
If a QR code is available, then use the image component to render the QR code. If no QR code is available, then use the text component with color="subdued".
Add buttons to preview the public URL, and to download the QR code.
Anchor to Add save barAdd save bar
Use shopify.saveBar and ui-save-bar to render Save and Discard buttons.
Use the useSubmit hook to save the form data.
Copy the data that the metaobject needs from formState and set initialFormState to the current formState.
Anchor to Create, update, or delete a QR codeCreate, update, or delete a QR code
Create an action to create, update, or delete a QR code.
If the action deletes a QR code, then use deleteQRCode with the metaobject's global ID and redirect the app user to the index page. For creating or updating, generate a handle for new QR codes using generateHandle, or use the existing handle from the id URL parameter. Then call saveQRCode with the handle and form data.
The action should return errors for incomplete data using your validateQRCode function.
If the action creates or updates a QR code, then redirect to app/qrcodes/$id, where $id is the handle of the saved metaobject.
Anchor to List QR codesList QR codes
To allow app users to navigate to QR codes, list the QR codes in the App Home.
Anchor to Load QR codesLoad QR codes
In the app's index route, load the QR codes using a loader.
The loader should load QR codes using the getQRCodes function from app/models/QRCode.server.js, passing the graphql client and the shop from the session.
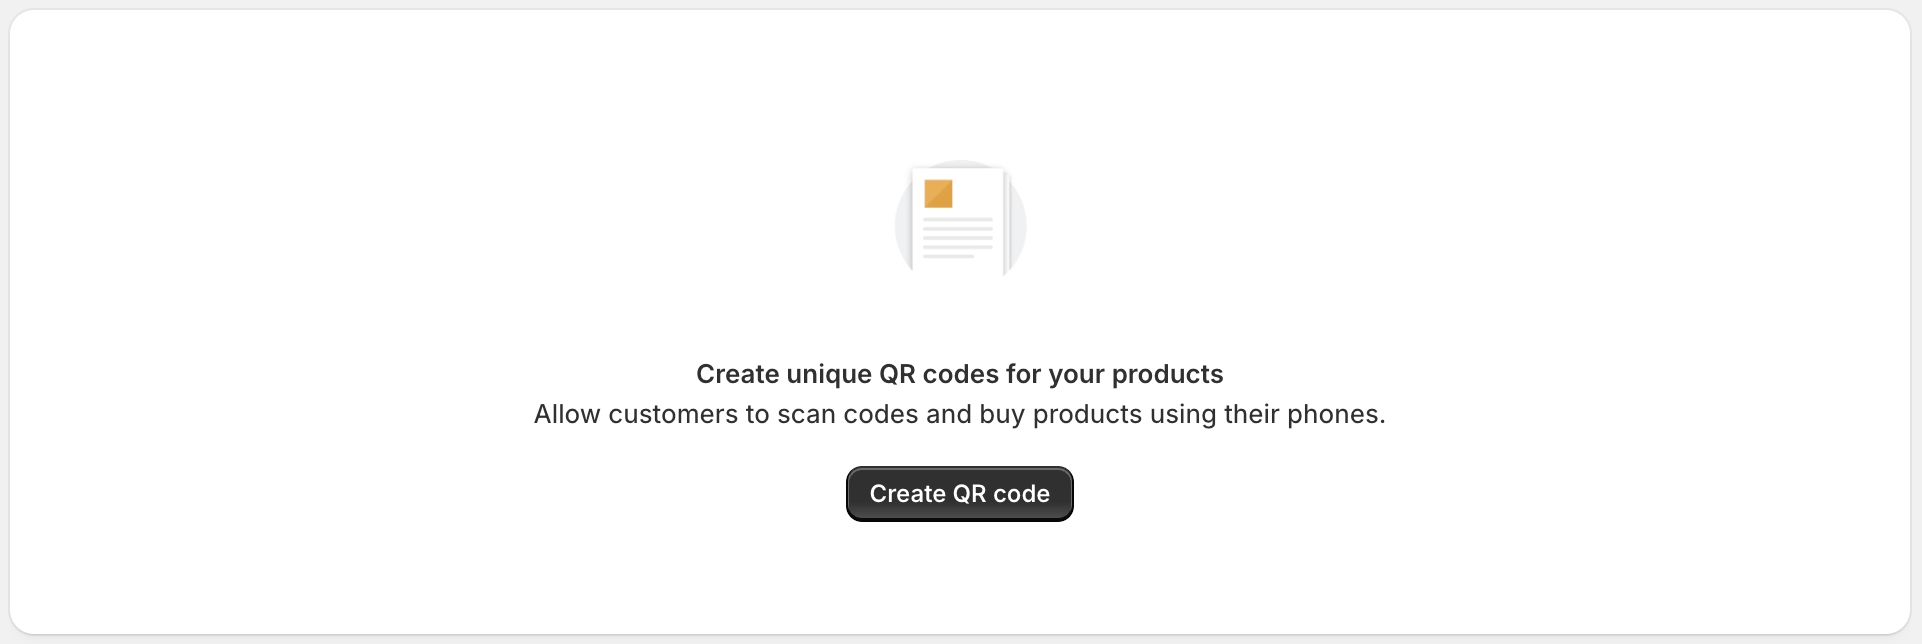
Anchor to Create an empty stateCreate an empty state
If there are no QR codes, construct an empty state display using the section, grid, box, heading, and paragraph components. Use the button component to link to the QR code form for creating a new QR Code.
Anchor to Add a truncation helperAdd a truncation helper
Create a truncate function that shortens long strings to a given length (defaulting to 25 characters) and appends an ellipsis. This keeps the QR code table readable when titles or product names are long.
Anchor to Create an index tableCreate an index table
If there are QR codes present, then use a table component to list them.
The table should have columns for the QR code title, product, the date the QR code was created, and the number of times the QR code was scanned. The title table header should use listSlot="primary".

Anchor to Create index table rowsCreate index table rows
Map over each QR code and render a table row. Make sure each row has a table cell for the QR code title, product, the date the QR code was created, and the number of times the QR code was scanned. Use the QR code's handle for the row key and for linking to the edit form.
Anchor to Warn if a product is deletedWarn if a product is deleted
A merchant can delete a product after creating a QR code for it. The data returned from the model includes a productDeleted property. productDeleted is true if the product reference can't be resolved — meaning the product ID exists in the metaobject but the product no longer exists in the store.
Use the badge component to render a warning to the user if a product is deleted.
Anchor to Lay out the pageLay out the page
After you create your empty state and index table, adjust the layout of the index page to return the markup that you created.
Create a layout using Polaris components. Render the empty state and table inside a Polaris Card.
Use the page component to render the title bar with a title. Add a primary button to navigate to the QR code creation form.
Anchor to Add a public QR code routeAdd a public QR code route
Make QR codes scannable by customers by exposing them using a public URL. When a customer scans a QR code, the scan count should increment, and the customer should be redirected to the destination URL.
Anchor to Create a public QR code routeCreate a public QR code route
Create a public page to render a QR code.
In the app > routes folder, create a new file called qrcodes.$id.jsx.
Because the qrcodes.$id.jsx doesn't require authentication or need to be rendered inside of the Shopify admin, it doesn't use the app layout.
Anchor to Load the QR codeLoad the QR code
Create a loader to load the QR code on the external route.
In the function, check that there's an id parameter in the URL (which contains the QR code's handle) and a shop query parameter. If either is missing, then throw an error using tiny-invariant.
Use unauthenticated.admin with the shop domain to get an admin client, then query the metaobjectByHandle endpoint to fetch the QR code's title. Use getQRCodeImage to generate the QR code image.
Anchor to Render a public QR code imageRender a public QR code image
In the route's default export, render an img tag for the QR code image. Scanning this image takes the user to the destination URL. This is the next route to implement.
Anchor to Redirect the customer to the destination URLRedirect the customer to the destination URL
When a QR code is scanned, redirect the customer to the destination URL. You can also increment the QR code scan count to reflect the number of times the QR code has been used.
Anchor to Create the scan routeCreate the scan route
Create a public route that handles QR code scans.
In the app > routes folder, create a new file called qrcodes.$id.scan.jsx.
Anchor to Validate the QR code handleValidate the QR code handle
Create a loader function that checks there's an id parameter in the URL (which contains the QR code's handle) and a shop query parameter. If either is missing, then throw an error using tiny-invariant.
Use unauthenticated.admin with the shop domain to get an admin client for querying the metaobject.
Anchor to Fetch the QR code dataFetch the QR code data
Use the metaobjectByHandle GraphQL query to fetch the QR code's product, variant, destination, and scan count fields. If no matching metaobject is found, then throw an error using tiny-invariant.
Anchor to Increment the scan countIncrement the scan count
If the loader returns a QR code, then increment the scan count using incrementQRCodeScans with the metaobject's global ID and current scan count.
Anchor to RedirectRedirect
Construct a QR code object from the metaobject fields and use getDestinationUrl from app/models/QRCode.server.js to get the destination URL. Use redirect to redirect the user to that URL.
Anchor to Preview and test your appPreview and test your app
Use the CLI to preview your app. If you make changes, you'll see those changes hot reload in the browser.
Anchor to Start your serverStart your server
Run the Shopify CLI dev command to build your app and preview it on your dev store.
-
In a terminal, navigate to your app directory.
-
Either start or restart your server to build and preview your app:
Terminal
shopify app dev -
Press
pto open your App Home.
Anchor to Test the QR code index and formTest the QR code index and form
Follow these steps to test the routes that are exposed to the app user in the Shopify admin. These routes include the app index and the QR code form.
-
In the index page for your App Home, click Create QR code to go to the QR code form.
The QR code form opens at
/app/qrcode/new. The title of the page is Create QR code. -
Try to submit the QR code form with an empty title, or without selecting a product.
An error is returned.
-
Create a few QR codes for different products and destinations.
-
Click the QR codes breadcrumb to return to the index page.
The QR code list is populated with the QR codes that you created:
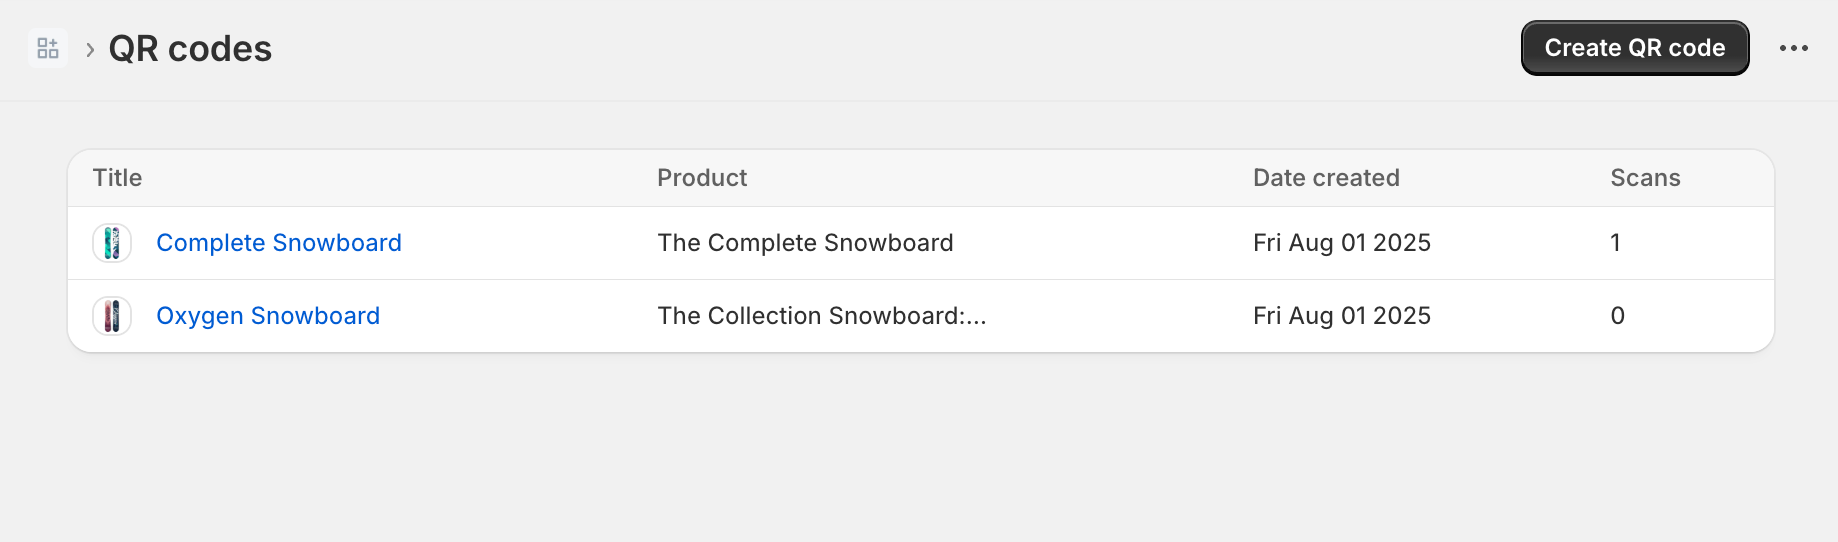
-
Select a QR code from the list.
The QR code form opens at
/app/qrcode/<handle>. The title of the page is Edit QR code: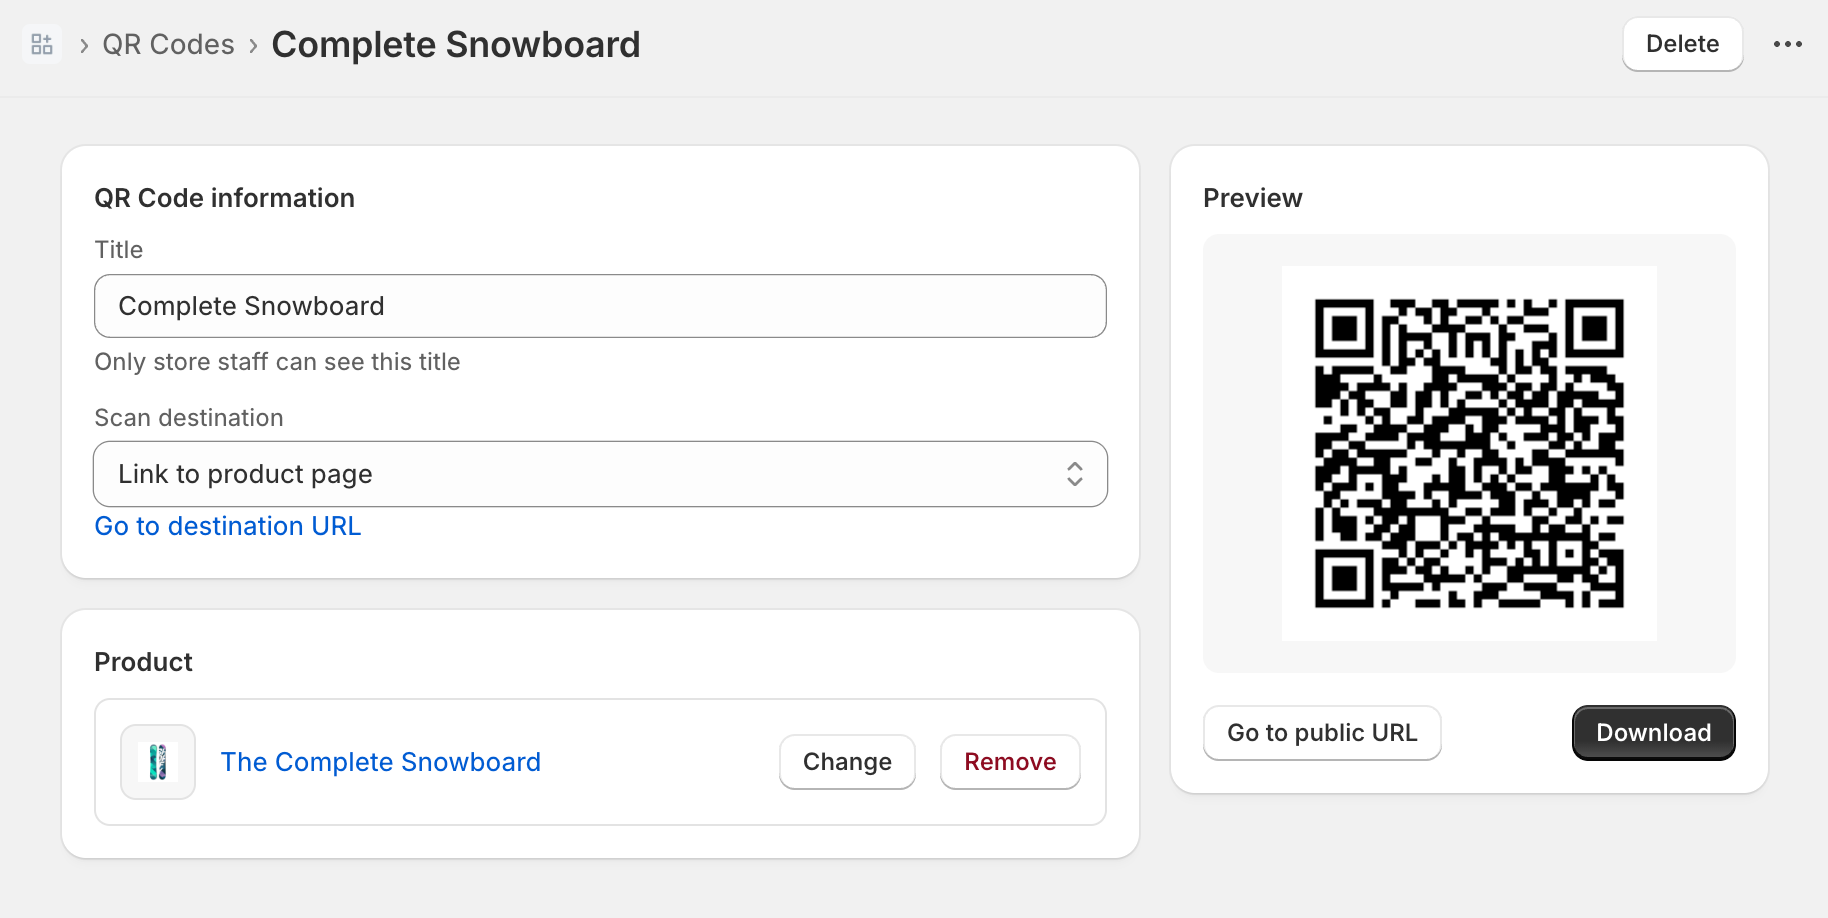
-
On the Edit QR code page, click Delete.
You're taken back to the index page, and the deleted QR code is removed from the list.
Anchor to Test QR code scanning functionalityTest QR code scanning functionality
Scan the QR code that you created in the previous step.
-
From the app index page, click an existing QR code or create a new one.
-
On the QR code form, click Go to public URL.
A new tab opens for the public URL for the QR code.
-
Scan the QR code with your phone.
You're taken to the destination URL.
-
Return to your app index page.
The scan count for the QR code that just scanned is incremented.
Anchor to Tutorial complete!Tutorial complete!
Congratulations! You built a QR code app using React Router, web components, App Bridge, and metaobjects. Keep the momentum going with these related tutorials and resources.
Anchor to More resourcesMore resources
- Explore the GraphQL Admin API to read and write Shopify data, including products, customers, orders, and more.
- Use webhooks to stay in sync with Shopify or execute code after a specific event occurs in the store.
- Deploy your React Router app to a testing or production environment.
- Select a distribution method to share your app with users.