Shopify App Pricing
Managed Pricing has been renamed to Shopify App Pricing and expanded with new features, including App Events, App Billing Events, and the Active Subscription and Historical Events APIs in the Partner API. If your app was using Managed Pricing, it is now part of Shopify App Pricing. See Migrate to Shopify App Pricing for what's changed and what you may need to update.
Managed Pricing has been renamed to Shopify App Pricing and expanded with new features, including App Events, App Billing Events, and the Active Subscription and Historical Events APIs in the Partner API. If your app was using Managed Pricing, it is now part of Shopify App Pricing. See Migrate to Shopify App Pricing for what's changed and what you may need to update.
Shopify App Pricing lets you define your app's pricing plans directly in the app submission form, without needing to use the Billing API. Shopify hosts your app's plan selection page, and automates most common billing tasks, such as recurring charges, usage-based pricing, free trials, proration, no-charge testing, and price updates.
For most developers, Shopify App Pricing is simpler and more consistent than coding your own billing logic using the Billing API.
Anchor to Pricing modelsPricing models
Shopify App Pricing supports the following billing models:
- Recurring charges: Bill merchants on a regular schedule with free, monthly, yearly, or monthly-with-yearly-discount plans. Learn more about setting up subscription charges.
- Usage-based pricing: Charge merchants based on actual usage using fixed, graduated, or volume pricing structures. Learn more about setting up usage charges.
- Combined pricing: Combine recurring fees with usage-based charges for hybrid plans. Learn more about combined subscription and usage.
You can also configure free trials, public and private plans, and welcome links for each plan.
Anchor to Set up Shopify App PricingSet up Shopify App Pricing
Shopify App Pricing is the default option when you submit a new public app for approval. Existing apps without active paid merchants can opt into Shopify App Pricing by selecting the option. This will be available for all developers soon. Learn more about migrating.
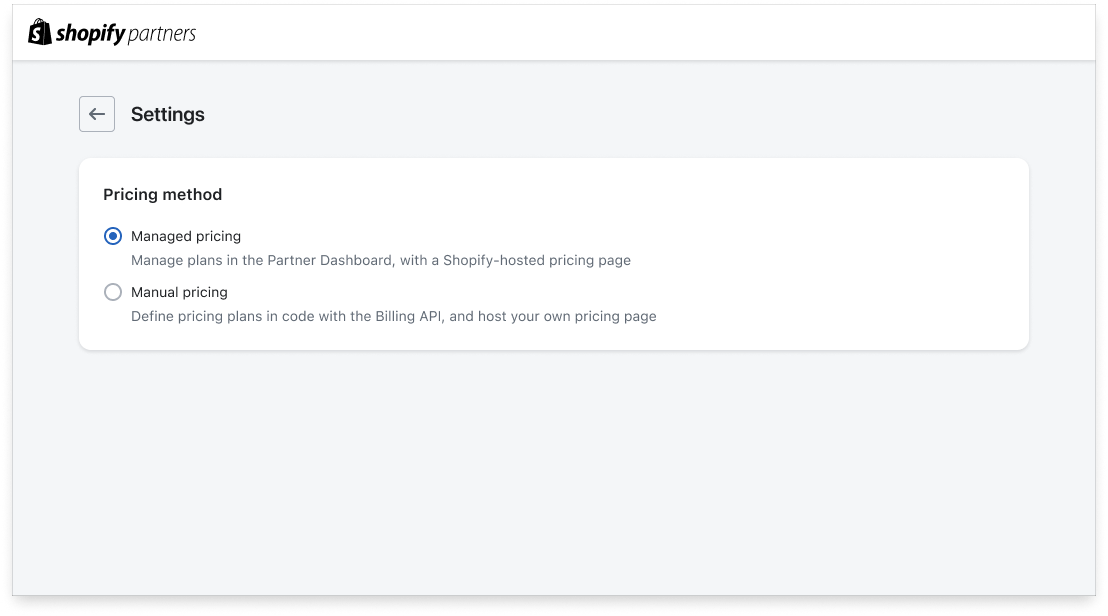
Anchor to Opt in to Shopify App PricingOpt in to Shopify App Pricing
If you've already created plans with the Billing API that aren't compatible with Shopify App Pricing, then you'll need to remove them before you can switch.
- From your Partner Dashboard, click Apps > All Apps and click the name of the app you want to update pricing for.
- Click Distribution.
- Beside Shopify App Store listing, click Manage listing.
- Under Published languages, click Edit for the locale you want to update.
- Under Pricing content, click Manage to open the Pricing index page.
- Click Settings.
- Select Shopify App Pricing.
- In the confirmation dialog, click Switch.
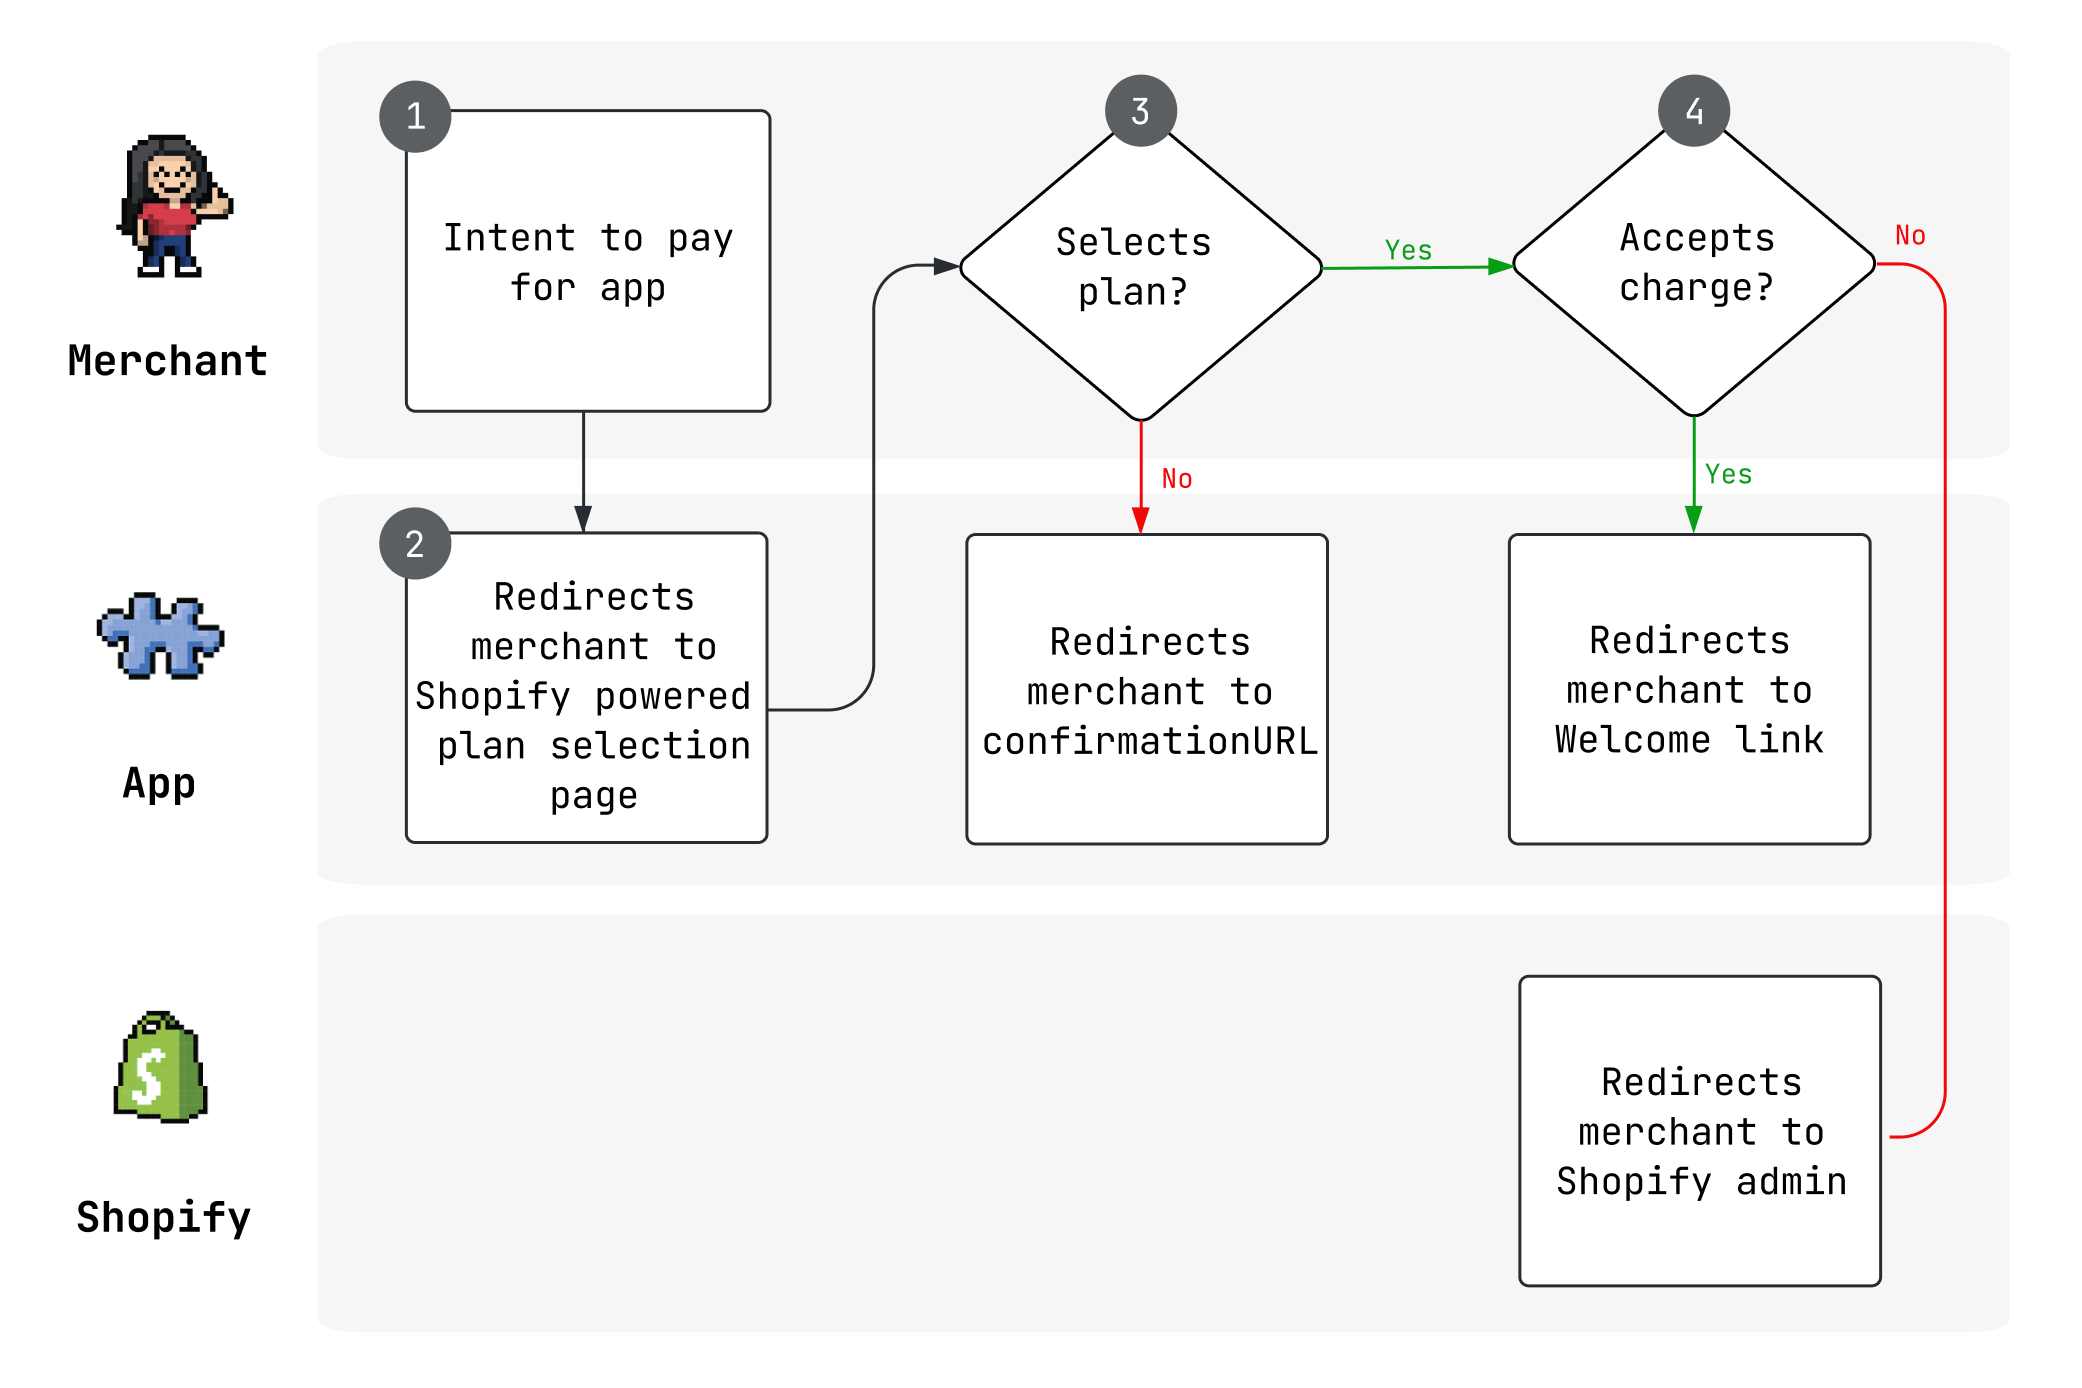
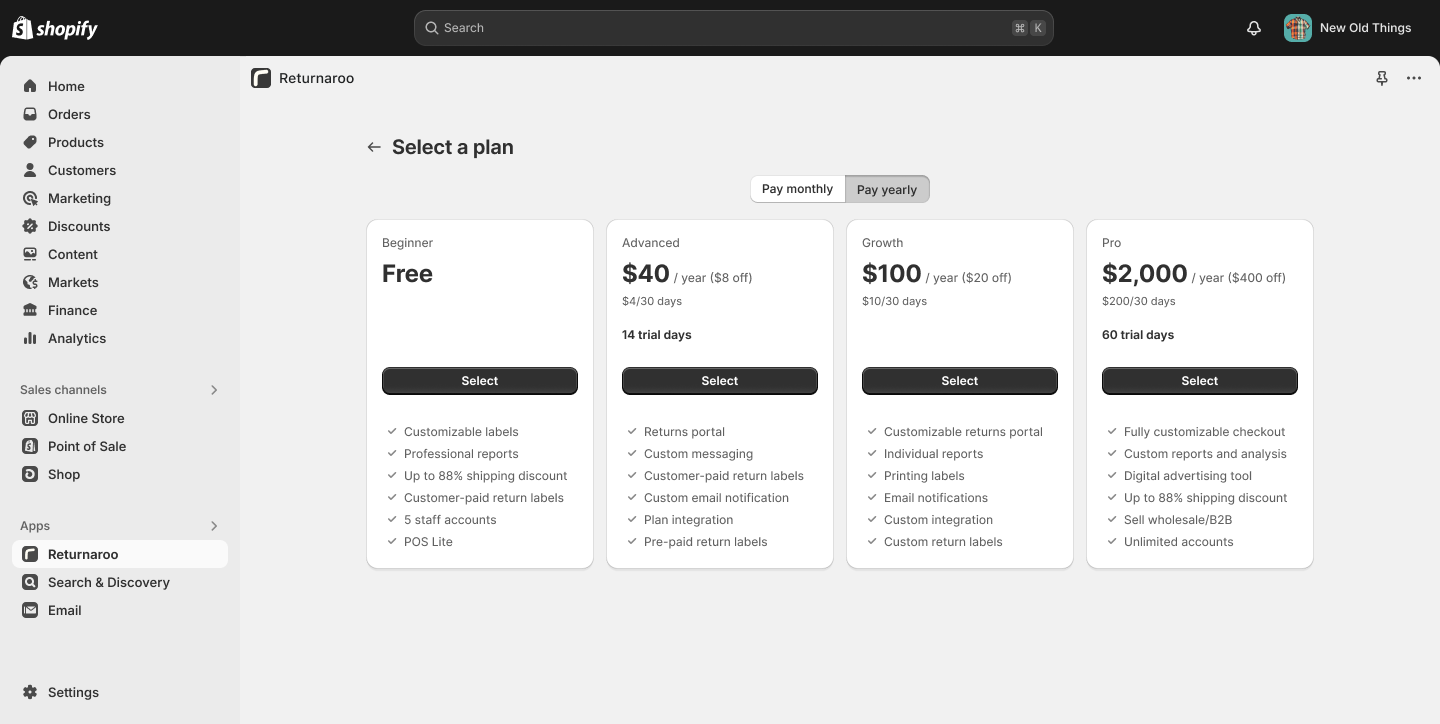
Anchor to Plan selection pagePlan selection page
When using Shopify App Pricing, Shopify hosts your plan selection page. It's visible in the Shopify admin, and allows merchants to view and select their plan.
Your app's plan selection page URL follows this pattern:
Learn how to redirect merchants to the plan selection page in your app.
Anchor to Redirection URLRedirection URL
The redirection URL is where merchants are redirected after approving your app plan charge. You can configure welcome links on a per-plan basis to customize your app onboarding experience.
- Apps with a landing page in App Home: Specify a relative path to your app root, such as
/welcome. Yourplan_handleURL parameter is appended to all redirect URLs which is a plan that merchant is subscribed to. - Apps without a landing page in App Home: Redirect to a valid URL (including the
httporhttpsprotocol). URL parameters for theplan_handleand the merchant shop domain are appended to redirect URLs.
After a merchant approves a charge, query the Partner API to confirm the subscription status. See query subscription data for details. If you enrolled before April 2026, refer to legacy Billing API queries.
Anchor to TestingTesting
App Pricing lets you configure and test your billing integration in development stores at no charge. The plans you can test depend on which Partner organization owns the app and the store.
| App and dev store relationship | Plans available at no charge |
|---|---|
| The app and dev store belong to the same Partner organization | Every plan that is available to the store |
| The app and dev store belong to different Partner organizations | Free plans and paid plans the Partner marks as free to test |
Anchor to Test your app's plansTest your app's plans
When you select a paid plan at no charge, Shopify creates an app subscription contract with effective prices of $0 for its recurring and usage-based items. Use these plans to verify that your usage meters, welcome links, and billing events work correctly.
Anchor to Let other Partners test your appLet other Partners test your app
To let another Partner select a paid plan at no charge on a dev store, mark the plan as free for partners and developers in your plan's configuration. The plan's price still applies on production stores.
Anchor to Use the private test planUse the private test plan
Shopify App Pricing includes a $0 private test plan that you can use to configure and test your billing integration before you publish a plan or when you want to limit testing to specific stores. The test plan is available in the Private plans section of your app's pricing configuration in the Partner Dashboard.
Anchor to Query subscription dataQuery subscription data
With Shopify App Pricing, you use the Partner API to retrieve both a merchant's current subscription status and their subscription history. This is different from the Billing API, where subscription status comes from the GraphQL Admin API.
For Partner API setup — including authentication, creating a Partner API client, rate limits, and error handling — see the Partner API technical reference.
Anchor to Subscription statusSubscription status
Query activeSubscription(appId:, shopId:) on the Partner API to get a merchant's current subscription, including the active plan, billing period, current billing cycle, subscription items (with pricing and usage), discounts, and any pending updates. This is the canonical way to check "what is this merchant subscribed to right now?" — the query returns the live contract state, not a derived view of historical events.
Partner API
GraphQL query
Query
query ActiveSubscription($appId: ID!, $shopId: ID!) {
  activeSubscription(appId: $appId, shopId: $shopId) {
    billingPeriod
    cancelAtEndOfCycle
    trialEndsAt
    currentBillingCycle {
      startTime
      endTime
    }
    items {
      handle
      description
      price {
        __typename
        active
        currency
        ... on FlatRatePrice {
          amount
        }
        ... on TieredPrice {
          tiersMode
          tiers {
            upTo
            amountPerUnit
            amount
          }
        }
      }
      discount {
        amount
        percentage
        remainingDiscountCycles
      }
      usage {
        quantity
        cost {
          amount
          currencyCode
        }
      }
    }
    pendingUpdate {
      billingPeriod
      items {
        handle
      }
    }
  }
}
Variables
{
  "appId": "gid://shopify/App/1234",
  "shopId": "gid://shopify/Shop/5678"
}
activeSubscription returns null when the shop doesn't have an active Shopify App Pricing contract for the app. It only works for public apps.
For full field reference, including trial behavior, pending updates, and legacy subscription IDs, see Active Subscription in the Partner API docs.
Anchor to App / subscription historyApp / subscription history
Use the root events query on the Partner API to retrieve your app's event history across all merchants — installs, uninstalls, plan changes, cancellations, freezes, charges, earnings, and credits. The query returns events in reverse chronological order by default. Filter by subjectId and shopId to scope results to a specific app and merchant.
Filter by event types to get just the information you need:
Partner API
GraphQL query
Subscription events
{
  events(
    filter: {
      eventTypes: [
        SUBSCRIPTION_CREATED,
        SUBSCRIPTION_UPDATED,
        SUBSCRIPTION_CANCELLATION_SCHEDULED,
        SUBSCRIPTION_CANCELED,
        SUBSCRIPTION_FROZEN,
        SUBSCRIPTION_UNFROZEN
      ]
    }
    first: 10
  ) {
    edges {
      node {
        id
        eventType
        ... on SubscriptionStatus {
          state
          cancelEffectiveOn
          plan {
            handle
            billingPeriod
            trialDays
            trialDaysRemaining
            prices {
              currencyCode
              ... on FlatRatePlanPrice {
                amount
              }
              ... on TieredPlanPrice {
                tiersMode
                tiers {
                  upTo
                  amountPerUnit
                  amount
                }
              }
            }
          }
        }
      }
    }
  }
}
Filter by app and shop
{
  events(
    filter: {
      subjectId: "gid://shopify/App/1234"
      shopId: "gid://shopify/Shop/5678"
    }
    first: 10
  ) {
    edges {
      node {
        id
        occurredAt
        eventType
        shop {
          id
          myshopifyDomain
        }
      }
    }
  }
}
The following event types track subscription lifecycle changes:
| Event type | Description |
|---|---|
SUBSCRIPTION_CREATED | A merchant subscribed to a plan |
SUBSCRIPTION_UPDATED | A merchant changed their plan |
SUBSCRIPTION_CANCELLATION_SCHEDULED | A cancellation has been scheduled (for example, a downgrade to a free plan that takes effect at the end of the billing cycle) |
SUBSCRIPTION_CANCELED | The subscription was canceled |
SUBSCRIPTION_FROZEN | The subscription was frozen due to a store billing issue |
SUBSCRIPTION_UNFROZEN | A previously frozen subscription was reactivated |
To get a merchant's complete app event history, omit eventTypes from the filter — all event types are returned. To restrict to app events only, set subjectType: APP in the filter. If you filter by shopId, you must also provide subjectId (the app GID). By default the events query returns the last 30 days — use occurredAtMin and occurredAtMax to widen the window (maximum range is 365 days). The page size limit is 250; use cursor-based pagination with first and after to page through results. See Historical Events for the full filter reference.
Anchor to Subscription change notificationsSubscription change notifications
Shopify App Pricing doesn't use webhooks to notify your app of subscription changes. Instead, Shopify passes subscription details as URL parameters when a merchant is redirected from the plan selection or charge confirmation page to your app's redirection URL.
This replaces the following webhook topics used by the Billing API:
| Billing API webhook | Shopify App Pricing equivalent |
|---|---|
APP_SUBSCRIPTIONS_UPDATE — triggered when a subscription's status or capped amount changes | Subscription status is passed as URL parameters on redirect. For status changes that happen outside of a redirect (such as cancellations or freezes), query the Partner API. |
APP_PURCHASES_ONE_TIME_UPDATE — triggered when a one-time purchase status changes | Not applicable. Shopify App Pricing doesn't support one-time purchases. |
APP_SUBSCRIPTIONS_APPROACHING_CAPPED_AMOUNT — triggered when usage reaches 90% of the capped amount | Not applicable. Shopify App Pricing doesn't use capped amounts for usage-based pricing. |
Anchor to URL redirect parametersURL redirect parameters
When a merchant selects or confirms a plan, Shopify redirects them to your configured redirection URL with the following parameters appended:
| Parameter | Description |
|---|---|
plan_handle | The plan that the merchant is subscribed to |
shop | The merchant's shop domain (for external redirection links) |
Use these parameters to confirm the subscription status by querying the Partner API when your app handles the redirect.
For subscription lifecycle events that don't involve a merchant redirect — such as cancellations, freezes, or plan expirations — query the Partner API to check the current subscription state.
Anchor to LimitationsLimitations
- Shopify App Pricing currently supports the following pricing models:
- Fixed recurring charges (for example, $10/month or $100/year)
- Usage-based pricing with fixed, graduated, or volume pricing
- Combinations of monthly recurring charges with usage-based pricing
- Once you opt in to Shopify App Pricing, you can't create new recurring application charges using the Billing API. Charges created before opting into Shopify App Pricing continue to process as expected.
- Usage-based pricing has the following limitations:
- You can create up to five active usage meters per plan
- You can define up to six pricing tiers per usage meter
- Usage charges must be billed monthly (can't be combined with yearly-only plans)
- Usage caps aren't currently supported
- When testing a draft app during development, its plan selection page might return a 404 error if the development store and the app listing are set to different locales. This issue doesn't affect production stores or published apps.
Anchor to Partner API event typesPartner API event types
The Partner API has two separate event type systems with different naming conventions. Make sure you're using the correct one for your query.
Anchor to [object Object], — used by ,[object Object], (recommended)EventType — used by QueryRoot.events (recommended)
EventType — used by QueryRoot.events (recommended)The events query at the query root uses the EventType enum. This is the recommended approach for Shopify App Pricing and provides subscription lifecycle tracking, charge events, and earning events.
| Event type | Description |
|---|---|
SUBSCRIPTION_CREATED | A merchant subscribed to a plan |
SUBSCRIPTION_UPDATED | A merchant changed their plan |
SUBSCRIPTION_CANCELLATION_SCHEDULED | A cancellation has been scheduled |
SUBSCRIPTION_CANCELED | The subscription was canceled |
SUBSCRIPTION_FROZEN | The subscription was frozen due to a store billing issue |
SUBSCRIPTION_UNFROZEN | A previously frozen subscription was reactivated |
CHARGE_RECURRING | A recurring charge event |
CHARGE_ONE_TIME | A one-time charge event |
CHARGE_USAGE | A usage-based charge event |
CREDIT_APPLIED | A credit was applied |
CREDIT_FAILED | A credit application failed |
CREDIT_PENDING | A credit is pending |
EARNING_CHARGE_RECURRING | A recurring earning event |
EARNING_CHARGE_ONE_TIME | A one-time earning event |
EARNING_CHARGE_USAGE | A usage-based earning event |
EARNING_CREDIT | A credit earning event |
EARNING_REFUND | A refund earning event |
EARNING_ADJUSTMENT | An adjustment earning event |
RELATIONSHIP_INSTALLED | A merchant installed the app |
RELATIONSHIP_UNINSTALLED | A merchant uninstalled the app |
RELATIONSHIP_REACTIVATED | A previously deactivated relationship was reactivated |
RELATIONSHIP_DEACTIVATED | The relationship was deactivated |
Use the events query with the EventFilterInput eventTypes field to filter by specific event types, as shown in query subscription data.
Anchor to [object Object], — used by ,[object Object], (legacy)AppEventTypes — used by App.events (legacy)
AppEventTypes — used by App.events (legacy)The older App.events field uses the AppEventTypes enum with a different naming convention. These event types use a more granular naming pattern for charge lifecycle states (accepted, activated, declined, expired).
| Event type | Description |
|---|---|
SUBSCRIPTION_CHARGE_ACCEPTED | A subscription charge was accepted |
SUBSCRIPTION_CHARGE_ACTIVATED | A subscription charge was activated |
SUBSCRIPTION_CHARGE_CANCELED | A subscription charge was canceled |
SUBSCRIPTION_CHARGE_DECLINED | A subscription charge was declined |
SUBSCRIPTION_CHARGE_EXPIRED | A subscription charge expired |
SUBSCRIPTION_CHARGE_FROZEN | A subscription charge was frozen |
SUBSCRIPTION_CHARGE_UNFROZEN | A subscription charge was unfrozen |
SUBSCRIPTION_CAPPED_AMOUNT_UPDATED | The subscription's capped amount was updated |
SUBSCRIPTION_APPROACHING_CAPPED_AMOUNT | The subscription is approaching its capped amount |
ONE_TIME_CHARGE_ACCEPTED | A one-time charge was accepted |
ONE_TIME_CHARGE_ACTIVATED | A one-time charge was activated |
ONE_TIME_CHARGE_DECLINED | A one-time charge was declined |
ONE_TIME_CHARGE_EXPIRED | A one-time charge expired |
USAGE_CHARGE_APPLIED | A usage charge was applied |
CREDIT_APPLIED | A credit was applied |
CREDIT_FAILED | A credit application failed |
CREDIT_PENDING | A credit is pending |
RELATIONSHIP_INSTALLED | A merchant installed the app |
RELATIONSHIP_UNINSTALLED | A merchant uninstalled the app |
RELATIONSHIP_REACTIVATED | A previously deactivated relationship was reactivated |
RELATIONSHIP_DEACTIVATED | The relationship was deactivated |
If you're building new billing integrations with Shopify App Pricing, use the QueryRoot.events query with the EventType enum. The App.events query with AppEventTypes is available in the unstable Partner API version but uses an older naming convention that predates Shopify App Pricing.
If you're building new billing integrations with Shopify App Pricing, use the QueryRoot.events query with the EventType enum. The App.events query with AppEventTypes is available in the unstable Partner API version but uses an older naming convention that predates Shopify App Pricing.
Anchor to For apps enrolled before April 2026For apps enrolled before April 2026
If you set up Shopify App Pricing (formally known as managed pricing) before April 2026, the following features still apply to your app. New apps should use the current system documented above.
If you set up Shopify App Pricing (formally known as managed pricing) before April 2026, the following features still apply to your app. New apps should use the current system documented above.
Anchor to Webhook-based subscription notificationsWebhook-based subscription notifications
Before April 28, 2026, you can receive a webhook when a subscription is updated by registering for the APP_SUBSCRIPTIONS_UPDATE topic. Note that webhooks can take several minutes to deliver. Make sure your app can handle webhook delays and follow Shopify's best practices for webhooks.
After April 28, 2026, Shopify App Pricing no longer sends webhooks for subscription changes. Use the Partner API and URL redirect parameters instead.
Anchor to Billing API subscription status queriesBilling API subscription status queries
Before April 28, 2026, a charge_id URL parameter with a transaction ID is appended to your redirect URL when a merchant approves a plan charge. For apps rendered in the Shopify admin, charge_id is appended to the relative path. For external redirect URLs, both charge_id and the merchant shop domain are appended. You can use charge_id with the Billing API to query subscription status.
After April 28, 2026, Shopify App Pricing no longer appends charge_id to your redirect URL. Use the Partner API and plan_handle URL redirect parameters instead.
Anchor to Legacy test subscriptionsLegacy test subscriptions
Before April 28, 2026, Shopify App Pricing created test subscriptions when a development store selected a plan. For current development-store testing, use the no-charge testing options.